


Adding and replacing floppy disc drives
David Holden explains how to modify PC floppy disc drives in an article originally published in Archive.
Anyone who has had a floppy drive fail will have discovered that a replacement for some models can be expensive. Even if you have a later machine with a drive which appears identical to those fitted to PCs, you may be told that this type of drive doesn't work or, if you do fit one, you may have problems.
This article will try to show how most models of Acorn can use cheap PC drives, and also how they can be fitted with external or additional drives.
Warning
First, the warning. By fitting a 'non-approved' part, you could be invalidating your warranty. In fact, you could do this by carrying out any work yourself, although this may not be important if your machine is out of warranty anyway. You may need to modify the case of your computer to get a drive to fit (especially the 'single box' models). I am assuming that the reader is intelligent enough to appreciate this and will not attempt to undertake work that they do not feel competent to carry out.
For this reason, I do not intend to make this a step-by-step guide. If you do not feel confident enough to disassemble and reassemble your computer and fill in the gaps that I may leave, then please have your drive replaced by an approved Acorn repair centre. This article is intended for those who are prepared to wield a soldering iron and remove and replace Insulation Displacement Connectors (IDC) on ribbon cables. It will be rather longer and go into greater theoretical detail than required of a step-by-step guide because I hope it will be useful to people who wish to do more than just replace a faulty drive.
Those experienced with computer hardware may realise that there could be a simpler way to do some things by making alterations to the computer itself. I have been at pains to avoid any alterations to the actual computer (apart from necessary butchery to the case) because, in using the methods I describe, the worst that someone is likely to do is ruin a brand new floppy drive or cable. With normal care, it is extremely unlikely that any damage to the actual computer could result. However, although everything I describe has been tried and tested by myself, I must stress that you should not attempt anything unless you feel confident of your ability to carry out the work.
One final point. Before you remove the case from your computer and start poking about inside, unplug it! Don't just switch it off. I do not want to discover that readers have failed to renew their subscriptions to RISC World because they've electrocuted themselves.
The machines
The range of Acorn RISC computers can be divided into three main 'families', plus one that doesn't fit into any of these groups.
The first are early machines fitted with a double density (DD, 800Kb) drive, the A310, A440, A4x0/1, A540 and A3000. I shall refer to them as the 'DD family'. Throughout this article I shall group the A305 and A310 with its contemporary, the original A440, and refer to them all as the 310, and I shall refer to all A4x0/1 machines as the 400. These will be dealt with next month.
The second group is the A3010, A3020 and A4000. These are all basically the same machine, and are fitted with a high density (HD, 1.6Mb) drive. I shall refer to them as the '3010 family'.
The third is the RiscPC (RPC) series, the RPC 600, RPC 700 and A7000. For the purposes of this article, I shall define the 600 and 700 by the type of motherboard fitted and not by the name given to the computer. The early 600 was fitted with OS 3.5 and designed to have only a single floppy drive. Fitting an additional drive requires modifications. The later 600, those supplied fitted with OS 3.6, have the newer motherboard as used by the 700. For all practical purposes, these machines are a 700, and if you have one of these you should ignore any comments I make about the 600 and follow instruction for the 700.
The 'odd man out' is the A5000. This is different from all the others because it was designed so that it could easily be fitted with four floppy drives, two internally and two externally. It has all the hardware required to support the four drives, and the external drives can be almost any type from 360Kb 5¼" to 1.6Mb 3½".
There could be difficulties replacing drives on any of these machines, but any of them can, with a bit of ingenuity, be fitted with a cheap PC drive as a replacement for the internal drive or as an additional or external drive.
What drive?
Some makes can be fitted without any problems as a direct replacement for any HD drive, but I have only found one so far and that is difficult (and expensive) to obtain. However, most will work without modification if you are prepared to put up with the density problem described later, and even that is normally easily solved.
In my experience, almost all Sony, most Teac, and many Fujitsu drives can be made to work. However, the two makes most readily available today are Samsung and Mitsumi. The former will work, but cannot readily be modified to solve the density problem, so I would recommend you use a Mitsumi drive. These are cheap (not more than £15 retail), quiet, and seem very reliable. You should be able to get one from any PC supplier.
Drive ID
First I must differentiate between the drive ID and the drive number.
The drive ID is the actual physical number of the drive as 'seen' by the hardware, and is the number the drive will respond to when the appropriate Drive Select (DS) line is set. This number is set on the drive itself. On older drives, it could be varied between 0 and 3 by jumpers on the PCB. More modern 3½" drives may be able to be set to 0 or 1, but many are designed to be used only as drive ID 1 or require soldering on the PCB to have this changed.
The drive number is the logical number (or letter) assigned by the operation system (OS) of the computer to a drive. In RISC OS, this will be 0 to 3, in DOS A: or B:.
It is important to understand the difference between the physical drive ID and the logical drive number, or you could find some of the following very confusing.
The drive ID need not concern you if you are replacing a single internal drive in an A5000 or 700, but the 600, 7000 and 3010 family do not have all the drive select lines connected and so can only address drive ID 0.
When RISC OS (well, RISC OS 3.xx) is initialising, it interrogates all floppy drives from ID 0 to 3 in turn, and assigns a drive number, starting at 0 and going up to the maximum number of configured drives, to each drive found. Now, all drives fitted to PCs have a drive ID of 1, so this will be the ID of any drive you buy. This will not matter if you have a machine that can address drive 1 because, as no drive ID 0 will be found, drive ID 1 will be assigned drive number 0. This is completely transparent to the user. However, if you have a machine which can only address drive ID 0, then although the software will go through the motions, the hardware will not find any drive which does not have an ID of 0, so you will get no floppy icon.
Changing the drive ID
As I have said, if you have a 700 or A5000, and only a single floppy drive, you need not bother with this, but with a 600, A7000 or any 3010 family machine, the drive must have an ID of 0.
On older drives, it may be possible to alter a link on the drive PCB, but few modern drives have this facility. With some (eg. Samsung) the ID is set by putting a blob of solder on two pads to link them, and to change it, you must use a solder sucker to remove the ID 0 solder blob and then join up the ID 1 pads. You could go to this trouble if you wish, but there's a simpler way.
As I have said previously, all PC drives have their ID set to 1, and this applies even when they have more than one drive. Instead of changing the ID, they reroute the DS lines on the cable between the floppy interface and the drive. By interchanging the DS 0 and DS 1 lines, when the interface addresses drive 0, the signal is sent to drive 1. If a second connector is fitted to the cable with the DS lines left unchanged, then a drive attached to this connector will get the 'correct' ID signal. In this way two drives, each with a 'real' ID of 1, will appear to the computer as ID 0 and ID 1. The advantage of this system is that there is no need to mess about with the drive ID when replacing a drive, which makes servicing easier.
If you fit a replacement PC drive to your machine, I strongly recommend you adopt this system. It is easier to modify a ribbon cable than alter the drive, and it's cheaper if you make a mistake.
Modifying a cable
On a floppy drive cable lead 10 is DS 0 and lead 12 is DS 1. Lead 1 will have some sort of identification - normally it is coloured red or blue. All you need to do to switch the DS lines is slit the cable between leads 9 and 10 and between leads 12 and 13 and rotate the three leads thus separated, thereby transposing the positions of the DS 0 and DS 1 leads.
I know that sounds very simple in theory, and it really isn't too difficult to do. Before you begin, you will need a Stanley knife with a sharp point to slit the cable. Unless you have previous experience of removing and replacing IDC connectors it might be best to purchase a new one first and have it to hand before you begin, then, if the original is damaged during removal, you can use the replacement. These 34 way connectors are readily available - for example, Maplin supply them for £1.69, part number FG86T.
First you will obviously need to disconnect the floppy data cable so that you can work on it. Remove the original connector at the drive end and cut off the last bit of the cable that has been pierced by the connector. You can either use a sharp pair of kitchen scissors or a Stanley knife for this, but make sure you don't leave any 'whiskers' of cable that will give trouble later. Lay the cable on a flat surface (not the dining room table or a kitchen worktop) and slit about 5 or 6 cm of the end of the cable between leads 9 and 10 and leads 12 and 13. Double check that you are cutting in the right place and check again after you've cut. You should now find that you have three leads separated from the rest, numbers 10, 11 and 12. Take these and rotate them through 180 degrees so they are 'back to front'. You can crease the cable to hold this piece in place. You will probably find it best to stick a piece of tape to either side of the cable to hold it all together before you try to refit the connector.
When you replace the IDC connector (or fit a new one) make sure the lead with the identifying stripe goes to pin 1. Normally there are no numbers on these connectors, so hold it horizontally with the socket away from you and the cable connection towards you. There may be a locating lug in the centre of one side or two groves or arrows. That side is the top, so rotate it until the top is uppermost. Pin 1 will now be on the right. You can check this by looking at the other end of the cable which will have a similar connector. If you don't have the proper tool for fitting IDC connectors, you can use a vice or a pair of pliers or a 'mole' grip, but do be careful and apply pressure evenly or you will damage the connector.
I'm afraid you can't save yourself this job by using a ready-made PC cable instead. Although the principle is the same, they use slightly different connections.
The density problem
It is a feature of Acorn machines that they can format and use HD and DD discs interchangeably, ignoring the density identifying hole on the disc. This lets silly people format DD discs to 1.6Mb (and then wonder why they get disc errors six months later) but it also means you can format an HD disc to 800Kb. This might seem a useless thing to do, but it lets people like myself distribute software in a standard 800Kb format that everyone can read, but supply it on a physical HD disc to people with an HD drive so they can reformat the disc to 1.6Mb and not have piles of 800Kb discs they don't really want.
Now the problem with this is that there are two methods of changing between low and high density modes - software or hardware control. There is a small switch inside the drive which opens when it locates the hole in an HD disc and switches the drive into HD mode. This is the method used on PCs which do not use software control. To demonstrate this, format an HD disc to 720Kb in an Acorn HD drive and then put it in a PC with an HD drive. You will get a 'General failure' error, because the drive is mechanically switched into HD mode and can't read the disc formatted to 720Kb. Wrap a piece of sticky tape around the disc to cover the HD ident hole and it will read the disc.
You will get the same type of error if you have a machine fitted with a PC drive which hasn't been modified as described below. This is very common with A3010 machines which have been fitted with cheap replacement drives, and which are unable to read HD discs formatted to 800Kb unless the HD ident hole is covered with tape.
The software control system operates by pulling pin 2 of the drive cable connector to 0v to force the drive to DD mode. When an Acorn machine with an HD drive tries to read a disc, if it can't identify it, pin 2 is pulled low and it tries again, thus overriding the mechanical switch inside the drive and enabling HD discs formatted to 800Kb to be read. The reverse process enables DD discs to be 'forced' to HD mode.
This method is not used by PCs, so most modern drives will ignore it, or need to have pads bridged on the PCB before they will work in this way. Also, pin 2 is used for a different purpose on older, DD drives, so it is often deliberately left disconnected. As there are so many alternative makes and models of drives, and they are nearly all different in this respect, it is often simpler to bypass the regular way of using pin 2 (if it exists) and override the HD switch directly. This is possible because on most makes of drive this switch just connects a signal line to earth when a DD disc is in the drive, and so by connecting pin 2 to the 'live' side of the switch it can be pulled to 0v and the drive switched to DD mode.
Using this method, what you can't do is force the drive into HD mode with a DD disc, because the control line is tied to 0v by the switch. However, no sensible person would want to use a DD disc formatted to HD anyway, so this isn't really a problem. In fact, it's an advantage, as you won't be able to accidentally format a DD disc to HD.
To avoid overloading the floppy disc controller (FDC) on the computer if it should try to force the drive into HD mode while the switch is closed, you should not wire pin 2 of the connector directly to the live side of the mode select switch. There are two very simple ways of buffering. If you have only a single drive, you could use a resistor - around 270R would be adequate. A more effective solution, and essential with more than one drive, is a diode between pin 2 of the connector and the switch. This lets the computer pull the density select line low, but the diode will be reverse biased when the switch is closed and pin 2 is high.
Modifying the drive
You will need a soldering iron with small tip, a short length of thin insulated wire (a single strand of internal telephone cable is ideal) and a diode. Almost any diode will do, and most electronic enthusiasts will have something in their junk box - a 1N4148, 1N4001 rectifier - in fact just about any silicon diode that is small enough to fit.
The diagram opposite shows the position of the density select switch and connector on a Mitsumi drive. Most makes will be similar, but probably not identical. You will need to remove the shielding from the bottom of the drive, and this is retained by three small clips on the side. Locate these, lever the sides outwards and upwards gently, and the shield can be slipped off. Some makes of drive have shields held by two or four screws, and some don't have any shield across the PCB.
Mitsumi and Teac drives have two separate PCBs, and the front section is recessed, which means there is more room for the diode. With some drives there might not be enough clearance between the PCB and the shield for the diode, so you may have to fit it elsewhere, wherever there is room, and adjust the wiring to suit.
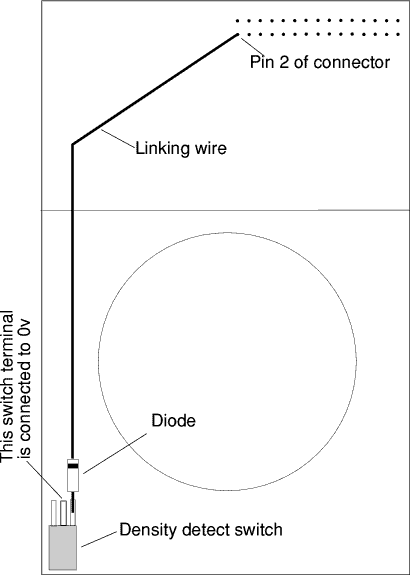
Cut the leads on the diode to about 5mm and solder the linking wire to the end of the diode with a ring around it. Kink the lead at the other end slightly so that you can solder it to the switch terminal, leaving the diode slightly proud of the PCB. Now solder the other end of the wire to pin 2 of the cable connector. It's best to put a small piece of sleeving or tape around the bare wire at the diode end to make sure it doesn't come into contact with anything it shouldn't. Be careful when soldering to the connector terminal. The PCB is normally full of components and tracks in this area, so make sure you don't inadvertently put solder where you don't intend.
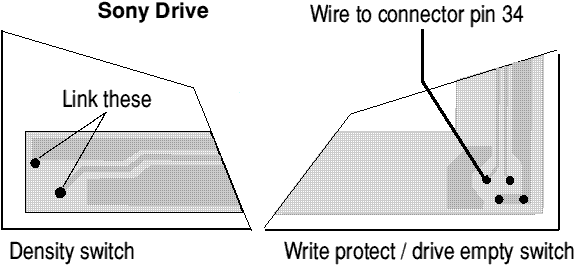
The large diagram represents the layout of a Mitsumi drive, and the smaller one shows the layout of the density detect switch of a typical Sony drive. This is equivalent to the bottom left hand corner of the main diagram.
If you want to be absolutely sure you can't overload the FDC, you can include a 220R resistor in series with the diode. This will limit the maximum possible current to less than half of the 48mA that the FDC chip can sink.
The diode and wire pass rather close to the rotor of the drive motor, and this normally has a small magnet stuck to it somewhere, sticking out about 5 mm. Make sure that the motor can rotate freely and the magnet can't come into contact with the diode or wire. You may need to bend the diode away from the motor slightly.
Most drives have the connector pins as shown in the diagram, although the leads to the density switch (but not its location) could vary. A minority of drives have the connector the other way around, so before you unplug the data cable from the drive, check which end of the connector the identifying lead goes to, although most drives actually have a small '1' or '34' printed on the PCB to indicate which end is which.
Please remember also that this is intended as a guide only. Other types of drive may not switch the density select signal to ground for DD. If you use a different type, you should make sure of this before you begin.
Fitting a drive to A3010/A3020
With one of these machines, you must set the drive ID to 0, either by altering the drive itself or twisting the cable as described. You may also choose to modify the drive so it will read DD formatted HD discs.
Some drives will fit as a direct replacement after you have removed the front bezel, (normally retained by a couple of plastic lugs at the sides), but you might have problems with alignment of the eject button. One simple, though more drastic, solution is leave the bezel in place and carefully cut away the computer case to accommodate it. This sounds crude, but there's no reason why it shouldn't be done, and if you're careful, it looks just as good as the original. As these machines are not now very valuable, you need not worry as much as previously about reducing their resale value by making them look non-standard.
Replacing 800Kb drives
The 1Mb drives fitted to earlier machines are no longer manufactured, and they can be difficult to obtain. Even if you do find a supplier who has some, their rarity often means that you will be asked to pay an extortionate price, but don't despair - you can fit a modern HD drive to one of these machines, although you will obviously only be able to use DD discs because the FDC fitted to them can't operate with HD discs.
There are two main differences between older DD drives and modern HD types. Modern drives use pin 34 as the Disc Change (DC) line to inform the controller that the disc has been changed, earlier drives used pin 2 for this purpose. The older drives use pin 34 to inform the controller that the drive is ready, but modern drives don't bother with a READY signal, because the controller just checks that it is getting the correct index pulses instead.
So, to use a modern drive on one of the 800Kb family machines, we need to move the DC signal from pin 34 to pin 2, and be able to use pin 34 to signal the controller that the drive is ready. As with the software control of density, this can sometimes be done by cutting and making various prepared links on the drive PCB, but in order to do this, you would need the full manufacturer's data for the individual drive, and even if you could obtain it, the cost would probably be high. So, we shall probably have to do it the hard way, using a few wire links to achieve the same end.
The first part is straightforward, if somewhat fiddly. You will need to cut the PCB track on the drive close to pin 2. The easiest way to do this is to use your Stanley knife (the one with the sharp point), and make two cuts across the track at least a millimetre apart. Now scrape away the track between these two cuts. You will need to be very careful not to damage any adjacent tracks while doing this.
You will then need to cut the track to pin 34, but this time you should choose the position for the cut carefully because you will have to solder a wire to the track after it's been cut, so pick a location where you are going to be able to do this. Now, using a short length of fine insulated wire, connect pin 2 to the track which originally went to pin 34. This will move the DC signal from pin 34 to pin 2.
Next we must get a READY signal to the (now disconnected) pin 34. In fact, although it's called the READY line it's used by the controller to detect if a disc is in the drive, so all we need do is make sure that this line is pulled to 0v when a disc is present. This is much easier than providing a proper READY signal, as there will be a switch near the front of the drive to do just that.
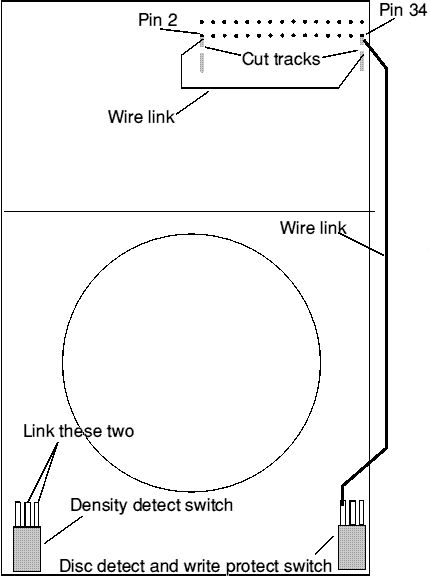
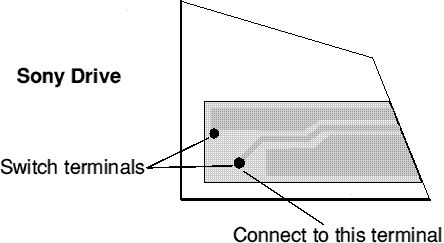
As with the Density Select switch, we really need something that connects a signal line to 0v, and luckily that's what most drives have. Drives generally have a dual switch, one part of which is used to detect when a disc is in the drive, and the other part detects when the Write Protect (WP) slider on the disc is closed. The diagram shows the layout for Mitsumi and Sony drives, and others will probably be similar. If you use another make, you will need to do some investigating with a multimeter to find out which switch terminal to use, and you will also need to ensure that the signal line is actually connected to 0v with a disc in the drive.
Connect the 'live' side of the switch to pin 34 as shown, and then with a disc in the drive, pin 34 will be taken to 0v which is just what the controller requires.
The trouble with this method is that it is only suitable if you have a single floppy drive. If you have more, you need some way of ensuring that the READY line is only pulled low when that drive is selected. The easiest way to do this is to AND the signal from the switch with the DS line. Anyone with a knowledge of electronics should be able to do this, but I don't intend to pursue it any further here.
If you use a different make of drive, and can't work out how to connect to the switch, you can just connect pin 34 to 0v (most of the odd numbered pins on the connector are 0v so that's very easy). This will work, but the computer will think there's a disc in the drive all the time, so it could 'hang' if you click on the icon when the drive is empty.
This leaves only one problem which you may think is not worth bothering with. Because we are using an HD drive, if an HD disc is placed in it the Density Detect switch will operate and the drive will be switched into HD mode. The FDC can't handle HD format discs, so you will be unable to read it, but you will still be unable to read it even if it's formatted to 800Kb because the drive is in HD mode. This is exactly the same problem as in later machines trying to control the density with a signal on pin 2. So, as the drive can never be used in HD mode anyway, the easiest solution is just to permanently fix the switch in the DD position. You can do this mechanically by gluing the button down (you will probably be able to get to it by removing the front bezel), or by soldering a short piece of wire across the switch terminals - a neater solution, and easier to remove if you ever want to restore the drive to its original state.
Once all this is done, you should find that your (cheap) HD drive will now work perfectly in your DD-only machine. The only problem that remains is physically fitting it. An A400 has a standard drive cutout, so it's just a matter of removing the old drive and fitting the new one, but the A310 and A3000 don't, so you will need to take a padsaw or hacksaw to the case and (carefully) cut the correct size hole. Luckily, on the A310 this is neatly marked out ready for you.
If you do have any problems you can write or email me at the APDL address (please enclose an SAE if you write), but although I will try to help, I'm not able to go into great detail or answer complex individual queries. This article is meant as general guidance, and although I hope it will be of use, it is really aimed at people who are experienced with a soldering iron and prepared to 'have a go' and try to sort out minor difficulties themselves.
Next month I shall continue by describing ways of fitting additional internal and external drives, even to those machines which can normally only have one.
Dave Holden