


Powerbase - Part 1
A shareware solution for your database requirements
by Derek Haslam
In the RISC OS world database programs have come and gone over the years. Some, such as DataPower2, are extremely powerful and versatile but demand a fair bit of work on the user's part before a functioning database is produced. Others, such as Masterfile, make it it easy to get something up and running but are light on features. Powerbase falls somewhere between these extremes. It is not a relational database like DataPower2 and is easy for the beginner wanting only to create a computerised address book, yet it is quite feature-rich and incorporates some facilities which would normally require a relational database.
This article gives an introduction to Powerbase, describing its origins, its evolution and its principal features. It ends with the first stages of a step-by-step tutorial for constructing a Powerbase database. Subsequent articles will enlarge on this by adding further features to the database and devising one or more other databases which illustrate as many as possible of the program's facilities.
Origins
A RISC OS version of Powerbase has existed for nine years but the origins of the program go back much farther; all the way back to the mid-seventies and the very first micro-computers. At that time I was teaching A-level students in a Further Education college and, having incautiously shown an interest in the administrative side of the department, had become involved with timetabling and related matters. There just had to be something better than the clumsy paper-based timetabling system (if it could be called a system) which we were then using, and the acquisition of a micro-computer - a real computer of our very own, not just a terminal linked to a mainframe - provided the opportunity. This wonder-machine had 16Kb of RAM, half which was taken up by the BASIC interpreter. The interpreter had to be soft-loaded from cassette and the cassette interface was so unreliable that it often took 3 or 4 attempts. Nevertheless, a primitive BASIC program was produced which could, after a fashion, assign students to teaching groups. The arrival of a 32Kb Commodore PET (remember those?) made it possible to refine this first crude program into something which really could do the job faster than humans could, and print out the resulting class lists.
Solving the timetabling problem was, however, only the beginning. We needed to store more information about each student than just subjects and teaching groups; things like names and addresses, names of tutors, exam results etc. And we needed the ability to retrieve a student's record with minimum fuss, edit and re-save it, delete it if necessary and add new records. No appropriate commercial software for the PET was to be had, but by this time programming in BASIC had become an absorbing hobby with me and eventually led to three core programs: one to take care of all the editing and retrieval requirements just described, one to print lists and a third to design the formatted screen into which the data was typed. These, together with a few additional utility programs were all controlled by a master menu program which loaded each item in the package as required.
Then, suddenly, there was the BBC micro. Our first reaction on playing with one of these was "Wow!", colour! Mixed upper and lowercase text with proper descenders! (The PET couldn't manage those.) Real graphics! And what a BASIC! I immediately set about converting the student records system to run on the BBC and the job progressed rapidly. The excellent BASIC made some things so easy and resulted in a far more refined program than its predecessor. Take that business of inputting into a formatted screen. Placing the cursor in predetermined positions was awkward on the PET but the BBC had that marvellous INPUT TAB (X,Y) construct which no other machine had.
It was around this time that I had the idea of making a system which had been customised for student record keeping into a general database system. The result was the first incarnation of Powerbase. Memory limitations on the BBC micro meant that, like the PET version, it was a suite of programs under the control of a menu program. After acquiring an A3000 in 1992 converting Powerbase for RISC OS was given top priority and the result was a single, fully RISC OS compliant program. My son, Steven, who absorbs computer-related ideas like a sponge, got to grips with Wimp programming long before I did and his help when I finally took the plunge was invaluable. The memory-management routines which he wrote are still at the heart of Powerbase and without them the program could not work as effortlessly as it does. Over the years it has grown and grown. New features have been added at the request of users, numerous bugs have been fixed and friendlier ways of doing things have been devised. I don't suppose it will ever be "finished"; making it better is so much fun.
So what can it do?
I'll list some of the main features of Powerbase so that readers who are on the lookout for a database program can decide whether it's worth their while to read the rest of this, and subsequent, articles and give Powerbase a trial or whether they need to look elsewhere.
- The number of records is limited only by available disc space so very large databases are possible.
- The size and structure of the database can be altered without loss of data.
- Any data field or group of fields can be indexed so that records can be listed in a sensible order and retrieved almost instantaneously by inputting a short string called a key which is derived from the field(s).
- Fields may be of different types such as alphanumeric, uppercase, numeric. Date and time fields are supported and will accept only valid dates or times in hh:mm:ss format. Check-boxes, buttons which call up sprites, drawfiles etc. may also be defined. Sprites may be actually displayed on the record.
- Self-calculating fields can display the results of calculations and string operations performed on other fields. Printed reports may include the results of such calculations even when not attached to a self-calculating field, and columns of figures may be added, averaged etc. in such reports.
- Fields may be linked to tables which can be used both to validate the input (only items appearing in the table allowed) and to provide additional data which may be included in reports.
- Files of any type, on any part of the computer system, can be linked to buttons in database records allowing you to classify collections of photographs, sound samples etc.
- Reports can be generated quickly for display in a window or sent to the printer in a variety of formats. Printing of labels is supported.
- Data can be both exported and imported as CSV, TSV or anything-else-SV files.
- Direct data-merging (without the need for an intermediate CSV file) with the Impression family of wordprocessors is supported.
- A scripting language allows repetitive sequences of operations to be automated. If desired scripts can be run from buttons on the record window.
Sounds useful? Then read on!
Making a start
I'm a retired chemistry teacher with an interest in classical music (and computers, of course). I mention these seemingly irrelevant details because they have influenced the ways in which Powerbase has developed and will show up in the nature of the databases which follow. We're going to skip the trivial and hackneyed address-book example and construct a database of recorded music. If your own tastes run to jazz, rock, country or whatever it doesn't matter; you'll find it easy to make adjustments to tailor the database to your own needs.
Our database record will initially contain only four items of data or fields. These will be:
- The Title of the recorded work (or of the CD, LP etc itself)
- The names of the performing Artists
- The Medium on which the music is recorded (e.g. CD)
- The name of the record Label
In later articles we will refine and add to this simple structure
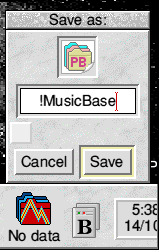
The latest version of the program, Powerbase v.8.22, is included on this CD ROM as a zip file. You are strongly recommended to use it for the exercises in this series rather than any earlier version you might possess. Copy it to your hard disc, double-click on it, and drag out the Powerbase application. Double-click the unzipped Powerbase to run it. Clicking SELECT on the iconbar icon brings up a Save box which offers the default name '!DataBase'. We want something more specific than that, so change it to '!MusicBase' as shown below and drag the icon to a suitable directory.
A full-screen window covered with a blue grid opens. This is where we design the record layout. Clicking in this window with MENU calls up a menu on which all but two items are greyed out. 'Grid' leads to a window which sets various options for the screen grid. Play with these if you wish but our main concern is with 'Create field' which opens the following rather daunting window.
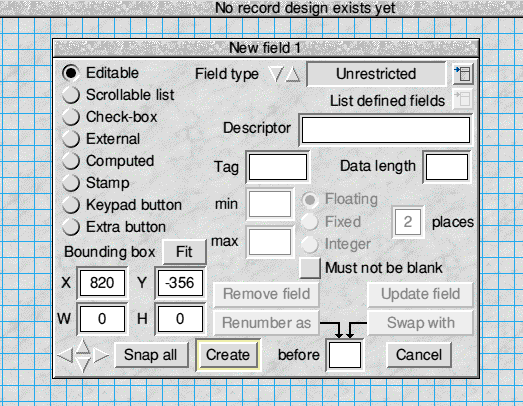
The field-design window
Fortunately, most of the gadgets in this window can be ignored for the present. All we really need to do is enter in the 'Descriptor' box the name which is to appear on the screen to identify our first field. This was given above as 'Title'. Something also has to be entered alongside 'Tag'. Put TITL in there; you'll find that no more than four characters can be entered. 'Data length' is the maximum number of characters which the field can accommodate. We'll settle for 50 for now. Enter this value, click on 'Create' and a white rectangle with 'Title' to its left is displayed. It won't be where you want it, so drag it with SELECT to somewhere near the top left of the screen. When you release the mouse button the rectangle is redrawn and 'Title' moves to the new position. It's also useful to know that if you drag 'Title' rather than the white rectangle it can be positioned somewhere other than to the left; above the rectangle, for example.
When you've positioned the Title field to your satisfaction, call up the menu and again choose 'Create field'. Details for the second field are now entered. The process is then repeated for the remaining two fields. The suggested definitions for these three fields are as follows:
                Descriptor       Tag      Data length

                Artists          ART          50
                Medium           MED          10
                Label            LAB          15
Arrange the fields to produce something like this:
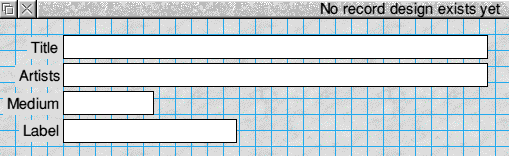
The record design so far
If you make a mistake just double-click on either the field rectangle or its descriptor and the field-definition window will re-open. Make whatever changes are needed (note that you can nudge the field into the required place using the four "bump" icons at the bottom left corner) then click on 'Update field'.
To get a working database as quickly as possible bring up the menu again and choose 'Default database'. A message appears asking if you want to create a database of 100 records with TITL (that's the Tag of the Title field, remember) as the primary key. Click 'OK'. The grid disappears and the record window is redrawn to a size which will just comfortably accommodate the fields with the addition of a tool-pane attached to the left-hand side (and another pane which we'll deal with later attached to the bottom). "But I hate attached tool panes!", I can hear some of you saying. Well, there is an alternative but put up with the attached pane for now, please: there are more pressing matters for this first article.
Using the database
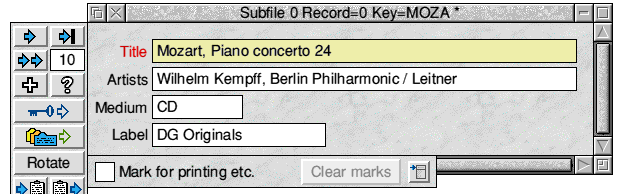
Let's add our first record to the database. I'm going to make this my first record:
A completed record
If you press <Return> after typing the last field you will be offered a blank record for the next entry. You needn't, however, complete all the fields if you don't want to. Repeatedly pressing <Return> will, of course, eventually give you a new, blank record but that would be a tedious way of getting there if the database had forty, instead of four, fields so this is an opportunity to introduce you to the 'Add record' button on the tool-pane. It's the one with the large cross, 3rd down on the left-hand side. Click on it with SELECT and up comes a blank record. Now enter four or five more records to give us something to play with. (If you're feeling lazy there's a copy of MusicBase on the CD with ten completed records in the file music/zip. De-archive it, as you did for Powerbase itself, before attempting to use it.)
If you click repeatedly with SELECT on the right-pointing arrow at the top left corner of the tool-pane you'll see your records displayed one after the other; using ADJUST instead of SELECT retrieves the records in the opposite order. The button to the right takes us to the last record (with SELECT) or the first (with ADJUST). But what order are they in? As each record is displayed look at the title bar of the window and you will see 'Key=' followed by four letters' (MOZA in the example shown above). You'll notice at once that these are always the first four letters of the Title field. We call this little group of letters the primary key of the record and the field from which they are taken is the primary key field, which is always distinguished from other fields by its yellow background and is the only field in the database which can not be left blank. Cycle through the records again and you will see that they are ordered alphabetically by primary key, regardless of the order in which the records were entered. Try confirming this by adding a new record whose primary key should fit somewhere in the middle of the sequence, then scan through the records again. The new record appears in its correct position.
The primary keys of the records are stored in an index. We mentioned indexes earlier when listing the features of Powerbase. The primary key index is created automatically and has to be present for the database to work. You may have as many additional indexes as you wish; we'll see about creating them later in the series. You might think that the first four letters of the Title field doesn't make a particularly good primary key, and you'd be quite right. In the example on the disc there are already some duplications and a database such as this will generate many more. (Mozart alone wrote over 600 works!) The reason we were landed with this primary key is that we took the shortcut to a working database by choosing 'Default database'. By taking a little more trouble we could have had a less primitive primary key structure and determined what field (or even group of fields) was used in its construction, how many letters, from which word(s) and even from which part of each word.
As a matter of fact we still can have the primary key we want because there's a way of redefining it but I'm going to end this first article with reference to two important features. Click on the button with the question mark, next door to the 'Add record' button on the tool-pane and the 'Search' window will appear:
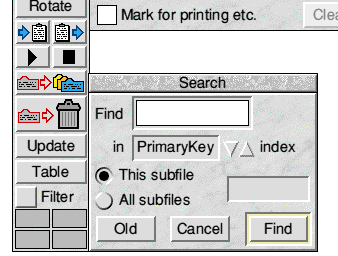
The Search window
Typing the primary key of a record into the writable icon and clicking on 'Find' will display the required record. This method of retrieving individual records is very fast, even if the database contains many thousands of records. If you had another index defined (on Artists, for instance) you could switch to that index and retrieve records in the same way using the key derived from the Artist field. Indexing, then, has two great advantages:
- Records can be retrieved very quickly
- They can be accessed according to the order of keys in the index
This second feature assumes even greater importance when we print a list or report as it's usually called in database-speak. Click on the record window with MENU. It's some time since we did this - and the menu which appears is quite different from the one we saw when we were creating the empty database. Choose 'Print' and you will see the 'Match' window:
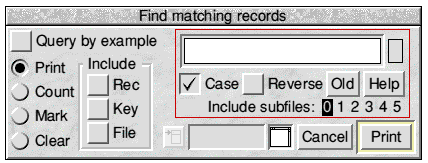
The Match window
Simply clicking on 'Print' will produce a list of records in primary key order. The report appears in a window and consists of the Title field only. How do you include other fields? By clicking on them with ADJUST before creating the report. A second ADJUST-click on a field de-selects it. But just choosing which fields to print isn't enough surely? We need to specify which records to print from as well! So here's where those mysterious 'Tags' which we specified when designing the database come in. Suppose we want a list of LPs only. In the writable icon of the Match window enter MED=LP. MED, remember, was the Tag of the Medium field. Clicking on 'Print' now lists only those records which have LP in that field and ignores the rest. MED=LP is a simple example of a search formula or query. Using MED instead of Medium, especially when the latter is there on the screen for all to see, might seem perverse but there are two very good reasons:
- Tags are limited to 4 characters; on-screen Descriptors may be much longer. Using Tags is therefore a lot quicker and less error-prone.
- A field might have no Descriptor at all. If it wasn't for the Tag there would be no "handle" to specify the field in a query. This situation would be likely to occur if the record contained an address occupying several fields. We'd want the Descriptor 'Address' beside the first field but there would be little point in labelling every other part of the address, except perhaps the postcode.
Reports may be saved as text files by clicking MENU over the report window and following 'Save as text' to the standard Save box. Note that you can also sort the report on whatever column the pointer is over when you click MENU. Another useful feature is that you can double-click on a line in the report and the relevant record is retrieved, with the caret positioned for editing.
Next time
In the next article we will refine MusicBase by:
- Re-defining the primary key to something more useful
- Adding some extra features to the record window
- Covering queries more fully
- Looking at the hard-copy printing facilities