


DrawWorks Revealed
Aaron Timbrell continues his series on DrawWorks New Millennium.
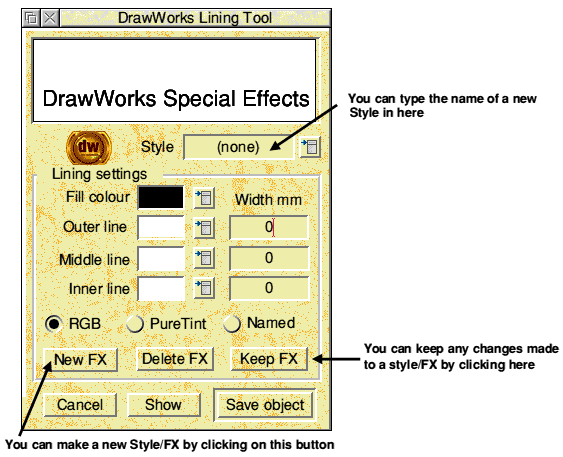
DrawWorks Effects
DrawWorks New Millennium offers a great range of tools, however quite often it can be difficult to see how to achieve a particular effect. One of the main strengths of DrawWorks is how the tools can be combined and even altered to produce much more amazing effects that one would initially imagine could be possible.
The Lining Tool
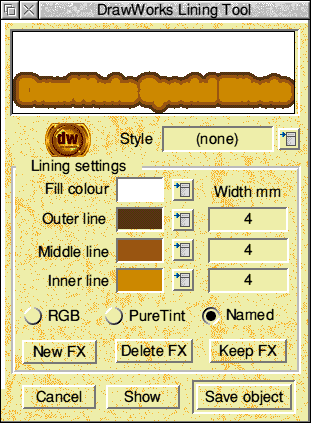
A number of the tools in DrawWorks can have their own effects written for then and then saved for later use. When you make a customised effect it will then appear on that tools menu every time the tool is opened. For the first example we will cover the DrawWorks Lining Tool. In these examples a line of text was typed directly into the Draw window using the default font (Homerton) and the default size (14pt). This line of text was then selected and the lining tool button was clicked on.
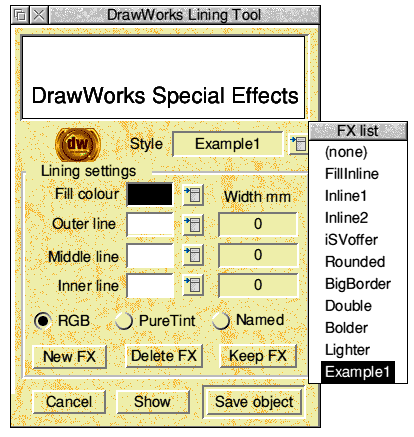
As a simple example we will make a new style called "Example1". Type "Example1" in the writable icon next to the word style near the top of the window. Now type 1.00 into each of the width icons. Now click on the "NewFX" button. Nothing seems to have happened but if you now open the style menu you will find the style "Example1" on the list.
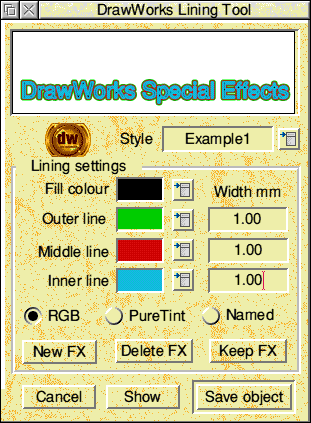
At the moment it looks like this new style does nothing, this is because only the fill colour of the objects is set (in this case black) the other colours are white and don't show in the white window. Try changing the other colours to see what happens.
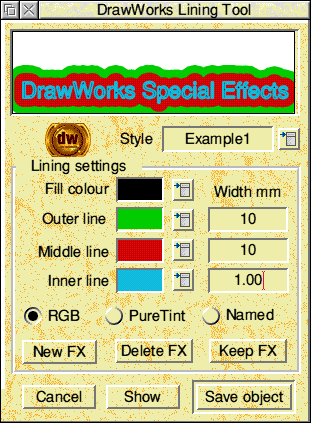
As you can see once the colours have been changed the result can be clearly seen in the preview at the top of the window. To keep the results of any changes you make to this new style/FX click on the "KeepFX" button. At this point it is worth pointing out how the line width icons work. The figure shown for each line is the thickness applied to that particular colour. So in the example below the total line width of the object will be 21mm (a 10mm wide green line, followed by a 10mm red line, followed by a 1mm cyan line). You will be able to see this more clearly if you change the middle line colour from red to white.
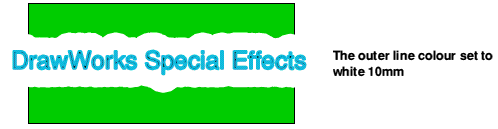
However enough if this, lets see what the lining tool can actually do. Lets us suppose we want a distinct white space around some text that is going to be on a coloured background, we can achieve this by setting the outer line colour to white.
I would suggest that you have a play with the lining tool to see what sorts of effects can be produced by changing the colours and the line widths. Don't forget that the lining tool on DrawWorks New Millennium can also use Named and PureTint Colours. So you could make a style that contained shades of a Named colour. The example below shows this done with various shades of iSVOrange from the Named colour picker (you can see the "Named" button is selected).
However although we can see the lines of colour the actual letters get a bit lost. This is simple to solve, the version made by the lining tool is dragged into the Draw window. It is then selected and placed behind (CTRL B) the original text that was used for the effect. To ensure that the whole design is aligned correctly both parts are then selected and and the Justify tool (from the edit toolbar) is used to align the lined part and the original text to both the "Centre" and the "Middle".

We could also now try just changing the text colour. Since the lines that make up the shading are paths and the original item is text, we can just use the DrawWorks text colour dialogue box to change the text colour to white. The drawfiles that make up both these example can be found in the DWORKS directory inside the software directory on this CD.

The Path Moulder
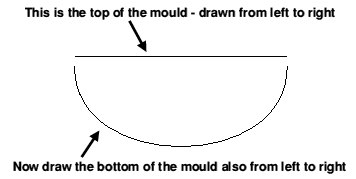
One of the other tools that can have its own effects added is the path moulder. This tool allows you to fit a selection of objects into a mould. Making your own mould is covered in the DrawWorks manual however sometimes it does seem to cause a few problems. Simply put, a mould consists of two lines produced in Draw (an example Mould is in the drawfile called MOULD in the DWORKS directory on this CD). The lines need to be drawn in the correct order and the correct way round. Draw the top of the mould first from left to right. Then draw the bottom of the mould from left to right. Now select the object you wish to mould in the Draw window and click on the Path Moulder button. Once the Path Moulder window opens select the mould itself and drag that into the right hand half of the Path Moulder window (where the mould preview is). You will now be asked to name you mould and it will then appear on the Path Moulder menu. Note that when you draw a mould the two parts must NOT be grouped or you will get an error message.
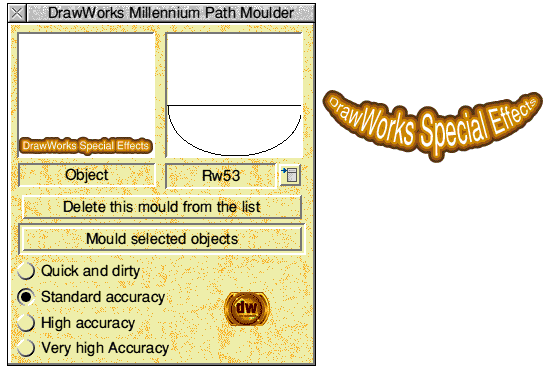
Once we have imported the mould we can now mould the object. The picture below shows the Path Moulder window and the resulting shape after moulding.
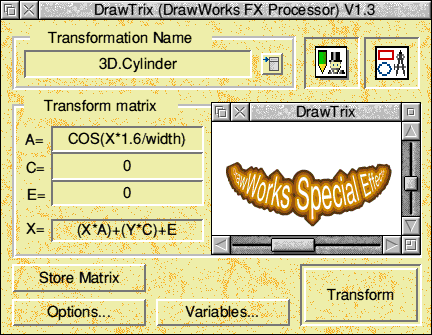
DrawTrix
Initially this shape looks fine, however it is meant to be in 3 dimensions. So the width of the letters at the edges should be narrower than those at the centre. To correct this fault we can now take this object and manipulate it in DrawTrix. If we select the object and click on the DrawTrix tool the DrawTrix window will open. Now choose "3D.Cylinder" from the DrawTrix menu and click on the "Transform" button.
The object we need is now finished, as you can see we have used a number of DrawWorks tools to make it. Not only that but we have customised two of the tools in order to get the results we wanted.
So what is it?
Now the objects is made what on earth am I going to do with it. The answer is simple. Place it around the neck of a wine bottle where it belongs!

If you want to look at the finished design it is called FINI and is in the DWORKS directory on this CD. See you next time.
Aaron Timbrell