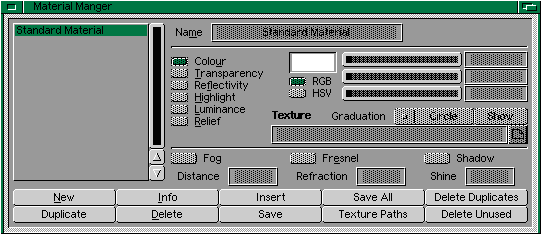
Creating a new material.
     There are two ways to create a new material in Cinema 4d.

     Firstly, if you have an object that has no material, and go to
     Edit>> material edit (press o), it will ask you if you want to
     create a new material. Click yes, and you can now edit your
     new material.

     Secondly, if you go to the material manager (press T), you
     can add a new material using the 'New' button.

     You can also delete/duplicate/load/save materials using the buttons along
     the bottom of the material window. Most of them are self explanatory :).


Once you have created a new material, you can edit it in the following ways:

Name:

     A bit obvious this one =)

Colour :

     changes the basic colour of the material. Use the RGB sliders
     to change the values, or alternativley you can type in the RGB text
     fields, using TAB to cycle between them.

     You can also select a file here, a 'colour map' which is basically
     a picture which is displayed on the objects surface when it is rendered.

Transparency:

     This determines how 'see through' the object will be. Lighter colours
     are more transparent, while darker ones are more opaque.

     You can enter a file here, a 'transparency map'. Basically, this is
     a greyscale image, where black is transparent and white is opaque. You
     can also have 'in-between' greys for more/less transparency. A good
     example of this can be found in the examples drawer of Cinema4d,
     "butterfly". Notice that you can completely see through where the black
     parts are on the transparency map.

Reflectivity.

     Determines how light is reflected by the object. Eg Increasing the blue
     value here makes the object reflect more blue light. If you put all of these
     sliders to 100% you can make the object reflect everything that touches it.

     You can also have a 'reflectivity map' which works in the same way as the
     transparency map. White parts are more reflective while darker parts are less.

Highlight.

     Determines the colour of the highlights on the object. For example, on
     a shiny ball, when light hits it, you will see it shine. The colour of
     this shine is determined here.

Luminance:

     This allows the object to give off a certain colour of light of its own.
     EG. if you make the sliders show a deep red colour here, the object
     will radiate a deep red light.

Relief:

     In otherwords, a bumpmap. You cant select a colour here, but you can select
     a 'bumpmap' file, and how bumpy the object will be (the bump height). The
     bumpmap works in a similar way to the other maps mentioned here, the darker
     colours means less of a bump height, while brighter colours mean higher
     bumps. This only really works if you use a greyscale image. If you want
     a good example of a bumpmap, you can check out the next part of the tutorial,
     or check out one of the examples in the Scenes directory of cinema4d, (Earth-
     moon).

Other options:

          Fog:

               If you check this, you can only edit the Colour values in the
               current material. The Distance field determines how 'foggy' the
               material will be, in other words, visibility distance. This can
               produce some very nice effects (eg for clouds.)

          Refraction:

               Determines how much the light will be 'bent'. For example, for
               water you would have to specify a value here so that when you
               render the scene, you would see everything underneath the water
               appear distorted.

          Shadow:

               Again pretty self explanatory. Determines whether shadows will
               appear on this texture.

          Shine:

               Enter a percentage here to determine how 'shiny' this texture
               will be. Indispensible for materials such as Glass, water etc.
               For another good example of this, check out part 3 of the tutorial.

back

