|
|||||
![]() To
create this example
To
create this example ![]() Using the
PivotTable
Using the
PivotTable ![]() How PivotTables work
How PivotTables work
Summarising weekly, monthly or quarterly data into
a single worksheet can be done with Excel's PivotTable
Wizard as Helen Bradley explains.
Excel's PivotTable Wizard gives you some extra grunt
allowing you to create quite complex summaries in your
worksheets quickly and easily.
In Figure 1b you can see part of a workbook where each of the sheets on the left contains data for one of the 12 months of a calendar year. To the right of the screen is the PivotTable sheet which summarises these monthly sheets. This summarised data can be viewed from the summary sheet month by month, quarter by quarter, grouped by the half year or summarised for the whole year.
![]()
tutorial Part 1
![]() Play ScreenCam
Play ScreenCam
tutorial Part 2
![]()

Figure 1b: The
sheets containing data for 12 individual months, some of
which are on the left of the screen, are summarised into
the single custom designed table on the right using the
PivotTable Wizard.
Step 1: Create a new workbook and enter this data into the worksheet. Create a simple formula to subtract the expenses from the income to calculate the profit for each of the four divisions.
| Cell | Contents |
| B3 | Income |
| C3 | Expenses |
| D3 | Profit |
| A4 | North |
| B4 | 30,000 |
| C4 | 10,000 |
| A5 | South |
| B5 | 35,000 |
| C5 | 15,500 |
| A6 | Eastern |
| B6 | 45,000 |
| C6 | 22,000 |
| A7 | Central |
| B7 | 26,000 |
| C7 | 12,000 |
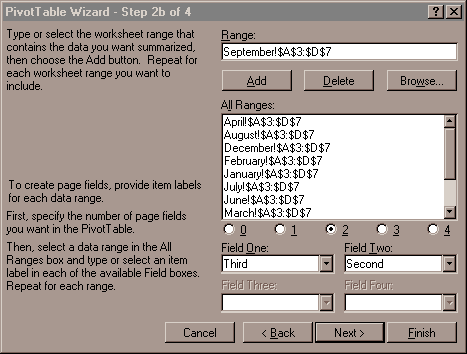
Figure 2b: Step 2b of the PivotTable Wizard allows you to select the data to be included in the table and to allocate data to a number of custom fields.
![]()
Step 3: To create the PivotTable,
return to January's sheet and select Insert, Worksheet to
add a sheet for the PivotTable. Now select Data,
PivotTable. From Step 1 of the PivotTable Wizard select
the option button for Multiple Consolidation Ranges and
click Next. From Step 2a of the PivotTable Wizard select
the option button for 'I will create the page fields' and
select Next.
Step 4: Select the Range box in Step
2b of the PivotTable Wizard and select the range A3:D7 of
the January spreadsheet so that the contents of the Range
box reads January!$A$3:$D$7 and click the Add button. You
may need to move the PivotTable Wizard dialogue box a
little to one side to complete this step (grab its
titlebar with the mouse to alter its position on the
screen). Repeat this step including the range A3:D7 for
all 12 months so that your dialogue box resembles the one
in Figure 2b. Select the number 2 as the number of Page
fields for your PivotTable. And then, selecting each
month in turn (they are in alphabetical order), add this
data to the Field boxes and click Next:
![]()
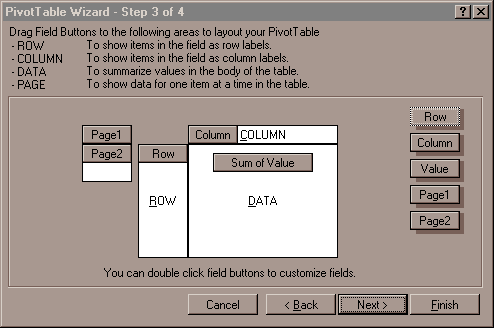
Figure 3b: Step 4 of the Wizard allows you to drag buttons representing the data into the positions you want it to appear in the table. You can allocate data to rows, columns, pages or omit it entirely.
| Field One: | Field Two: | |
| April | Second | First |
| August | Third | Second |
| December | Fourth | Second |
| February | First | First |
| January | First | First |
| July | Third | Second |
| June | Second | First |
| March | First | First |
| May | Second | First |
| November | Fourth | Second |
| October | Fourth | Second |
| September | Third | Second |
Step 7: You'll need to alter the column order because the PivotTable Wizard has ordered them alphabetically. Click on the Income heading and drag it so it appears to the left of the Expenses. You can reorder your column or row headings this way to suit your own needs.
Step 8: You can use Excel's AutoFormat function to format the PivotTable. Place the cell pointer within the table and select Format, AutoFormat, select a formatting style and click OK. To format the numbers, select the range B8:D12 and select the PivotTable Field button on the Query and Pivot toolbar. Select Number and choose an appropriate number format for your data. You must use the AutoFormat and the PivotTable Field formatting options as any other formatting will be lost if the PivotTable is refreshed.
To view the summary data for the year quarter by quarter, from the Half Year button select All and then from the Quarter button select each quarter that you want to view, one at a time. To view the data for the first half year, from the Quarter drop-down list select All and from the Half Year drop down list select First.
To view data for individual months from the PivotTable you can add a third page field to the PivotTable. To do this, place the cell pointer within the PivotTable and select the PivotTable Wizard from the Query and Pivot toolbar. Click the Back button to return to Step 2b of the Wizard and select three page fields and in the Field Three list box add the month name for each month as that month's entry. Click Next to move to Step 3 of the Wizard and drag the Page 3 button from the right of the dialogue box across to the top-left (Page) section and position it under the Half Year button. Click Finish when you are done and rename the Page 3 button calling it Month.
A PivotTable will remain as part of your Worksheet. It contains information about the data which it summarises but won't update automatically if any data it uses is altered. If any of your monthly worksheets is altered, you must refresh the PivotTable. To do this, position your cell pointer inside the PivotTable and select the refresh button (the one with the exclamation mark on it) on the Query and Pivot toolbar.
If you add extra rows or columns to any of the monthly sheets then you'll need to alter the PivotTable setup. Place the cell pointer in the PivotTable and select the PivotTable Wizard button on the Query and Pivot toolbar. Move through the dialogue boxes using the Back button to the Step 2b dialogue box, delete the old range, select a new one and click Finish. The PivotTable is automatically updated when you make these changes. You can print the PivotTable like any other sheet in the Workbook.
Next month
Next month we'll take this summary worksheet and show you how you can create custom views and reports from the data.

Top of page
|What's New | Software | Net Guides | Web Workshop | Net Sites | About PC User |
All text © 1997 Australian Consolidated Press - PC User Magazine