| Modeling/ Working with Multiple Projects |
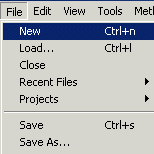
Working with Multiple ProjectsIntroductionAny number of projects can be created. Each project contains an independent set of materials, geometric primitives, post particle and post image effects. It should be noted that some data sections are shared between projects: render settings, grids, file render configurations are such shared objects. You can cut or copy objects in one project and paste them into another project. Animation time is also defined by a project: it is possible to continue modeling a project while playing the animation of another project. There is one special purpose project called material preview project. By modifying this project, you can define how material preview renders preview icons for the select window's material tab. Opening a new projectTo create a new project, select the pull down menu: File/New.
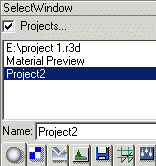
This creates a new project and makes the new project the current working project. All newly created objects are inserted into the current project. Also, all windows (such as the Select window and the View window) reflect the contents of the current working project. Switching between projectsFor example, you can create objects in a temporary project and when ready, move the new object into the actual project by using the cut/paste tools. The Current ProjectTo make a project the current working project: 1. Click the 'Projects' check box in the select window. The project list is shown.
2. Click the desired project to make it the current working project. You can rename projects through the 'Name' field. Deleting projectsThe current project can be deleted from the project list by selecting the pull down menu File/Close. All objects, such as materials, geometric primitives, etc. are deleted.
Note: the files are not deleted from your harddrive. The previous project in the project list becomes the current working project. Loading projects from a fileThe file load dialog, opened from 'File/Load' pull down menu, is 'non modal' just like all the other dialogs in Realsoft 3D. It can be left open when several successive load operations are needed. It can be resized just like any other window. The 'OK' button loads the selected file and closes the window. The 'Load' button loads the file but leaves the window open for new load operations. The 'Close' button does not load anything but closes the window. The 'Replace' check box defines whether the loaded objects should replace the existing objects or not. If not checked, new objects are inserted into the current project. If checked, existing objects are deleted from the current project before new objects are loaded in. After a file has been selected, new format specific options appear to the window. The native Realsoft 3D file format provides options for loading individual data sections from a file. If the 'Sections' box is checked, a suitable combination of data section selectors can be checked for loading only particular data from the file. For example, if you want to load only materials, check the 'Materials' check box and reset all the other section check boxes. Saving projects to a fileThe menu 'File/Save As' opens a file dialog. This dialog, just like the 'File/Load' dialog, is 'non modal'. It does not block use of other windows and hence it can be left open when necessary. Clicking the 'Ok' button saves the file and closes the window, whereas 'Save' does only the save operation.
The 'File Format' gadget defines the file format used for saving the project. The gadget shows the installed file formats, which support save operation. The 'Thumbnail' contains a small screenshot. To create a thumbnail picture, just click in the pictureframe. Name of the user and company are filled automatically, but can be altered if needed. The 'comment' field can be used to add some project specific information. 'Sections' defines which sections in the current project should be saved. See the 'File/Load' description above. If this field is set to 'Selected sections', the window is expanded and a number of check boxes are shown for section selection. 'Save all' tries to save all data sections. Note that some formats may not support saving of all sections. You cannot save Realsoft 3D materials to a DXF file. If 'Collect External Files' is checked, all the bitmap texture files used by the scene are collected into one single 'textures' folder, which is placed to the same folder where you save the project. This helps greatly when you need to move a project to another computer system. Finding all the textures (possibly scattered to many folders) would be laborious to do manually. The pull down menu tool 'File/Save' saves the current project using its name as a file name and the native file format. All data sections are saved. The pull down menu 'File/Save as Startup' saves the entire current project to the file, which is automatically loaded in program startup. Use this function after you have customized the working environment to suit your personal needs. The backup copy of the original startup file can be found from the 'environments' folder.
Rendering projectsThe current working project can be rendered to a file using the File/Render window. This File Rendering window allows you to select file format, rendering settings, post effects, image resolution, frame command and file name for the image to be rendered. Both still images and animations can be rendered. You should insert a camera object to the project before rendering it to a file. See the manual chapter 'Rendering' for more information about this topic.
|
 |
 |

