As outlined in the introduction and tutorial of this manual the 3-D model making process consists of collecting a number of pictures of the object of interest, pointing out features in Geometra and then letting the program generate the model.
The pictures can be collected using any means available to the user. It is possible to scan prints or negatives of conventional photographs, use a digital photo camera or even a digital video camera, with suitable image capture hardware and software, if preferred. Just as long as the images become available for Geometra in digital form on disk (JPEG and Windows BMP formats currently supported).
Some fundamental guidelines for taking and manipulating pictures to be used in Geometra are given in the following.
If photographs are scanned they should all be scanned at the same resolution and be therefore the resulting image files should be the same size. Scanned images should correspond to the whole photograph. Given the fact that the scanning process usually involves manual selection of the photo area it can be difficult to achieve this exactly therefore Geometra allows image dimensions to vary by ± 5%. Images which differ in size by more than this will be rejected by Geometra.
Under no circumstances should any images, be they scanned or acquired directly by electronic means, ever be cropped "to the interesting part" as this is in conflict with the physical model underlying the calculations which Geometra uses to calculate the 3-D model.
Anything which is to be included in the model must be visible in at least two or more pictures. This is why the minimum number of pictures for a Geometra project is two.
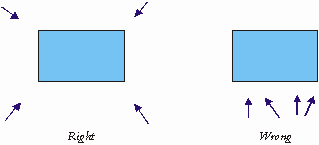
If at all possible images should be taken from differing and fairly evenly spaced viewpoints. Two pictures taken from the same viewpoint don't add very much as for all intents and purposes they are actually the same picture. The "box" example in the tutorial is a case in point with the six views distributed evenly round the box and every point on the box visible in at least two or more images.

Figure 35: Different shot set-ups
A schematic example of this is shown in Figure 35. The good shot set-up (on the left) has the pictures show from viewpoints evenly spaced round the object. All points on the object will be visible in two or more pictures and with well marked references accuracy will be good. The shot set-up on the right is inferior. All four pictures show only one side of the object and they will also exhibit a very large degree of similarity. Attempts to construct a model using using these pictures will result in low accuracy or even complete failure of the Geometra calculation.
If in doubt as to whether to use two or three pictures, use three. Both accuracy and reliability of Geometra are better when using three or more pictures.
More referenced image points also increase accuracy and reliability. Especially if accurately positioned.
If perhaps the object of interest is not very rich in features which can be pointed out then consider adding some auxiliary ones using little paper stickers from a stationery store or temporary marks using some kind of removable-ink pen or marker.
If necessary additional images can be added to a project at a later time using File, Add Images. Images can be removed from projects by closing them (using the Close button at the top right of the image window) within the Geometra workspace.
If you have other photo manipulation software available to you, you might want to pre-process your images with that in order to enhance some image characteristics if need be.