Making Your ActiveX Controls Web-Friendly
Perhaps one of the most pernicious issues affecting the growth and development of Internet-based applications is security. The dynamic document revolution that ActiveX is a part of brings with it the downloadable, executable objects. Unlike when you go to your local software store and buy a shrink-wrapped software package, you can't be sure of the intentions of the software provider on the Internet. One of the greatest things about the Internet is that even the little guy can distribute software to the masses. However, it's harder to know all the little guys well enough to trust the software that their Web sites ask you to download.
The ActiveX framework addresses this more risky environment with an API, tools, and processes that give clients (Web browsers, for instance) the ability to permit downloads from trusted software providers and deny download to untrusted or unknown sources.
Internet Component Download
Web browsers, such as Microsoft Internet Explorer 3.0 and other similar client applications, rely heavily on the Internet Component Download process. The WinVerifyTrust API provides the low-level support for these services.
The Internet Component Download specification provides for a safe mechanism to download executable content such as ActiveX Controls into Web browsers. Microsoft defines the Internet Component Download as a process consisting of the following steps:
Download the necessary files
Call WinVerifyTrust API before permitting installation
Self-register OLE components
Add entries to the system registry to keep track of downloaded code
Call CoGetClassObject for the appropriate CLSID
Let's take a few moments with each of these steps and look at a few details.
Packing Files for Download
In the typical Web browser download scenario, the <OBJECT> tag triggers a request for a downloadable component. The <OBJECT> tag includes a CODE attribute that indicates the location of the component to be downloaded. The Internet Component Download anticipates three different types of downloadable files, as shown in Table 6.1.
Table 6.1 - Types of Files to Download
|
File Type
|
Description
|
|
Portable executable
|
A single file OLE control
|
|
Cabinet file
|
A multiple file OLE control package with setup instructions
|
|
.INF file
|
A text file describing download and installation instructions
|
Working with Portable Executable Files
The portable executable, or PE, is a stand-alone .OCX or .DLL file. Of course, because the file is itself executable, no additional file compression can be used. This method is used for compact, simple ActiveX Controls.
Note that the Internet Component Download process can rely on the MIME type to determine the appropriate treatment of the PE file. Table 6.2 summarizes the appropriate MIME types.
Table 6.2 - MIME Types for PE Files
|
MIME Type
|
Description
|
|
application/x-pe_win32_x86
|
A portable executable built for Windows NT or Windows 95 on the Intel x86 platform
|
|
application/x-pe_win32_ppc
|
A portable executable built for Windows NT or Windows 95 on the PowerPC platform
|
|
application/x-pe_win32_mips
|
A portable executable built for Windows NT or Windows 95 on the MIPS platform
|
|
application/x-pe_win32_alpha
|
A portable executable built for Windows NT or Windows 95 on the DEC Alpha platform
|
|
application/x-pe_mac_ppc
|
A portable executable built for Macintosh on the PowerPC platform
|
Working with Cabinet Files
Some ActiveX control applications require more than one file. Installation instructions can be somewhat involved. For situations like this, the Internet Component Download process provides for the so-called "cabinet file" (.CAB). Cabinet files must include an .INF information file that describes the installation procedure. Best of all, the cabinet file permits file compression reducing bandwidth requirements during download.
Note that the Internet Component Download process can rely on the MIME type to determine the appropriate treatment of the cabinet file. Table 6.3 summarizes the appropriate MIME types.
Table 6.3 - MIME Types for .CAB Files
|
MIME Type
|
Description
|
|
application/x-cabinet_win32_x86
|
A cabinet file built for Windows NT or Windows 95 on the Intel x86 platform
|
|
application/x-cabinet_win32_ppc
|
A cabinet file built for Windows NT or Windows 95 on the x86 platform
|
|
application/x-cabinet_win32_mips
|
A cabinet file built for Windows NT or Windows 95 on the MIPS platform
|
|
application/x-cabinet_win32_alpha
|
A cabinet file built for Windows NT or Windows 95 on the DEC Alpha platform
|
|
application/x-cabinet_mac_ppc
|
A cabinet file built for Macintosh on the PowerPC platform
|
Making cabinet files is really quite simple. If you want to control the building of a cabinet file, the ActiveX SDK includes a utility called DIANTZ.EXE built for just this purpose. Listing 6.1. shows the command-line prototype for the DIANTZ.EXE.

If you would rather let an automated utility build cabinet files for you, the Visual Basic Application Setup Wizard builds cabinet files for ActiveX controls built using Visual Basic. This process is explained in Chapter 3, “Building ActiveX Controls with Visual Basic.”

Listing 6.1 - Command Line for the DIANTZ.EXE Application
DIANTZ [/V[n]] [/D var=value ...] [/L dir] source [destination]
DIANTZ [/V[n]] [/D var=value ...] /F directive_file [...]
  source         File to compress.
  destination    File name to give compressed file. If omitted, the
                 last character of the source file name is replaced
                 with an underscore (_) and used as the destination.
  /F directives  A file with Diamond directives (may be repeated).
  /D var=value   Defines variable with specified value.
  /L dir         Location to place destination (default is current directory).
/V[n]          Verbosity level (1..3).
Generally, you construct a directive file (with an extension of .DDF) that holds the instructions for creating the cabinet file. Listing 6.2 shows an example of such a directive file.
Listing 6.2 - Directive File for DIANTZ.EXE
;———————————————————————————
;— Directive file for generating Cabinet file
;———————————————————————————
.Option Explicit
.Set CabinetNameTemplate=MyCabinet.CAB
.Set Cabinet=on
.Set Compress=on
MyInfFile.INF
MyActiveXControl.OCX
You can try building a .CAB file by taking the following steps:
Create a new directory as a temporary working space for creating your cabinet file. The directory \activex\thedisk\NewCh6 was used in this example.
Put an ActiveX control file in your temporary working directory. Any .OCX file will do. In this example, a fictitious ActiveX control file called MyActiveXControl.OCX was used.
Next, create a file called MyInfFile.INF. Using Notepad or some other text editor, enter the code as shown in Listing 6.3. Save your .INF file.
Listing 6.3 - MYINFFILE.INF - Contents of the MyInfFile.INF File
;—————————97Ä————————
;— MyInfFile INF file
;——————————————————
[Add.Code]
MyActiveXControl.ocx=MyActiveXControl.ocx
;————————————————————————
;— MyActiveXControl.OCX can be found at
;— the provided URL
;————————————————————————
[MyActiveXControl.ocx]
file=http://www.somewhere.com/over/the/rainbow/MyCabinet.cab
FileVersion=1,0,0,0
Next, create a file called MyCabinet.ddf. Using Notepad, enter the code shown in Listing 6.4.
Listing 6.4 - MYCABINET.DDF - A Cabinet Definition File
;———————————————————————————
;— Directive file for generating Cabinet file
;———————————————————————————
.Option Explicit
.Set CabinetNameTemplate=MyCabinet.CAB
.Set Cabinet=on
.Set Compress=on
MyInfFile.INF
MyActiveXControl.OCX
From the command line, enter the DIANTZ command as shown in Listing 6.5. Press Enter and DIANTZ builds your cabinet file for you.
Listing 6.5 - Starting the DIANTZ Command
C:\MSDEV\INETSDK\BIN\DIANTZ.EXE /F MyCabinet.ddf
The DIANTZ executable creates two diagnostic files (setup.inf and setup.rpt) as well as a directory called disk1 where the new cabinet file is stored. The setup files show various statistics concerning the cabinet file.
Working with .INF Files
The .INF installation file describes which files need to be downloaded or retrieved from the cabinet. This file also provides installation instructions for the files contained in the cabinet.
Note that the Internet Component Download process can rely on the MIME type to determine the appropriate treatment of the .INF file. The MIME type for a stand-alone .INF file is application/x-setupscript.
Take a look at Listing 6.6 which shows a sample .INF file.
Listing 6.6 - An Example of an .INF File
;——————————————————
;— Sample INF file
;——————————————————
[Add.Code]
MyActiveXControl.ocx=MyActiveXControl.ocx
NeedsThis.dll=NeedsThis.dll
mfc40.dll=mfc40.dll
;————————————————————————
;— MyActiveXControl.OCX can be found in the
;— in the cabinet file at the provided URL
;————————————————————————
[MyActiveXControl.ocx]
file=http://www.somewhere.com/over/the/rainbow/MyCabinet.cab
clsid={94EF87GG-634R-929C-23FE-00444ECE293}
FileVersion=1,0,0,0
;————————————————————————
;— NeedsThis.dll can be found in the
;— in the cabinet file at the provided URL
;————————————————————————
[NeedsThis.dll]
file=http://www.somewhere.com/way/up/high/NeedsThis.dll
FileVersion=
DestDir=10
;————————————————————————
;— mfc40.dll must be present, if not the
;— the installation will fail
;————————————————————————
[mfc40.dll]
file=
FileVersion=4,0,0,5
Notice the DestDir parameter used in the NeedsThis.dll section of the .INF file. This parameter can be set to either 10 or 11. The number 10 indicates that this file should be downloaded to the \WINDOWS directory. If you select the number 11, the downloaded files are placed in the \WINDOWS\SYSTEMS directory.
The other important thing to notice in the .INF file is the file= notation in the mfc40.dll section. This entry implies that mfc40.dll version 4.0.0.5 is required to use the downloadable component. However, if this DLL is not available on the local system, the required DLL is not downloaded. Instead, the download operation fails.
Regardless of which type of file you choose to use for your downloaded objects, the download occurs asynchronously.
Using WinVerifyTrust to Permit Installation
After the proper information and files have been obtained for installation, the next step in the process is to obtain verification that the components are trustworthy. The WinVerifyTrust API is really an extension of the Win32 API. The trust verification services provided are used to determine whether an object can be trusted based upon local administrative policy. The trust model on which WinVerifyTrust is based begins with three basic concepts:
Trusted authority
Trust administrator
Trust provider
A trusted authority is an organization or entity that can be trusted to provide safe objects. For instance, your corporate MIS department would be considered a trusted authority to provide business applications for employees. You might also consider companies that sell shrink-wrapped products to be trusted to deliver safe copies of the products they sell.
A trust administrator holds the decision-making power to determine whether a given organization or entity is considered a trusted authority. The trust administrator can even decide not to trust entities that include digital certificates that guarantee the identity of entity. Say, for example, a certain software vendor is known to have an infected application in distribution. The trust administrator might decide that local policy prevents software from that vendor to be downloaded and installed.
A trust provider is a software implementation for local trust policy. In essence, a trust provider supplies the logic for determining whether a particular action is permissible via local policy. We discuss this more carefully in a moment.
Trust verification services are actually implemented for "subjects" and "actions." The service evaluates the trustworthiness of a subject based upon the action that's requested using the WinVerifyTrust function. Listing 6.7 shows the declaration of this important function for the WinBASE.h file in the ActiveX SDK.
Listing 6.7 - WINBASE.H - Declaration of WinVerifyTrust
///////////////////////////////////////////////////////////////
//                                                           //
//             Trust API and Structures                      //
//                                                           //
///////////////////////////////////////////////////////////////
WINBASEAPI
LONG
WINAPI
WinVerifyTrust(
    HWND    hwnd,
    DWORD   dwTrustProvider,
    DWORD   dwActionID,
    LPVOID  ActionData
    );
There are four parameters supplied to the WinVerifyTrust function. If user intervention (and therefore, a user interface) is needed to determine whether trust should be granted, the hWnd parameter is expected to be the handle to the appropriate interactive window. Note that determination of trust is intended to be a largely transparent exercise. Use of direct user interaction should be discouraged. The dwTrustProvider specifies the trust provider is to be utilized to determine whether the subject should be trusted for the requested action. The requested action is specified in the dwActionID parameter. The possible values for the dwActionID are dependent upon the individual trust provider making the decision. Any additional information required by the trust provider must be passed in the dwActionData parameter. The content and meaning of the information passed is determined by the value of dwActionID and the individual trust provider.
Signing Your Controls
When it comes to placing active controls on a user’s machine, through embedding them on a Web page so that the controls are automatically downloaded, the issue of security is raised in the minds of lots of users. How does the user know that the control is safe to run, and doesn’t contain a virus that will wipe out the contents of the user’s hard drive? How can you reassure the user that your control won’t scan their hard drive, find their online banking records, and upload them to your server? The fact is, they don’t know that your control won’t cause them any harm, and there’s little you can do to reassure them.
ActiveX controls, by their very nature (the fact that they have full access to the computer on which the control is running), have the capability to cause untold damage to a user’s computer. A good example of this that has gotten a lot of publicity is Fred McLain’s “exploder” control (available from http://www.halcyon.com/mclain/ActiveX/welcome.html), which doesn’t actually cause any damage to the user’s computer, but does shut it down (cleanly). Microsoft’s answer to this trust problem is to place signed certificates in each control, as can be seen in Figure 6.1. Unfortunately, as McLain’s control demonstrates, the certificate only proves that the control has not been modified or corrupted, not that the original creator did not have bad intent. This issue boils down to whether the user trusts the creator of the control. For large companies like Microsoft, this has little impact; most users still trust controls created by them. But for programmers like Joe Jones, how many users know who he is, much less trust that he writes safe controls?
Figure 6.1
Microsoft Internet Explorer showing the certificate for the WinFrame ActiveX control, which was issued by Verisign. This certificate shows that
the control has not been modified or tampered with between the time that the developer compiled it and the time you received it.
Most of the certificate issuing companies have policies that programmers have to follow to receive certificates for the controls they have created. However, these policies are again a matter of trust. The certificate issuing company does not examine or test your control before issuing a certificate. It is only after the fact, when the company receives complaints, that it takes action, which is limited to requesting that the owner of the control remove it from public accessibility or face possible legal action. There is no way possible for the certificate issuing company to remove the certificate from these controls that have already received certificates. It is up to the programmer to remove the certificate. However, an undocumented enhancement to Internet Explorer 3.1 is to automatically check with the Certificate Authority to determine if a certificate has been revoked. As of the time of this writing, the legal and liability issues surrounding this whole area has not been established, so this remains a murky legal area.
Microsoft’s position in the issue of signing controls with certificates is that, if users can reliably know who the developer is that developed a specific control, the developer can be held responsible for the control. Because of this heightened level of accountability, Microsoft believes that developers will be very reluctant to build and sign hostile controls.
Now that you understand what your browser is doing “behind the scenes” to verify that your ActiveX control is safe to run on your computer, how do you place a certificate on your controls so that users know your controls are safe? When you visit a site that contains ActiveX controls, your browser displays a certificate that tells you who wrote the control, who verified that person or company, and that the control has not be altered or corrupted since it was originally signed. If you visit a site that contains unsigned controls, you are likely to see a window like the one in Figure 6.2, informing you that the control is a potential security risk.
Figure 6.2
If you come across an unsigned ActiveX control, your browser will warn you with a dialog stating that the control is a security risk.
Getting a Digital Certificate
Getting your own digital certificate is really fairly simple. First, you need to have Internet Explorer 3.0 or higher (the digital ID center at Verisign states that you have to be using the newest version of IE), a credit card, and various other pieces of personal information about yourself. After you have all of this information together, hop on the Web and visit Verisign at http://www.verisign.com/. After you are at Verisign’s home page, you want to go to its Digital ID Center, shown in the upper-right corner of Figure 6.3.
Figure 6.3
Verisign's home page, showing the entrance to its Digital ID Center in the upper-right corner.
You need to be running Internet Explorer to apply for a software publishing digital certificate, because the ID process requires certain ActiveX controls to be downloaded to your computer. You also need to be aware that the digital certificate that will be issued to you is tied to the copy of Internet Explorer you are using to acquire the certificate. If you ever reinstall Internet Explorer or switch to a different machine, you need to apply for a new certificate. If you will be signing controls on multiple machines, you need one certificate for each machine. You cannot copy a single certificate to multiple machines.
After you are in the Verisign Digital ID center, you need to choose Enroll and then select Software Publisher. At this point, you are presented with a lot of information about digital certificates and Microsoft’s Authenticode technology. This page provides all of the information that you need to be prepared to give while applying for a certificate, as well as the current fees for a certificate (at this time, an individual certificate costs $20 a year). At the bottom of the page is a Continue button, where you start the enrollment process and begin providing information about yourself.
The process of applying for a digital certificate is fairly simple and self-explanatory with everything well-marked. But don’t try to rush through the process, as you need to read everything carefully so you know what you are committing yourself to. There are also a couple of steps that take awhile, and you need to be aware of that so you don’t quit the process thinking you are stuck. After you have finished the process, Verisign e-mails you an ID serial number, which you use to retrieve your certificate from Verisign's site. The whole process takes some time, but you can get your certificate within a couple of hours.
At the time of writing this chapter, Verisign is the primary Certificate Authority authorized to issue Authenticode certificates for use in code signing. Another Certificate Authority at this time is GTE at http://www.gte.com. There will probably be even more Certificate Authorities available in the near future. You can get a list of current Certificate Authorities at http://www.microsoft.com/workshop/prog/security/authcode/certs.htm.

During the process of applying for a certificate, you generate a public/private encryption key pair. It is not a good idea to keep your private key on your hard drive. If your private key is kept on a floppy drive, it is much more difficult for someone else to steal or corrupt your private key. If someone is able to steal your private key, that person could have the ability to corrupt your signed controls and generate a new hash so that the control looks to users' browsers like it hasn’t been tampered with. This would be very difficult to do, but the potential is there.
Signing a Control
Once you have your digital certificate, you need to download the ActiveX SDK from Microsoft’s Web site at http://www.microsoft.com/workshop/prog/sdk/. After you have the SDK unzipped and have run the install routine, you find a couple of utilities in the BIN sub-directory where you installed the SDK. These utilities are all intended to be run from the DOS prompt, so you need to change directory (CD) into the BIN directory to run these utilities.
The first one of these utilities is called SignCode, and it applies your digital certificate to your control. This utility has a large number of options that can be specified on the command line, or you can just run it without providing any information on the command line. If you do not provide any arguments to SignCode, it presents you with a code signing wizard, which walks you through all of the information needed with the following steps:
The first information the wizard asks for is the control that you want to sign, the name of the control, and an URL where users can get more information about the control, as seen in Figure 6.4. You need to specify the cabinet file (.CAB) that was created by the Setup Wizard as the control to be signed.
Figure 6.4
In the first window in the code signing wizard, you specify the control and the control name.
The next step asks you to provide your digital certificate and your private key. This step also allows you to choose between two hashing algorithms to be used to verify that your control has not been tampered with. This step is shown in Figure 6.5.
Figure 6.5
The next window in the code signing wizard asks for your digital certificate and private key.
This last step asks you to verify all of the information that is used in signing the control, as shown in Figure 6.6.
Figure 6.6
The code signing wizard asks you to verify the information to be embedded in the control before the control is signed.
When you are satisfied with all of the information used to sign your control, you select the Sign button on the wizard, and the wizard applies your digital certificate to your control. After the wizard is finished, it informs you that your control has been signed, as shown in Figure 6.7.
Figure 6.7
The code signing wizard informs the user that the control was signed.
If you make any changes or updates to your control, you need to repackage it using the Setup Wizard and resign the control using the SignCode utility.
Verifying a Signed Control
After you have signed your control, you need to verify that your control was actually signed. You can do this by placing your control (and Web page) on a Web server and trying to download it into a Web browser. That’s an awful lot of unnecessary work, however, and it might not work because your computer might determine that the control doesn’t need to be downloaded because there is a local copy already on the hard drive. Instead, you can use another utility that is included in the ActiveX SDK called ChkTrust.
ChkTrust does not have a wizard to walk you through, but it’s simple enough that it doesn’t need one. ChkTrust needs to be run from the command line, where it requires two parameters to be passed. The first parameter is a flag that informs ChkTrust what kind of file it’s verifying - a cabinet file, a PE file, or a Java class file. The flags for these file types can be found in Table 6.4. The second argument is the name of the control file, complete with the path name of where the file can be found. The ChkTrust command looks something like the following:
ChkTrust -c F:\Inetsrv\wwwroot\ax\Mysign.CAB
Table 6.4 - The File Type Flags for the ChkTrust Utility
|
Flag
|
File Type
|
|
-c
|
Cabinet file
|
|
-i
|
PE file
|
|
-j
|
Java class file
|
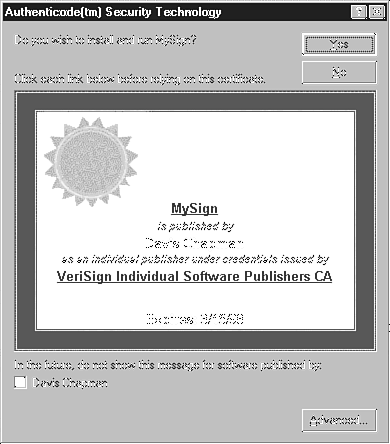
If the control contains a valid certificate, the ChkTrust utility displays the certificate, as shown in Figure 6.8.
Figure 6.8
The ChkTrust utility displays the certificate for the control that it is being used to verify.
From Here . . .
In this chapter, you learned about how ActiveX controls can specify any dependent files that need to be downloaded along with the actual control and how those files are packaged such that your Web browser can find and download all of them. You also took a look at how the security mechanism works in ActiveX controls, to verify that they have not been corrupted or altered in any way. Finally, you learned how you can sign your own controls using freely available tools that can be downloaded from Microsoft’s Web site.
From here, you might want to enroll yourself with Verisign (or another Certificate Authority), get yourself a digital certificate, and start signing those controls that you have been building so that you can begin placing them in Web pages. This allows you to spice up your Web site with any control that you might dream up. You also might want to check out the following additional subjects:
To learn how to package up your controls using the Application Setup Wizard, read Chapter 3, “Building ActiveX Controls with VB.”
To see how you can interact with VBScript to extend the functionality of your control to the Web page, check out Chapter 8, “Interacting with ActiveX Controls and VBScript.”
To learn how you can replace a Web page with an actual Visual Basic application, be sure to read Chapter 10, “ActiveX Documents: Serving Up VB in a Web Browser.”