The first time we used the OLE container control with Excel, we were amazed to see all the cool things we could include in our program. We found ourselves doing things that we never dreamed one person could do. What's more, we saw VB and Excel handle these incredibly difficult tasks with the greatest of ease. After seeing this section's code example at work, you will appreciate the power these two objects possess.
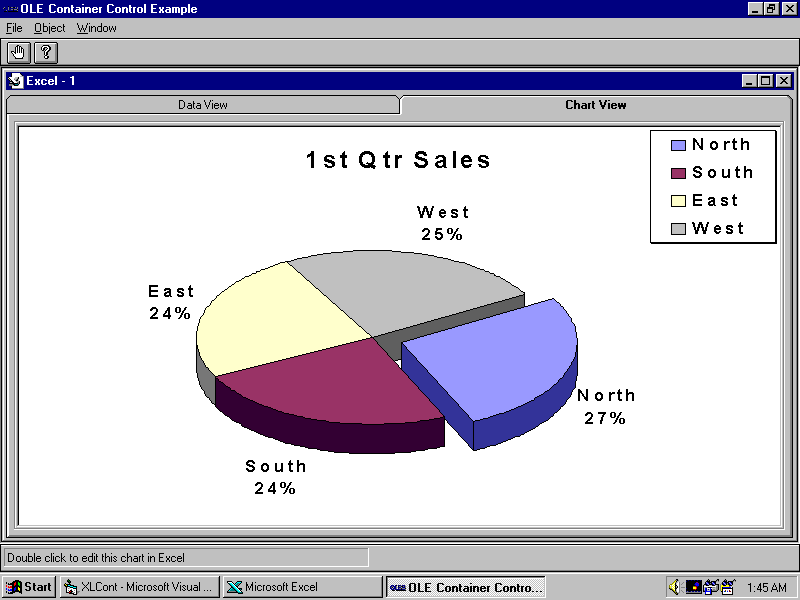
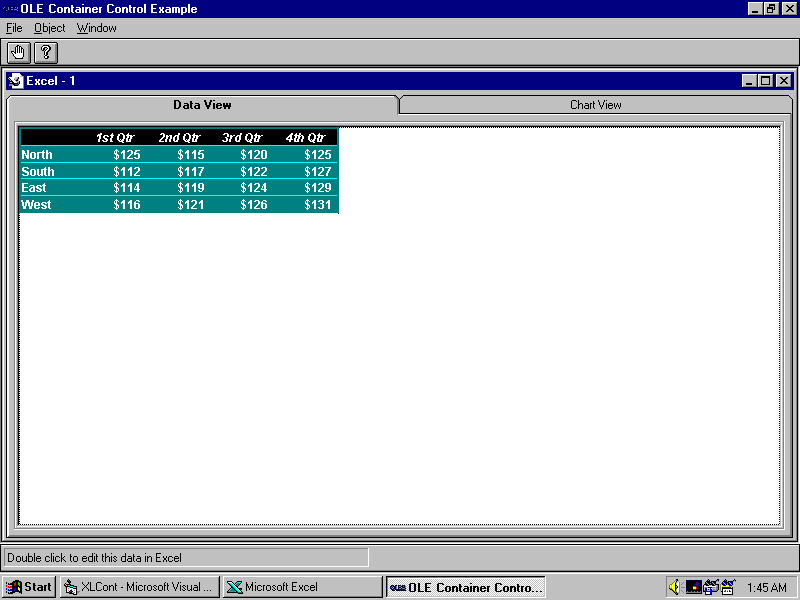
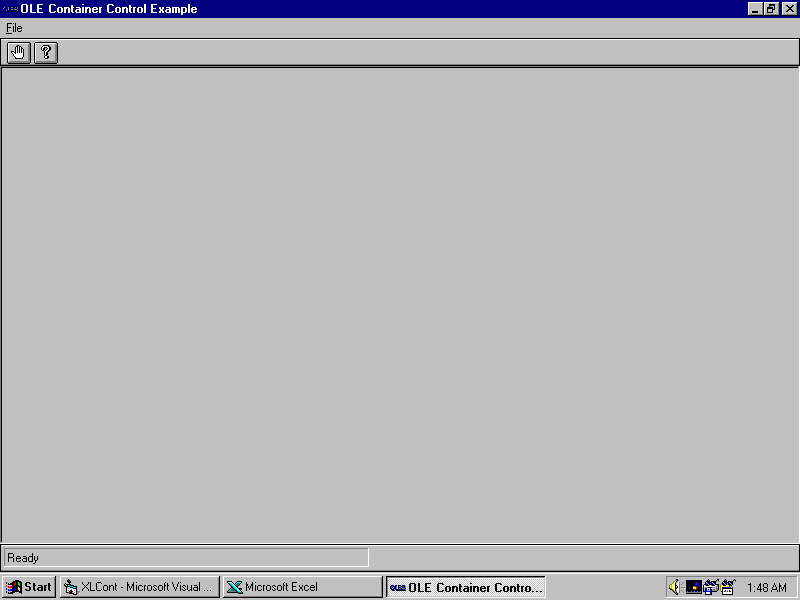
The sample program in this section is an MDI application that presents information from Excel in chart and table form. By using tabs, the user can switch between the two views shown in Figure 26.1 and .
Using the OLE Container control, you can view data in a chart.
By adding tabs, you can switch from the chart to the data.
It is a good programming practice to build a set of "helper functions" for use with large-scale applications. contains code that must be accessible to two or more modules in the project at runtime. Placing this code in a separate module prevents your having to maintain the identical code in several modules.
Listing 26.2 - PUBLIC.BAS - Shared Procedures and Declarations Should Be Stored in Modules
'*********************************************************************
' PUBLIC.BAS - Global constants, functions, and variables
'*********************************************************************
Option Explicit
'*********************************************************************
' API Declarations for this module
'*********************************************************************
Private Declare Function FindWindow Lib "user32" Alias "FindWindowA" _
   (ByVal lpClassName As Any, ByVal lpWindowName As Any) As Long
Private Declare Function PostMessage Lib "user32" Alias _
   "PostMessageA" (ByVal hWnd As Long, ByVal wMsg As Long, ByVal _
   wParam As Long, lParam As Any) As Long
Private Declare Function ShowWindow Lib "user32" (ByVal hWnd&, _
   ByVal nCmdShow As Long) As Long
'*********************************************************************
' This global keeps track of the new instances of frmExcel
'*********************************************************************
Public gintXLInstances As Integer
'*********************************************************************
' Creates a new instance of frmExcel
'*********************************************************************
Public Sub CreateNewWindow()
   Dim objExcel As New frmExcel
   '*****************************************************************
   ' Avoid showing your newly created form until you are finished
   ' making changes to it
   '*****************************************************************
   With objExcel
       .Caption = .Caption & " - " & CStr(Forms.Count - 1)
       .Visible = True
   End With
End Sub
'*********************************************************************
' Generic update status bar routine.
'*********************************************************************
Public Sub UpdateStatus(lblStatusBar As Label, _
                       Optional strStatusText As String = "Ready")
   lblStatusBar = strStatusText
End Sub
'*********************************************************************
' Start a OLE Server, if it is not already running
'*********************************************************************
Public Function StartServer(strClassName$, strProgram$) As Long
   Const SW_SHOWNA = 8
   Dim hWnd As Long
   '*****************************************************************
   ' Prevent any error messages from interrupting the program
   '*****************************************************************
   On Error Resume Next
   '*****************************************************************
   ' Check to see if its already running. If so, then activate it
   '*****************************************************************
   hWnd = FindWindow(strClassName, 0&)

   If hWnd Then
       ShowWindow hWnd, SW_SHOWNA
       '*************************************************************
       ' Return False to indicate that it was already running
       '*************************************************************
       StartServer = False
   Else
       '*************************************************************
       ' Otherwise, start it and return its hWnd
       '*************************************************************
       Shell strProgram, vbMinimizedNoFocus
       DoEvents
       StartServer = FindWindow(strClassName, 0&)
   End If
End Function
'*********************************************************************
' Posts a WM_CLOSE message to an application
'*********************************************************************
Public Sub CloseApp(hWnd As Long)
   Const WM_CLOSE = &H10
   PostMessage hWnd, WM_CLOSE, 0, 0&
End Sub
contains the minimum amount of code needed to display the splash screen.
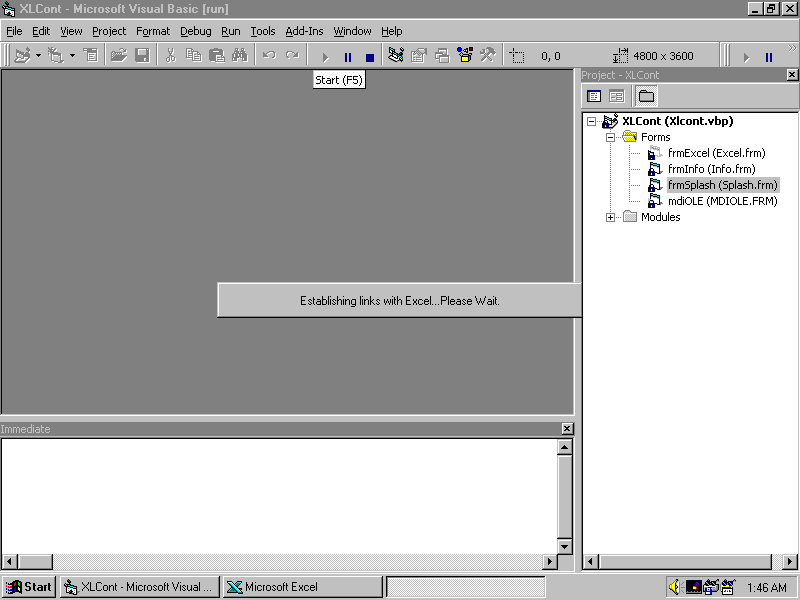
This form (Figure 26.3) gives the user "visual candy" during long processing times. A splash screen reassures users that their system has not locked up during heavy processing.
Splash screens give users "visual candy" during lengthy operations.
Listing 2.3 - SPLASH.FRM - Splash Screens Help Calm Users' Fears that Your Application Has Locked Up
'*********************************************************************
' FRMSPLASH - This is just a splash form that is used to display
'             messages to the user during long processes.
'*********************************************************************
Option Explicit
'*********************************************************************
' Declare SetWindowPos so this window can be "AlwaysOnTop".
'*********************************************************************
Private Declare Sub SetWindowPos Lib "user32" (ByVal hWnd As Long, _
   ByVal hWndInsertAfter As Long, ByVal X As Long, ByVal Y As Long, _
   ByVal cx As Long, ByVal cy As Long, ByVal wFlags As Long)
'*********************************************************************
' Initialize the form.
'*********************************************************************
Private Sub Form_Load()
   Const HWND_TOPMOST = -1
   Const SWP_NOMOVE = 2
   Const SWP_NOSIZE = 1
   Const FLAGS = SWP_NOMOVE Or SWP_NOSIZE
   '*****************************************************************
   ' Set the mouse pointer.
   '*****************************************************************
   Screen.MousePointer = vbHourglass
   '*****************************************************************
   ' Set the window to TopMost, and ignore the return value.
   '*****************************************************************
   SetWindowPos hWnd, HWND_TOPMOST, 0, 0, 0, 0, FLAGS
   '*****************************************************************
   ' Reposition the label to the center of the form.
   '*****************************************************************
   lblMessage.Move (ScaleWidth - lblMessage.Width) / 2, _
                   (ScaleHeight - lblMessage.Height) / 2
End Sub
'*********************************************************************
' Restore the mouse pointer.
'*********************************************************************
Private Sub Form_Unload(Cancel As Integer)
   Screen.MousePointer = vbDefault
End Sub
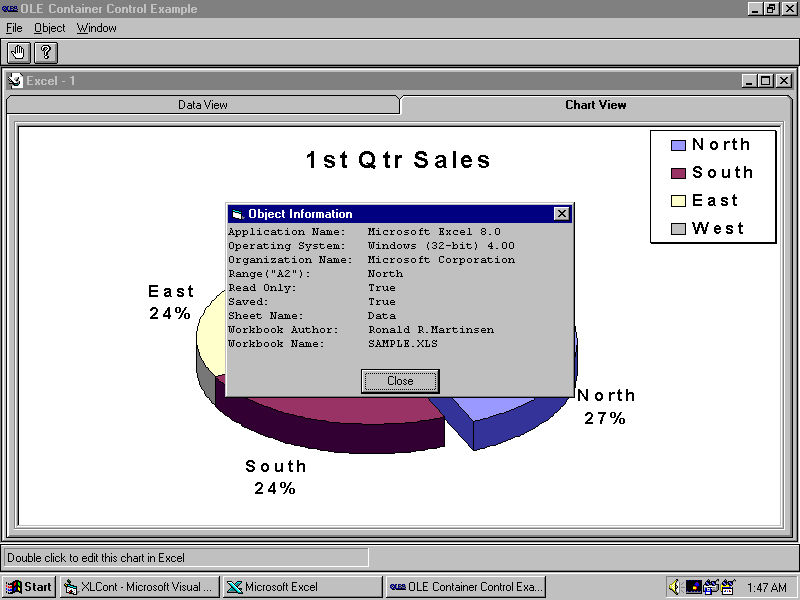
contains code to size frmSplash and its command button. This form displays information, gathered through OLE Automation, about the linked OLE object in this application (see Figure 26.4).
The Object Information dialog box displays data gathered via OLE Automation using the control's Object property.
Listing 26.4 - INFO.FRM - Information Dialog Boxes Should Contain Little to No Code
'*********************************************************************
' FRMINFO.FRM - This is essentially a "stupid" dialog used by
'               frmExcel. Its only purpose is to display information.
'*********************************************************************
Option Explicit
'*********************************************************************
' Initialize the form so that it can hold 10, 40 char lines.
'*********************************************************************
Private Sub Form_Load()
   '*****************************************************************
   ' Get the height and width of a character to set the form size.
   '*****************************************************************
   Width = TextWidth(String(50, "X"))
   Height = TextHeight("X") * 14
   '*****************************************************************
   ' Move the command button to the bottom center of the form.
   '*****************************************************************
   With cmd
       .Move (ScaleWidth - .Width) / 2, ScaleHeight - .Height - 10
   End With
End Sub
'*********************************************************************
' Always unload this form, since it loads so fast.
'*********************************************************************
Private Sub cmd_Click()
   Unload Me
End Sub
is the MDI parent. This form contains code that starts Excel, if necessary, and maintains the toolbar and the status bar (see Figure 26.5). You develop the toolbar and status bar, shown in Figure 26.5, entirely in Visual Basic by using picture boxes and image controls. You use no custom controls, so your application loads faster and your distribution disk is smaller. This is important when you are writing large applications, because every control in your project increases the startup time.
The MDI form contains only a minimal menu, a toolbar, and status bar.
Listing 26.5 - MDIOLE.FRM - An MDI Form Should Only Manage Itself and Load the First Child Form
'*********************************************************************
' MDIOLE.FRM - MDI Parent Form.
'*********************************************************************
Option Explicit
Private mlngStartedExcel As Long
'*********************************************************************
' Saves the button image in imgHold, and inserts the down picture.
'*********************************************************************
Private Sub imgTools_MouseDown(Index As Integer, Button As Integer, _
                          Shift As Integer, X As Single, Y As Single)
   imgHold.Picture = imgTools(Index).Picture
   imgTools(Index).Picture = imgTools(Index + 1).Picture
End Sub
'*********************************************************************
' Updates the status bar.
'*********************************************************************
Private Sub imgTools_MouseMove(Index As Integer, Button As Integer, _
                          Shift As Integer, X As Single, Y As Single)
   UpdateStatus lblStatus, imgTools(Index).Tag
End Sub
'*********************************************************************
' Restores the graphic, and processes toolbar clicks.
'*********************************************************************
Private Sub imgTools_MouseUp(Index As Integer, Button As Integer, _
                        Shift As Integer, X As Single, Y As Single)
   '*****************************************************************
   ' Restore the toolbar picture.
   '*****************************************************************
   imgTools(Index).Picture = imgHold.Picture
   '*****************************************************************
   ' Execute the appropriate toolbar action.
   '*****************************************************************
Select Case Index
   Case 0 ' Hand
       Unload Me
   Case 2 ' Question Mark
       '*************************************************************
       ' Bring up the splash form again, because the first OLE
       ' Automation call will require Excel to be started. After
       ' it is started, any subsequent calls will be performed
       ' as fast as they would be in a native Excel macro.
       '*************************************************************
       frmSplash.lblMessage = _
       "Gathering OLE Automation information from Excel...Please Wait!"
       frmSplash.Show
       frmSplash.Refresh
       '*************************************************************
       ' Load the info dialog, and start printing to it.
       '*************************************************************
       Load frmInfo
       '*************************************************************
       ' NOTE: Using the OLE Container's Object property, you can
       '       execute OLE Automation statements on the object in
       '       the control.
       '*************************************************************
       ' Cache a couple helpful object to prevent unnecessary OLE
       ' automation lookups.
       '*************************************************************
       Dim objExcelSheet As Object, objExcelApp As Object
       Dim objExcelWorkbook As Object
       '*************************************************************
       ' Although the Class property contains Excel.Sheet, beginning
       ' with Excel 97, all embedded Excel objects are now Workbooks.
       ' Since we will be making multiple calls to the Workbook
       ' object, we will cache this variable.
       '*************************************************************
       Set objExcelWorkbook = ActiveForm.Excel(0).Object
       '*************************************************************
       ' We will also be making a few calls to the worksheet object,
       ' so we should cache it to by retrieving a pointer to the
       ' active worksheet via the ActiveSheet method of the workbook
       ' object.
       '*************************************************************
       Set objExcelSheet = objExcelWorkbook.ActiveSheet
       '*************************************************************
       ' Query Excel for the information and send the results off
       ' to a helper function that will print the results to a
       ' form.
       '*************************************************************
       With objExcelSheet.Application
           PrintMessage "Application Name:", _
               .Name & " " & _
               .Version

           PrintMessage "Operating System:", _
               .OperatingSystem

           PrintMessage "Organization Name:", _
               .OrganizationName
       End With

       PrintMessage "Range(""A2""):", _
           objExcelSheet.Range("A2")

       PrintMessage "Read Only:", _
           objExcelWorkbook.ReadOnly

       PrintMessage "Saved:", _
           objExcelWorkbook.Saved

       PrintMessage "Sheet Name:", _
           objExcelSheet.Name

       PrintMessage "Workbook Author:", _
           objExcelWorkbook.Author

       PrintMessage "Workbook Name:", _
           objExcelWorkbook.Name
       '*************************************************************
       ' Make sure all activity is complete, before unloading the
       ' the splash.
       '*************************************************************
       DoEvents
       Unload frmSplash
       '*************************************************************
       ' Display the information to the user.
       '*************************************************************
       frmInfo.Show vbModal
End Select
End Sub
'*********************************************************************
' Print the formatted string to frmInfo.
'*********************************************************************
Private Sub PrintMessage(strItem As String, varResult As Variant)
   Dim strLeft As String * 20, strRight As String * 30
   strLeft = strItem
   strRight = varResult
   frmInfo.Print strLeft & strRight
End Sub
'*********************************************************************
' Prepares the application for use.
'*********************************************************************
Private Sub MDIForm_Load()
   Dim strXLClassID As String, strXLPath As String
   '*****************************************************************
   ' Always use the system defined backcolor.
   '*****************************************************************
   BackColor = vb3DFace
   picStatusBar.BackColor = vb3DFace
   Toolbar.BackColor = vb3DFace
   '*****************************************************************
   ' Lookup the location of Excel in the registry by getting its
   ' class id (a GUID) and then finding that GUID in the CLSID
   ' section. Once you've found it, then just take the default
   ' value from the LocalServer (or LocalServer32) entry.
   '*****************************************************************
   strXLClassID = GetRegString(HKEY_CLASSES_ROOT, "Excel.Sheet\CLSID", "")
   strXLPath = GetRegString(HKEY_CLASSES_ROOT, _
       "CLSID\" & strXLClassID & "\LocalServer", "")
   '*****************************************************************
   ' If necessary, start Excel to prevent annoying message boxes.
   '*****************************************************************
   mlngStartedExcel = StartServer("XLMAIN", strXLPath)
   WindowState = vbMaximized
   CreateNewWindow
   Arrange vbTileHorizontal
End Sub
'*********************************************************************
' Updates the status bar with the default text.
'*********************************************************************
Private Sub MDIForm_MouseMove(Button As Integer, Shift As Integer, _
                                           X As Single, Y As Single)
   UpdateStatus lblStatus
End Sub
'*********************************************************************
' If you had to start Excel, then close it. Otherwise, leave it alone.
'*********************************************************************
Private Sub MDIForm_Unload(Cancel As Integer)
   If mlngStartedExcel Then CloseApp mlngStartedExcel
End Sub
'*********************************************************************
' Terminates the application.
'*********************************************************************
Private Sub mnuFileItems_Click(Index As Integer)
   Unload Me
End Sub
'*********************************************************************
' Updates the status bar with the default text.
'*********************************************************************
Private Sub StatusBar_MouseMove(Button As Integer, Shift As Integer, _
                                            X As Single, Y As Single)
   UpdateStatus lblStatus
End Sub
'*********************************************************************
' Adds a 3D appearance to the status bar.
'*********************************************************************
Private Sub picStatusBar_Paint()
   HighlightBar picStatusBar
   Highlight picStatusBar, lblStatus
End Sub
'*********************************************************************
' Updates the status bar with the default text.
'*********************************************************************
Private Sub Toolbar_MouseMove(Button As Integer, Shift As Integer, _
                                           X As Single, Y As Single)
   UpdateStatus lblStatus
End Sub
'*********************************************************************
' Adds a 3D appearance to the toolbar.
'*********************************************************************
Private Sub Toolbar_Paint()
   HighlightBar Toolbar
End Sub
'*********************************************************************
' Adds a 3D effect to a picture box.
'*********************************************************************
Private Sub HighlightBar(picBar As PictureBox)
   With picBar
       picBar.Line (0, 5)-(.ScaleWidth, 5), vb3DHighlight
       picBar.Line (0, .ScaleHeight - 15)-(.ScaleWidth, _
           .ScaleHeight - 15), vb3DShadow
   End With
End Sub
'*********************************************************************
' Adds a 3D border around a control.
'*********************************************************************
Private Sub Highlight(ctlSurface As Control, ctlSource As Control)
   Const HORIZONTAL_OFFSET = 50
   Const VERTICAL_OFFSET = 70
   With ctlSource
       '*************************************************************
       ' Top
       '*************************************************************
       ctlSurface.Line (.Left - HORIZONTAL_OFFSET, .Top - _
           HORIZONTAL_OFFSET)-(.Width, .Top - HORIZONTAL_OFFSET), _
           vb3DShadow
       '*************************************************************
       ' Left
       '*************************************************************
       ctlSurface.Line (.Left - HORIZONTAL_OFFSET, .Top - _
           HORIZONTAL_OFFSET)-(.Left - HORIZONTAL_OFFSET, .Height _
           + VERTICAL_OFFSET), vb3DShadow
       '*************************************************************
       ' Bottom
       '*************************************************************
       ctlSurface.Line (.Left - HORIZONTAL_OFFSET, .Height + _
           VERTICAL_OFFSET)-(.Width, .Height + VERTICAL_OFFSET), _
           vb3DHighlight
       '*************************************************************
       ' Right
       '*************************************************************
       ctlSurface.Line (.Width, .Top - HORIZONTAL_OFFSET)-(.Width, _
                      .Height + VERTICAL_OFFSET + 15), vb3DHighlight
   End With
End Sub
is the child form. This form is the heart of the application, because it contains all the code necessary to display the data and tabs. It also keeps the status bar up to date when the user moves the mouse around the screen.
Listing 26.6 - EXCEL.FRM - In an MDI Application, Most Code Should Reside in the Child Form
'*********************************************************************
' EXCEL.FRM - MDI Child form with a OLE container control.
'*********************************************************************
Option Explicit
'*********************************************************************
' The RECT and GetClientRect decs are required for PositionFrame.
'*********************************************************************
Private Type RECT
   rLEFT As Long
   rTOP As Long
   rWIDTH As Long
   rHEIGHT As Long
End Type
Private Declare Sub GetClientRect Lib "user32" (ByVal hWnd As Long, _
   lpRect As RECT)
'*********************************************************************
' Gets the client area of a frame, and sizes an object to it.
'*********************************************************************
Private Sub PositionFrame(fraSource As Frame, ctlChild As Control)
Dim Client As RECT, X As RECT
   GetClientRect fraSource.hWnd, Client
   With Client
       X.rLEFT = (.rLEFT * Screen.TwipsPerPixelX) + 50
       X.rTOP = (.rTOP * Screen.TwipsPerPixelY) + 150
       X.rWIDTH = (.rWIDTH * Screen.TwipsPerPixelX) - 90
       X.rHEIGHT = (.rHEIGHT * Screen.TwipsPerPixelY) - 190
   End With
   ScaleMode = vbTwips
   ctlChild.Move X.rLEFT, X.rTOP, X.rWIDTH, X.rHEIGHT
   ScaleMode = vbPixels
End Sub
'*********************************************************************
' Forces Excel to be the topmost window when you double-click.
'*********************************************************************
Private Sub Excel_DblClick(Index As Integer)
   Excel(Index).Object.Application.Visible = True
End Sub
'*********************************************************************
' Initializes this form instance. This code is also called every time
' a new form is created.
'*********************************************************************
Private Sub Form_Load()
   '*****************************************************************
   ' Establishing links takes a few minutes, so give the user
   ' something to look at.
   '*****************************************************************
   With frmSplash
       .lblMessage = "Establishing links with Excel...Please Wait."
       .Show
       .Refresh
   End With
   '*****************************************************************
   ' Always create your recreate links in case the program has been
   ' moved. In a real program, you should NEVER hard-code your links.
   '*****************************************************************
   Excel(0).CreateLink App.Path & "\" & "SAMPLE.XLS!R1C1:R5C5"
   Excel(1).CreateLink App.Path & "\" & "SAMPLE.XLS!Pie"
   '*****************************************************************
   ' Call DoEvents to process the links, and to prevent the splash
   ' screen from disappearing prematurely.
   '*****************************************************************
   DoEvents
   Unload frmSplash
End Sub
'*********************************************************************
' Updates the status bar with the default text.
'*********************************************************************
Private Sub Form_MouseMove(Button As Integer, Shift As Integer, _
                                            X As Single, Y As Single)
   UpdateStatus mdiOLE.lblStatus
End Sub
'*********************************************************************
' This procedure controls the tab redrawing to handle switching.
'*********************************************************************
Private Sub Form_MouseUp(Button As Integer, Shift As Integer, _
                                           X As Single, Y As Single)
   Dim intRes As Integer
   intRes = Abs(DrawTabs(Me, X, Y) - 1)
   If intRes < 2 Then Tabs(intRes).ZOrder
End Sub
'*********************************************************************
' Repositon the frames and resize the tabs.
'*********************************************************************
Private Sub Form_Resize()
   Dim sngActivateTab As Single
   '*****************************************************************
   ' When the form is resized, the tabs must be rescaled to fit.
   '*****************************************************************
   SetupTabs Me, 2
   '*****************************************************************
   ' Position the OLE Containers to fit inside the frames.
   '*****************************************************************
   PositionFrame Tabs(0), Excel(0)
   PositionFrame Tabs(1), Excel(1)
   '*****************************************************************
   ' SetupTabs will make the first tab active. Determine which
   ' tab should be active, and send it a MouseUp event.
   '*****************************************************************
   sngActivateTab = IIf(gintXLInstances = 0, 10, _
                    ((ScaleWidth - 2) / 2) + 100)
   Form_MouseUp 0, 0, sngActivateTab, 20
End Sub
'*********************************************************************
' The following code demonstrates how to close a workbook without
' being prompted to save the changes.
'*********************************************************************
Private Sub Form_Unload(Cancel As Integer)
   Excel(0).Object.Saved = True
End Sub
'*********************************************************************
' Handles clicks from the File Submenu.
'*********************************************************************
Private Sub mnuFileItems_Click(Index As Integer)
   On Error Resume Next
   Select Case Index
       Case 1 'New
           CreateNewWindow
       Case 3 'Exit
           Unload mdiOLE
   End Select
End Sub
'*********************************************************************
' Handles clicks from the Object Submenu.
'*********************************************************************
Private Sub mnuObjectItems_Click(Index As Integer)
   Select Case Index
       Case 1 'Update Links
           Excel(0).Update
           Excel(1).Update
       Case 2 'Close Object
           Excel(gintXLInstances).Close
   End Select
End Sub
'*********************************************************************
' Updates the status bar.
'*********************************************************************
Private Sub Excel_MouseMove(Index As Integer, Button As Integer, _
                          Shift As Integer, X As Single, Y As Single)
   UpdateStatus mdiOLE.lblStatus, Excel(Index).Tag
End Sub
'*********************************************************************
' Handles clicks from the Window Submenu.
'*********************************************************************
Private Sub mnuWindowItems_Click(Index As Integer)
   mdiOLE.Arrange Index - 1
End Sub
'*********************************************************************
' Set the gintXLInstances. This isn't foolproof, but it works for this
' demonstration. In the "real world," this wouldn't be enough.
'*********************************************************************
Private Sub Tabs_MouseMove(Index As Integer, Button As Integer, _
                          Shift As Integer, X As Single, Y As Single)
   gintXLInstances = Index
End Sub
In addition to all the code and forms in Visual Basic, the XLCONT.VBP project also includes some code inside Excel that enables the user to return to your application. includes the essential Excel macros.
Listing 26.7 - SAMPLE.XLS - Supporting Code in Excel Can Help in Two-Way Communication Between Your Applications
'*****************************************************************
' Returns control to your VB Program, and minimizes Excel.
'*****************************************************************
Sub ReturnToExample()
   On Error Resume Next
   AppActivate Title:="OLE Container Control Example"
   If Err Then MsgBox "The example program isn't open.", _
          vbInformation
   Application.WindowState = xlMinimized
End Sub
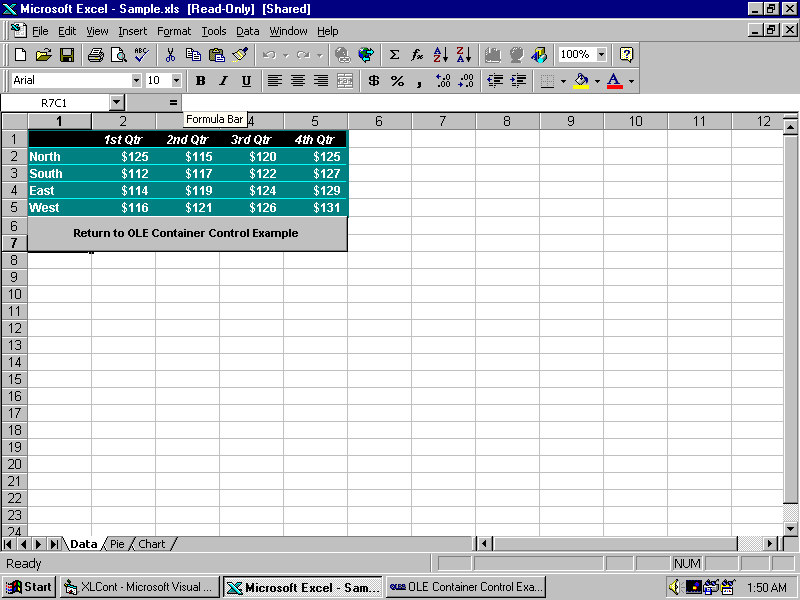
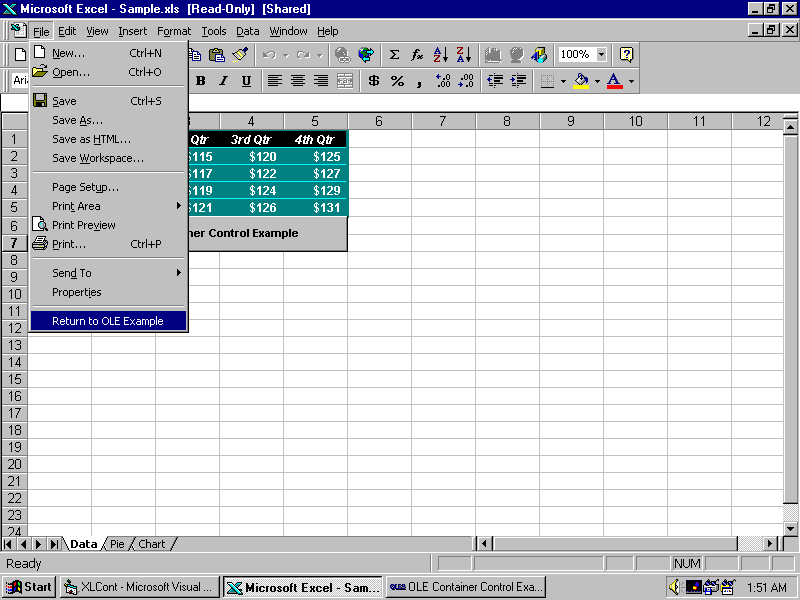
The ReturnToExample() procedure enables you to add a macro button to the worksheet, as shown in Figure 26.6. Such a button clearly shows users what they must do in order to return to your application. In addition, you can modify your menus (see Figure 26.7) to prevent users from closing the file or Excel. Notice how the Exit menu item has been removed.
When using linked objects, you usually should give the user a viable way to return to your application.
Modifying Excel's menus can help ensure that users can't do anything they shouldn't.