Frames, Reference
The main window of Probe is divided into nonoverlapping 'frames'. Each frame has a Probe component in it, such as a Folder Browser, a Location Bar etc. The frames are separated from each other by edges. You use the mouse and the keyboard in a frame just as you would with any other window type.
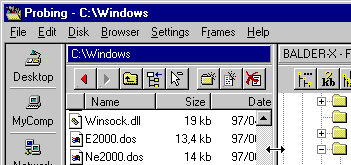
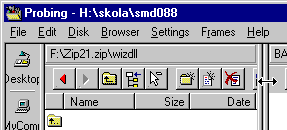
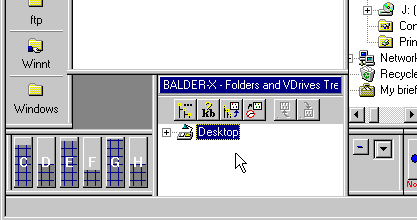
When you want to change the size of a frame, move the mouse cursor over the frame, towards an edge, so that it turns into double arrow symbol as in fig 1. Press the left mouse button and drag the edge. Then release the left mouse button.
Fig 1: Taking hold of the edge

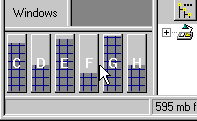
Fig 2: The edge has been dragged and released
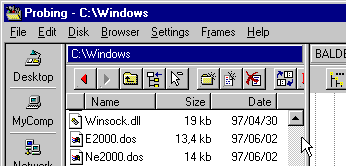
When taking hold of an edge at the intersection of two edges, both a horizontal and vertical edge is dragged. All frames attached to the two edges are resized.
When you resize the main application window, all frames within it are scaled in proportion to the main window. Some frame types responds by scaling their contents when resized. Other components respond by updating their scrollbar status accordingly.
The Probe main window has a minimum size of 400x300 pixels.
Fig 3: Resizing the Probe main window

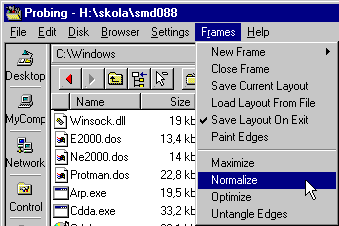
All commands for creating and closing frames etc, are available in the 'Frames' pull-down menu. There are also commands for loading/saving the frame layout state to a file in this menu.
Fig 4: The Frames pull-down menu
Every frame has a popup menu which appear when clicking with the right mouse button in the frame. At the bottom of this menu, below the last separator, some commands for frames are available.
Fig 5: Every frame has a popup menu
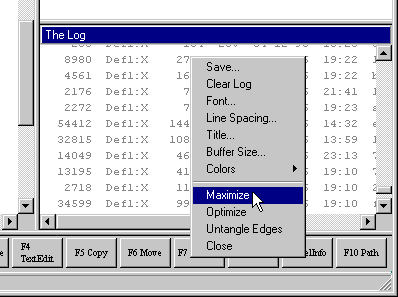
At least some of the commands 'Maximize', 'Normalize', 'Optimize', 'Untangle edges', 'Close' are available in all frame popup menus. These commands are common for all different frame types.
Above the separator in fig 4 (from 'Colors' and up), are commands which are specific for the specific frame type, in this case the Log Window.
As can be seen in fig 4, the frame commands are also in the 'Frames' pull-down menu.
NOTE: In a Folder Browser, or in a Tree Browser, you must click the right mouse button in a area which has background color for this menu to appear. Otherwise a popup menu specific to the file/folder being clicked appears.
If you temporarily want to focus on a specific frame, you can maximize it, so it occupies the full application window. You do this by selecting 'Maximize' in the frame popup or pull-down menu.
NOTE: Not all frame types can be maximized.
Fig 6: Before maximizing the frame
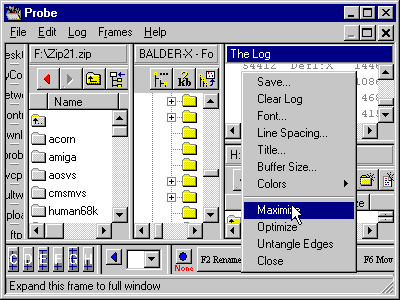
Fig 7: After maximizing the frame
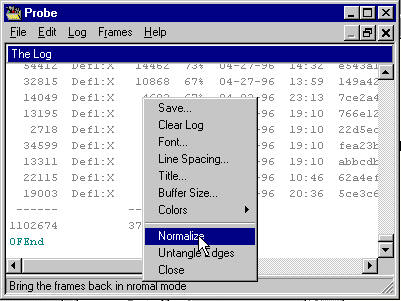
You return to the normal frame layout by invoking the item 'Normalize'
Frames can be created and destroyed. When creating a new frame, there must first be some free area to put it in. This is done by splitting edges and the dragging edges.
If two frames are next to each other they share an edge. Such edges can be split by double-clicking them, with either left or right mouse button.
Fig 8: Putting the mouse over a shared edge
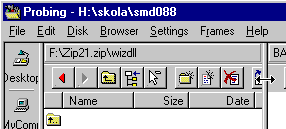
Fig 9: Splitting the edge by double-clicking
Untangling the Edges of a Frame
Frames next to each other typically share edges. A frame can also share it's edges with main window border, or with the status bar or the menu bar.
When making room for new frames you must drag edges so that free space is created. This is best done when the dragged edge is used by only one frame.
Through selecting the 'Untangle Edges' alternative in the frames popup menu, all four edges of a frame are separated from it's neighbor frames, or 'Untangled'.
Fig 10: About to untangle edges of the Disk Monitor
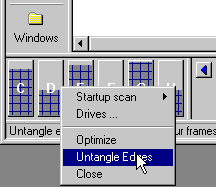
Fig 11: After untangling the edges
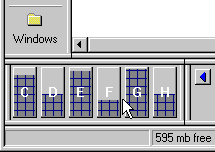
After untangling edges or splitting shared edges, they can easily be dragged to provide free window area for a new frame.
Fig 12: Preparing free space by dragging edges
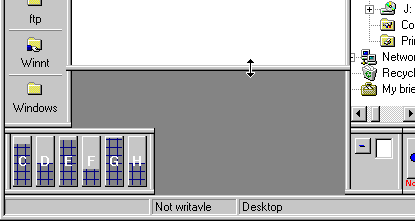
After providing free window area we're ready to create a new frame. We do this by clicking the right mouse button in the free area where we want to position the new frame. A popup menu appears and we choose the type of the new frame.
NOTE: Some frame types, such as Command Prompt, Function Bar etc, can only exist in a single instance.
NOTE: Some frame types cannot be created if the free area is too small.
Fig 13: Selecting a new frame typee
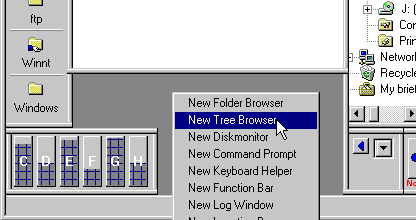
Fig 14: New frame was successfully created
Frames can also be created through the pull-down menu 'Frames', submenu 'New Frame', then selecting the frame type. In this case the new frame is created where the largest free window area is found.
If you want the edges of two close frames to join into a shared edge, you just drag one of the edges, so that it clearly overlaps with the other edge. When releasing the mouse button the two edges will merge into a single edge.
Edges are merged with window borders, the status bar, the menu bar in the same way.
Fig 15: Merging two edges by dragging
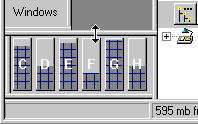
Fig 16: After merging three edges
Optimizing the Area of a Frame
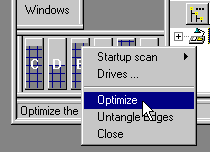
The merging of edges performed in the previous paragraph can also be done through the 'Optimize' command found on the frame popup menu. This command enlarges the frame as much as possible, by merging edges, and occupying free window area surrounding it.
Fig 17: Before selecting the 'Optimize' command
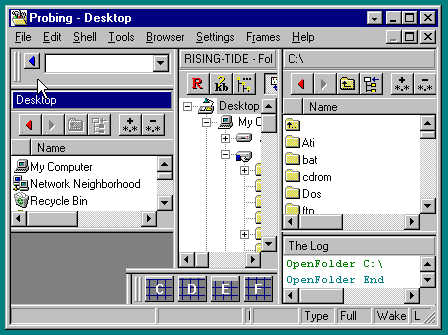
Individual frames can be dragged within the Probe main window. As the frame is dragged, Probe will suggest distinct locations in the main window, where the can be moved to.
To drag a frame:
NOTE: For frames that have a caption (a frame title), the caption bar serve as a drag handle.
NOTE: Any frame can be moved by pressing the ALT button and dragging the frame using the right mouse button.
Fig 18: About to drag a frame (lower left part of figure)
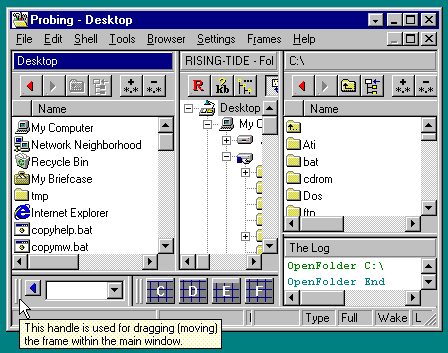
Fig 19: The mouse cursor has been changed to the frame drag symbol
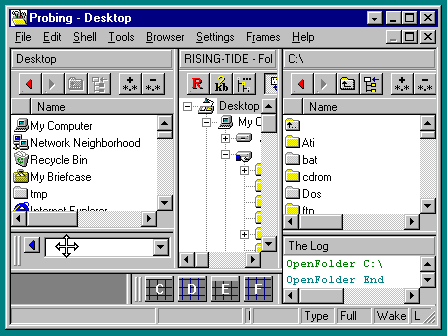
Fig 20: Releasing the mouse button ends frame dragging
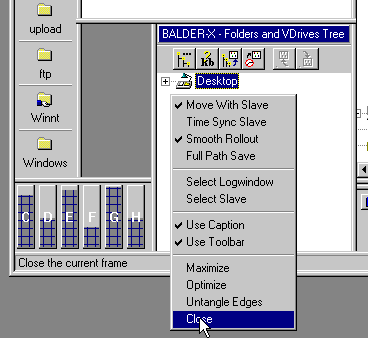
Closing a frame can be done either by selecting 'Close' in the frame popup menu, or by clicking the same alternative in the 'Frames' pull-down menu.
Fig 21: About to close a frame:
Up to now, only ways of manipulating individual frames have been discussed. From now on we'll deal with commands handling the layout of all frames in the Probe main window. These commands are available in the frames pull-down menu (see fig 21) or in the extra caption menu (see fig 22). These commands are:
Fig 21: Commands for manipulating main window layouts (clickable)

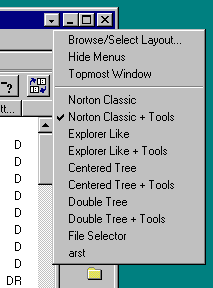
The extra caption menu ![]() is located (fig 22) to the left
of the three buttons for minimizing
is located (fig 22) to the left
of the three buttons for minimizing ![]() , maximizing
, maximizing ![]() and closing
and closing ![]() windows. It provides quick
access to frame commands that affect the state of the entire main window. It's main
purpose is to allow for quickly swapping to another main window layout.
windows. It provides quick
access to frame commands that affect the state of the entire main window. It's main
purpose is to allow for quickly swapping to another main window layout.
This menu can be used for example to quickly switch the layout of Probe into Norton Commander emulation mode, or to MS Explorer emulation mode, ...etc. Also, personal main window layouts can be created and added to this menu.
Fig 22: The extra caption menu (clickable)
These two commands deal with saving/loading the layout of the main window to Probe layout files (*.str).
This command allows for loading a Probe main window layout that was previously saved to disk. With this command, the looks of the layout cannot be previewed before loading it. The Browse/Select Frame Layout functionality provides a more interactive method of managing different main window layouts.
By invoking this command, the current main window layout is saved to a file. The state of all frames of the main window is stored. This layout file can be loaded at a later time, or on some other computer. The filename should have the suffix .str. Again, the Browse/Select Frame Layout provides a more intuitive way of handling layouts.
If this option is checked, the layout is saved each time Probe is closed. If you don't want to save any updates to the layout at program termination, clear this setting.
This setting (nr two from the top of the menu in fig 23) enables hiding the main window menu. This is useful for conserving screen area.
When the window menus have been hidden, the 'Hide Menus' item is replaced by the 'Show Menus' item. After hiding the main window menus, you can still access them through the sub menu 'Window Menus', see fig 23.
Fig 23: After hiding the main window menus
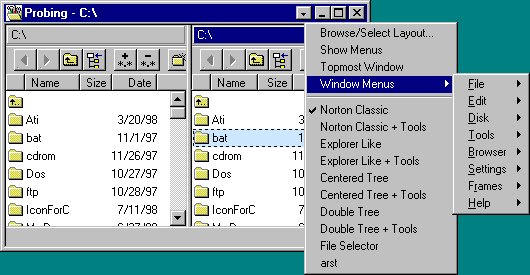
This is a setting to turn Probe into a 'topmost' window. With this setting, all ordinary windows will appear behind Probe, even when they are activated and have input focus.
The 'Topmost Window' setting is toggled from this menu.
Through the functionality discussed in this section, one can visually browse several pre-fabricated main window layouts. Without loading the layout, a preview image of the layout is available, a component listing for the layout, a comment for the layout and also a recommended screen resolution (in pixels) for using the layout.
The available main window layouts are browsed using the dialog of fig 25. The purpose of this dialog is to maintain a list of available main window layouts, allow the layouts to be previewed, and to add and remove layout items from this list.
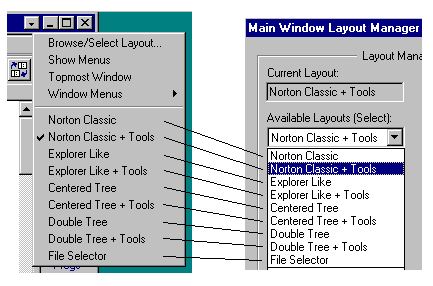
The items in the layout list in fig 25 (in the combo box) are also available for quick layout selection in the extra caption menu (fig 24).
Fig 24: The same list of layout items in two places:
The dialog for browsing, selecting and manipulating layouts (fig 25) is either invoked from the extra caption menu (topmost item fig 24, fig 23) or from the Frames pull-down menu (see fig 21). Selecting a layout using this dialog is a three step process:
Fig 25: The Main Window Layout Manager dialog (clickable)
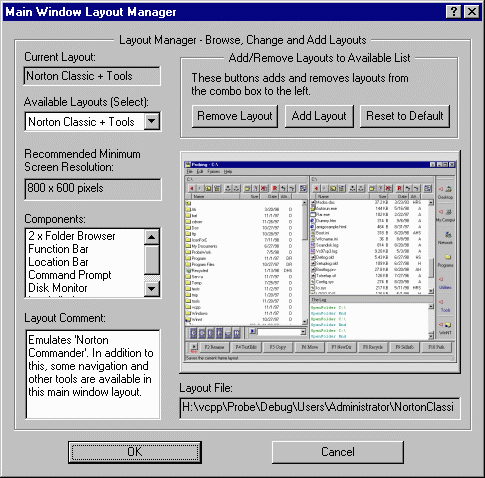
This is the name of the layout that is currently used in the Probe main window.
This combo-box contains a listing of all layout items that are available. When selecting a layout item in the combo-box, the preview image, the component list, ...etc, are updated to show details about the selected item.
To use a layout selected in the combo-box in the main window, press 'OK' after selecting it.
Recommended Minimum Resolution
When having to many Probe components in a small main window, the result is cluttered. To provide a hint to a layout user, a recommended minimum screen resolution is included with each layout item.
This is a list of the frame types (Probe components) that make up the main window layout being previewed.
This is a comment on the layout being previewed.
Add/Remove Layouts to Available List
It is possible to add and remove items from the list of available main window layouts. One way to add new layouts is to modify the appearance of the main window, and than make a snapshot of it.
Pressing this button will remove the layout currently being previewed from the list of layout items.
This opens the New Layout dialog, that enables creating and adding new layout items to the layout list.
Press this button to reset the layout list to its original state. After doing so, the layout list only contains the layouts that were available after program installation.
This is an image providing a down scaled preview image, representing what the layout looks like, when activated.
This is the path of the file (*.str) containing the layout description.
Press 'OK' to actually load the layout selected and previewed as described above. When doing so, all current frames are closed, the main window is repositioned, and new frames for the selected layout are created.
NOTE: Layouts cannot be loaded while file operations are in progress.
Press 'Cancel' to exit this dialog, without changing main window layout.
This dialog is invoked from the Main Window Layout Manager dialog. It is used to add layout items to the list of available main window layouts. A layout item can be added in one of two ways:
or
Fig 26: The New Layout dialog (clickable)
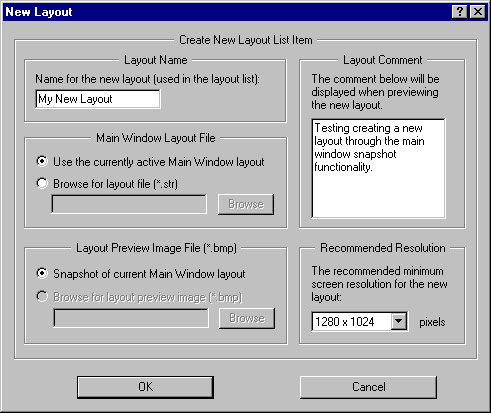
This is the name used when presenting this layout in the list of available main window layouts.
Each layout item is associated with a layout description file (*.str). This file can come from two places when creating new layout items:
Use the currently active Main Window layout
With this option set, Probe makes uses the currently active main window layout as layout description file. See Snapshot method (1) above.
Browse for layout file (*.str)
With this option set, the user must browse for and locate a previously saved *.str file to be used as layout description.
When browsing the available main window layouts, preview image files (*.bmp) of them are presented. This preview image can be:
Snapshot of current Main Window layout
With this option set, Probe uses a snapshot image of the current state of the main window.
Browse for layout preview image (*.bmp)
With this option set, the user must browse for and select a BMP image to be used as preview image.
This is a comment providing a hint to a user of the layout about its properties.
When having to many Probe components in a small main window, the result is cluttered. To provide a hint to a layout user, a recommended minimum screen resolution is included with each layout item.
Press 'OK' to actually create a new layout item, and add it to the list of available main window layouts.
Press 'Cancel' to exit this dialog without creating a new layout item.
It is possible to change main window layout, without using the Main Window Layout Manager. In the extra caption menu, all layout items that are available in the layout manager, are also available. The currently active main window layout is checked.
Changing main window layout in this way is accomplished through:
Fig 27: Quick layout selection using the extra caption menu (left).

Next: Frames, Hints
Back: Frames