![]()
In addition to its conversational capabilities, Internet Phone Release 5 provides a complete interactive environment to enhance your conversations.
The full suite of multimedia features include:
| NOTE To use the Internet Phone data sharing features with another user, the other user must have Internet Phone Release 4 or higher. |
You and your partner can view each other in live motion video while conducting an Internet Phone conversation. If you have the proper video equipment, you can both transmit and receive video. Your partner will receive your transmitted video even if he/she does not have a video device.
The Self View window displays your picture (or the focus of your installed video device). The person that you call will see the contents of your Self View window on his/her screen.
For instructions on setting up the Self View window, see Setting Up the Video.
To open the Self View window
![]() Check the Self View command from
the Options menu.
Check the Self View command from
the Options menu.
| TIP If Self View is selected when you quit Internet Phone, the video window will be displayed automatically when you run Internet Phone again. |
After completing the Video setup, click the Video icon in the Internet Phone window to automatically transmit and receive video each time you begin a conversation.
Received video frames are viewed on the main window, replacing the Animated Assistant. You can detach the Remote View window and enlarge the video size of your received video frames.
To enlarge the size of your received video frames
The Video icons on the Internet Phone window show you the status of your transmitted and received video frames during a conversation; the camera icon shows if you can transmit video and the monitor icon displays if you can receive video from others.
| TIP You can see other users video capabilities on the VocalTec Community Browser user list. The video icons indicating the capability: a user with a camera icon indicates video transmitting capabilities, and a monitor icon indicates video receiving capabilities. |
While talking, you can disable either or both receiving and transmitting video by clicking on the buttons. If one of the buttons is dimmed, it means that the other user has either disabled receiving or sending video or does not have these capabilities.
| With
Internet Phone you can send and receive voice mail, edit
your messages, and send text messages as well. These activities are done via the Internet Phone Voice Mail window shown here. You receive your voice mail in your regular e-mail program. To listen to incoming messages, use the Voice Mail Player included with the Internet Phone software. |
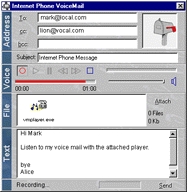 |
|
To access the Internet Phone Voice Mail
Do one of the following:
| Click the Voice Mail tool button in the Internet Phone window. | |
| Choose Voice Mail... from the Phone Menu. | |
| Right-click a user's entry (e.g., in the Community Browser, NetPals or Session list etc.) and choose Send Voice Mail. |
The following steps lead you through the process of creating and sending a new voice mail message:
| Type the recipient e-mail address | |
| Enter a subject (optional) | |
| Record your message | |
| Add a text message (optional) | |
| Add a file attachment (optional) | |
| Send your voice mail message with text and file attachments | |
| Attach the Voice Mail Player (optional) |
To select recipients and secondary recipients
Do one of the following:
| Type the e-mail address of the person to whom you want to send voice mail in the To: box. Type the e-mail address of the secondary recipient in the cc: box or of a hidden secondary recipient in the bcc: box. | |
| Bcc means blind carbon copy. Primary and secondary recipients will not see the bcc names. If you type more than one name in the bcc: text box, recipients will see only their own name in that box; that is, their names are hidden from each other. | |
| Click the To: button. From the Personal Directory folder, select a person and click the Open button at the bottom of the dialog box. If the selected person has a valid e-mail address, it is displayed in the To: box in the Internet Voice Mail window. For secondary recipients click the cc: or the bcc: buttons and select people from the Personal Directory folder. |
You can type more than one address into each text box.
To Enter a subject
To title your message or briefly describe the subject, type this information into the Subject box in the Address panel. This information is optional.
To record a message
To play back a message
| Play back the recorded message using the Pause, Rewind, Forward and Play buttons. | |
| The Message Line displays the message Playing.... |
You can adjust the volume level using the Volume Slider. Drag the slider to the right to increase the volume.
During playback, the number to the left of the Time Bar shows the elapsed playing time of your recorded message.
If you do not hear yourself through your speakers during playback, check the microphone connection and sound card configuration.
To add a text message to your voice mail
![]() Type your message into the text box just as you
would with a regular e-mail message. Use the scroll bar to scroll
text.
Type your message into the text box just as you
would with a regular e-mail message. Use the scroll bar to scroll
text.
To add a signature to the end of your message
To attach a file(s)
Click the Attach button and choose File... to open the Select File To Attach dialog box. Do one of the following:
| Select the file you want to attach and click the Open button. | |
| Double-click the file you want to attach. |
The total amount and size of attached files is indicated on the right side of the File Attachment panel.
You can send the Voice Mail Player to recipients who do not have Internet Phone, see The Voice Mail Player.
It is recommended that you compress all non-text files before attachment.
To remove a file(s)
To send your message
![]() Click the Send button.
Click the Send button.
The Progress Bar and Message Line indicate that the voice mail is being sent.
The Send button switches to Cancel while sending; click it to stop the sending process.
The voice mail message may be composed of a text message, file attachment(s) and/or voice message; all are easily retrieved using your mailer application.
A voice mail that has been sent to you appears as an e-mail message with an attached voice file (Voice.VMF).
To listen to your voice mail message
Do one of the following:
| Double-click the voice file attachment (if your e-mail program enables you to open an attachment this way). | |
| Save the voice file attachment to your hard drive according to your mailer application's method. Double-click the voice file to open the Voice Mail Player and play the message. |
Use the Tape Recorder Controls Play, Forward, Rewind and Stop to replay the message.
You can send the Voice Mail players to Macintosh and Windows users, enabling even users who do not have the Internet Phone software to listen to your messages.
Attach the Voice Mail Player to your message by clicking the Attach button and choosing Attach PC Player (for Windows users) or Attach Mac Player (for Macintosh users) and send your voice out to family, friends and colleagues. After a quick installation process, they can listen to your message and save the player for future voice mail.
To assist these recipients, they will receive installation instructions together with the Voice Mail Player.
You can share text and graphics with another person by using the Whiteboard workspace, send and receive textual messages using the Text Chat window and transfer files to each other using the File Transfer feature.
All data sharing activities - Whiteboard, Text Chat and File Transfer - constitute a single data sharing session. Either you, or the person you are currently connected to, can start a data sharing session.
| NOTE You can participate in only one data sharing session at any one time and share data with only one user at a time. |
If you are engaged in a data sharing session with one user, and you want to share data with another user, you must end the data sharing session with the first user and start another one with the other.
To start a data session with another user
Do one of the following:
| Click on the Share Data icon at the bottom of the Internet Phone window. | |
| Select User from the Phone menu and check the Share Data command. |
This action will terminate any ongoing data sharing activities which involve other users.
The Internet Phone Whiteboard is a virtual workspace for sharing text, graphics and data in real-time with another user. The Whiteboard is ideal for visually describing ideas and concepts. You can import or capture graphics from other software or from your Web browser and show scanned photographs of family and friends.
Or, if you are using the Whiteboard to work collaboratively, you and the other user can use the Whiteboard tools to annotate (i.e., make comments or notes) on the contents of the workspace, without marking or changing the image or document. Some of the supported tools are: shape tools (arrowhead lines, rectangles, diamonds, ellipses), highlighters, pens, line draw and freehand erasers. Every change you make on your side of the Whiteboard will appear shortly on the other user's screen, and vice versa.
To access the Internet Phone Whiteboard
During an Internet Phone conversation, do one of the following to establish a whiteboard session:
| In the Internet Phone window, click the Whiteboard tool button. | |
| In the Internet Phone window, choose Whiteboard... from the Phone menu. |
Internet Phone Whiteboard is displayed and you can start sharing data.
All the tools for the Whiteboard are displayed in the side bar of the screen. They can also be activated from the Tools menu. Experiment by drawing a line, changing the color or thickness of the pen, adding text, drawing shapes, etc.
Internet Phone Whiteboard assigns ownership of annotations to the local machine on which they were made. To erase annotations do any combination of the following:
| Clear only your annotations by clicking the icon on the toolbar. | |
| Clear all the annotations on both participants' machines by clicking the icon on the toolbar. | |
| Use the freehand erase tool for minor errors. |
The Erase tool, Clear My and Clear All operations only clear annotations. None of them affect images or objects in the frame.
Internet Phone Whiteboard enables you to "snap'' or capture, any part of the Windows desktop or windows themselves.
To capture a region of the screen
To move the region
Do one of the following:
| Click the Object Select button. | |
| Click on the image. The image is now surrounded by a gray border. | |
| Drag the object around the whiteboard workspace. |
To delete the image
To save your work
Do one of the following:
| Click the Save icon. | |
| Select Save from the File menu. |
Frames are saved in "Conference'' file format and the file names have a .CFR extension.
During a conversation, you may want to exchange files. To send any file from your hard disk or local network to the other user, do one of the following:
| Click the File Transfer tool button in the Internet Phone window. | |
| Choose File Transfer... from the Phone menu. |
A dialog box appears from which you can select the file to transfer. Click the Open button. The Transfer File dialog box prompts you to Compress File Before Sending. It is recommended you check this option. Click the OK button in the Transfer File window to send the selected file to the person you are speaking with.
Either you, or the person you are currently connected to, can start a text chat session. This feature is useful when the Internet connection is slow, or you cannot hear each other well.
To access the Internet Phone Text Chat window
Do one of the following:
| Click the Text Chat tool button in the Internet Phone window. | |
| Choose Text Chat... from the Phone menu; Internet Phone Text Chat session and the Text Chat window open simultaneously on your screen and the other person's screen. | |
| Type your
message in the line at the bottom of the window and then
press the Enter key to send it. The
message is added to the window above, and the other user
can reply. |
| TIP You can copy and paste text to and from the Text Chat window using its Edit menu commands. You can also save your Text Chat session as a text file by choosing Save from the Text Chat window File menu. |