Portfolio Mappings give you the ability to extract text data that is embedded in source files fields other than the standard Description and Keywords fields.
Typically, software that allows you to add information to a file (Photoshop’s File Info is a good example) assigns a numeric ID, or Tag, to each field of embedded data. Using Portfolio’s Mappings feature you can map this field ID to a Custom Field in your catalog, and have Portfolio read the source file data into the Custom Field.
Portfolio provides currently known Tag Codes for popular formats (Photoshop, IPTC, TIFF). These are displayed in the Mappings tab (Catalog > Mappings), and listed in the Mappings section. But you are not limited to the pre-installed codes—you can add Tag codes from any software that supports this convention, and also add new codes as they become available.
To use Mapping, you must create a Custom Field (Catalog > Administration > Custom Fields tab) for each tagged field that you want to extract from item source files. If the ID Code for the source file Tag is already listed in the Mappings table, all you need to do is Edit the entry and add the Custom Field name that you want to map it to. If the necessary code is not listed in the table, you can add it to the Mappings list from the Cataloging Options - Mappings tab and then map it to your Custom Field.
To Enable or Disable an existing Mapping:
Note: Mappings must be created before they can be used. Refer to the following pages for instructions on creating catalog Mappings.
Tip for Mac OS: To quickly enable or disable mappings, click and drag in the checkmark column. This also works in the Action column.
From the Mappings list (Catalog > Cataloging Options: Mappings), select the Mapping that you want to enable.
Click the “Edit” button or double-click the selection to open the Edit dialog or (Macintosh only) click in the first column of the Mapping that you want to change.
From the Edit dialog, select “On” from the “State” pop-up menu , then click “OK.”
A check indicates that the Mapping is enabled: Portfolio will extract data from the source file field and place it in the indicated catalog Custom Field. No check indicates that the Mapping will be ignored.
Click “OK” to close the Cataloging Options dialog and save the settings.
Notes about Mappings:
Mappings (that are enabled) are used during both Add and Update operations.
You cannot map to keywords or descriptions.
Some tags are automatically mapped to Keywords or Description. These tag codes cannot also be used to map to a Custom Field.
You cannot map one tag code to multiple Custom Fields.
To Map an existing Tag Code to a Custom Field:
Create a Custom Field (Catalog > Administration > Custom Fields) for each source file tagged field that you want to extract.
Select Catalog > Cataloging Options (Command-J [Ctrl+J]). Click the Mappings tab to select it.
Select the first source file Tag Title/Code that you want to map, the click “Edit.”
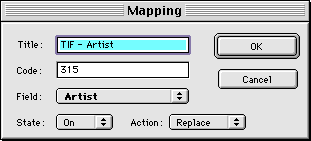
The “Mapping” dialog will be displayed, showing the selected Tag and its ID Code.

Tip: Since you cannot export a tagged data field without a Custom Field to map it to, the Mappings tab will be blank until you have created at least one Custom Field.
Assign a catalog Custom Field to the Tag by selecting it from the Field pop-up menu.
Set the State to On or Off.
On instructs Portfolio to import the data from the Tag. Off instructs Portfolio to ignore the Tag.
Select the appropriate Action from the Action pop-up.
Replace replaces any existing data in the specified Custom Field with the data from the source file field.
Append adds data from the source file field to any existing data in the catalog Custom Field. If the field is a Multi-valued field, Append adds a new value to the list.
Click “OK” to accept the settings and return to the Mappings tab.
Repeat steps 3 through 6 for all the tagged fields that you wish to import.
To Add a Tag ID Code to the Mappings list:
Create a Custom Field (Catalog > Administration > Custom Fields) for each source file tagged field that you want to map.
Select Catalog > Cataloging Options... [Command+J (Mac OS) or Ctrl+J (Windows).
Click the Mappings tab to select it, then click “Add.”
Enter the Tag ID Code, and enter a Title for the Tag.
Data is extracted using the ID Code. The tag Title is informational—you can name the tag anything you like.
Assign a catalog Custom Field to the Tag by selecting it from the Field pop-up menu.
Set the State to On or Off, and select the appropriate Action from the Action pop-up.
Click “OK” to accept the settings and return to the Mappings tab.
Repeat steps 3 through 7 for all the tagged fields that you want to map.
See also: