 Help
Help
Quick Start

 Create and edit your personal Web page:
- Fire up GNNpress. When the Page Window appears, move the cursor
to the Help menu at the top right of the window and single-click it.
- When the pull-down menu appears, click on the Examples... menu
item.
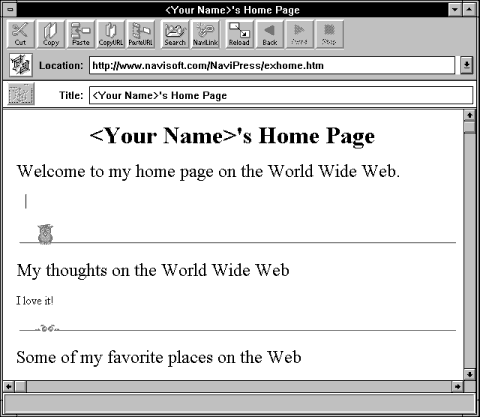
- A new Page Window appears. Click on the Personal Home
Page link. The following Web page
appears:
Template for your personal home
page

- In the Title field, it says <Your Name>'s
Home Page. Move the cursor into the Title field, hold the button
down, and sweep across <Your Name> (including the brackets).
Release the cursor button. The area swept is now presented in reverse video
or some other distinctive coloring, depending on the platform.
- Type your own name. The dialogue box below appears. Click
Edit.
GNNpress does not know whether you have permission to
modify a page on this particular NaviServer. You can edit the page with or
without permission, but you need permission to save the page on the
server.
Protected page dialogue

- Just below the Title field, at the top of the page itself, appears
the same text, <Your Name>'s Home Page. Repeat the same action:
sweep across <Your Name> with the cursor and type in your own
name.
- Create text on the page as you would with a word processor.
- Below the heading "Welcome to My Page on the World-Wide
Web," with the cursor sweep over whatever text is there
and type your personal statement.
- Similarly, below the heading "My Thoughts on the Web," type something
about your view of the Web.
- Experiment with the Format menu.
- Select the entire heading at the top of the page. Then click the
cursor on the Format menu. The menu expands.
- Click the cursor on the Heading menu. The small square to the
left of the Hdg 1 label is indented, showing that the heading is a
level 1 heading. Click on Hdg 2 to change it to a level 2 heading.
- Create a link to an interesting page
somewhere.
- At the bottom you see a heading "Some of My Favorite Places on the
Web." There is a bulleted list that is 3 items long, but only the first two
items have hyperlinks.
- You can click on either of the links in the bulleted list to view other
Web pages.
- Open an interesting page, perhaps one that you found while searching
the hyperlinks in the Global Network
Navigator.
- In that Page window, click Copy URL of Page on the Tool
Bar. You can then click on Close if you wish
to close the file, but you do not have to.
- Now move the cursor to your personal home page. Type in your proposed
"hyperlink"-a distinctive, descriptive phrase-next to the third (empty) bullet
in the bullet list and select it by sweeping over it with the mouse button
depressed.
- Click on Paste URL button in the Tool
Bar. A link to the new Web page appears in your personal home page,
and your hyperlink is now identified.
- Don't go away!

 Publish your personal home page to NaviSoft's
computers:
- Select the File menu item at the top of the page.
- When the options appear, select Save As... A dialogue box appears.
- Select the drop-down arrow to the right of the box labeled
Drives/Servers /MiniWebs.
- Select the item http://public.navisoft.com/.
- Now select the scrolling arrow for the bottom box, which lists files
and directories.
- Scroll down and select pub. Click on it. The name pub appears
after http://public.navisoft.com/ in the top box.
- Click the cursor in the top box and type a file name for the Web page
you wish to save. A common convention is a name followed by .htm, e.g.
joe.htm.
- Click the Save button.
- If the file already exists, the dialogue will ask you to confirm
the Save operation.
Now your Web page is saved on our server! You can save your
page to your own hard drive, as well. Just repeat steps 1-8 above, but select
your own drive in the Drives/Servers/MiniWebs box.