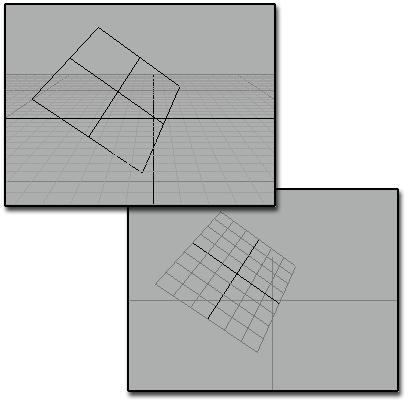
Above: Inactive grid object in a scene
Below: Activated grid object
Grid objects let you bypass the home grid and work on separately defined grids to create and position objects. You can use as many grid objects as you like, each serving as a custom construction plane with its own grid settings.
Grid objects are 2D parametric objects, with adjustments for overall size and grid spacing. You can adjust their orientation in world space, and match them to a particular surface or object.
To activate a grid object:
In the Create panel > Helpers category, click the Grid button.
Create a grid object.
Choose Views > Grids > Activate Grid Object.
To deactivate a grid object, do one of the following:
Select and activate another grid object.
Choose Views > Grids > Activate Home Grid.
Delete the grid object.
You find Grid objects in the Create panel > Helpers category.
When creating an object, you can also create a temporary "AutoGrid" grid object that's tangent to an existing object surface at the point you click. To do this, turn on the AutoGrid check box in the Object Type rollout. You can save this grid by holding the ALT key before you click. See AutoGrid.
Grid objects are named when you create them and are saved with the scene. They can be deleted at any time.
Like other objects created in gmax, standard grid objects are placed on the grid of the current viewport. By default, this is a plane of the home grid, but can also be another activated grid object.
For more information on grid object settings, see Grid.