Make a selection. > Modify panel > Modifier list > Conversion Modifiers > Turn to Mesh
The Turn To Mesh modifier lets you apply object conversions in the modifier stack. As another example, you could use this modifier on a sophisticated patch mode to which you might want to apply some tool, which only applies to meshes, or turn the patch into a mesh. Also, when you apply the general-purpose modifiers, such as Normal, Material, or UVW Map, it will be helpful to explicitly control the type of object beforehand.
Note: Converting from one object type to another causes a complete caching in the modifier stack. When you have large objects in your scene, this can take up a lot of space. For example, an object that starts as a mesh, converts to a patch, and then back to a mesh takes 3 times as much space as a mesh which just has ordinary modifiers like Bend or UVW Map applied.
Tip: Turn To Mesh can be useful on meshes, allowing you to invert a selection or change the selection level in a modifier that doesn't depend on topology.
Procedure
Example: To translate a patch sub-object selection to a polygon sub-object selection:
Select a patch model and turn on wireframe mode.
In the stack display, choose the Patch sub-object level.
Select a patch on the model.
Apply the Turn To Mesh modifier from the Modifier list.
In the stack display, right-click the Turn To Mesh modifier and choose Collapse All.
Click Yes in the dialog that warns you about the possibility of undesirable topological effects.
In the stack display (or in the selection rollout), choose the Polygon sub-object mode. The original patch selection has been preserved.
Interface
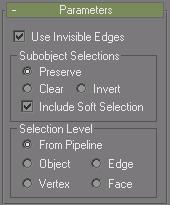
Parameters rollout
Use Invisible Edges: When on, uses invisible edges to represent polygons. When off, produces a completely triangulated mesh with all visible edges. Default=on.
Sub-object Selections group
These options control the selection of sub-objects.
Preserve: Passes the sub-object selection up the stack. For example, if you have an object that you have converted to an editable mesh, and you've selected a polygon, then when you apply a Turn To Mesh modifier, the polygon remains selected. Default=on.
Clear: Clears the sub-object selection so that nothing is selected. Default=off.
Invert: Inverts the sub-object selection. All sub-objects not currently selected are selected, and all sub-objects currently selected are deselected. Default=off.
Include Soft Selection: Affects the action of sub-object Move, Rotate, and Scale functions. When these are on, gmax applies a spline curve deformation to unselected vertices surrounding the transformed selected sub-object. This provides a magnet-like effect, with a sphere of influence around the transformation. Use this when you want to preserve the soft selection from beneath. For example, if Use Soft Selection is on when you select vertices on an editable poly, and you apply Turn To Mesh with Include Soft Selection on, then the same soft selection will apply to the mesh vertices. Default=on.
For more information, see Soft Selection Rollout.
Selection Level group
These options set the sub-object selection level for passing up the rest of the stack.
From Pipeline: Uses the equivalent of whatever the input object uses (patch level becomes face level, and so on.). For example, if you create a box, convert it to an editable patch in patch mode, and apply a Turn To Mesh modifier to it, gmax passes a sub-object selection in patch mode up the stack. The Turn To Mesh modifier takes the sub-object patch selection into account and selects the mesh faces that derive from the patch selection.
Object: Uses object as the selection level for passing up the rest of the stack.
Edge: Uses edge as the sub-object selection level for passing up the rest of the stack.
Vertex: Uses vertex as the sub-object selection level for passing up the rest of the stack.
Face: Uses face as the sub-object selection level for passing up the rest of the stack.