Customize menu > Grid and Snap Settings > Grid and Snap Settings dialog > Snaps tab
Prompt line > Right-click 3D Snap Toggle.
Keyboard > S (toggles snaps on and off)
Snaps give you control when creating, moving, rotating, and scaling objects, because they let you snap to specific portions of existing geometry during creation and transformation of objects or sub-objects. The controls in this dialog set the snap strength and other characteristics such as the snap target.
You can specify the portion of the geometry where you will snap. For example, when Vertex is selected, creation and transforms snap to the vertices of existing geometry. You can select any combination to provide multiple snap points. If Vertex and Midpoint are selected, snaps occur both at vertices and at midpoints. Grid Points is the default snap type when you turn on Snaps (although Snaps are not on by default).
Turn snaps on and off with the S key in the middle of a transform. You can use snaps with free positioning this way.
Snaps work at sub-object levels. For example, you can use snaps to position a gizmo to the object on which you're working, or snap it to other objects in the scene.
Note: You must activate a viewport in order to use snaps. Also, the Z-axis constraints don't apply to the home grid or grid objects, since grids don't have a Z axis.
Settings are stored in the gmax.ini file. The state of the snap settings persists from session to session.
Snaps take precedence over axis constraints. If you highlight an axis constraint, such as Restrict to X, you can only move the object in X. But if you then turn on snaps, Restrict to X is suspended and not used.
The software offers two different types of snap behavior. You can use snaps to move a selection to a snap point, an absolute snap. You can also use snaps to move a selection a relative distance from a snap point. This is called a relative snap.
Procedures
To set grid and snap settings:
Turn on the 3D Snap Toggle button to activate snaps.
Display the Grid and Snap Settings dialog.
In the Snaps tab, select one or more of the types of snaps you want active.
Create an object or transform an object.
Snap markers appear on existing geometry, and you'll snap to the displayed square snap points.
To display the Snaps shortcut menu:
Hold SHIFT and right-click anywhere in any viewport. The Snap quadrant in the quad menu that appears gives you access to transform constraints, snap to frozen, and snap settings.
To use absolute snaps:
Click the object with snaps on.
To use relative snaps:
Click in the viewport.
The distance from your cursor to the selection set is used as the relative snap distance. The object snaps that relative distance away from the snap point.
To use both constraint and snaps, do one of the following:
Turn on Use Axis Constraints at Grid and Snap Settings dialog > Options tab > Translation group.
Hold SHIFT and right-click in the viewport, and then choose Options > Transform Constraints from the Snap quadrant.
Example: To use 3D snaps and rotation transformations together:
Create a box.
Select the box and choose Lock Selection.
Turn on 3D Snaps and click Rotate on the toolbar.
Activate the Perspective viewport and move the cursor over the grid.
A blue icon displays when the cursor passes over a gridpoint.
When the blue icon displays, click and drag to rotate the box around the selected grid point.
You can rotate around anything you can snap to.
To turn snaps on and off during an operation:
Use the S keyboard shortcut to turn snap on and off.
Tip: You can select something with snap off, and then turn snap on to snap it to a snap target. Alternately you might want to snap to something, then position it freely wherever you want.
Interface
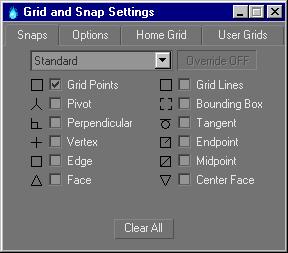
Use these check boxes on the Snaps tab to turn on any combination of snap settings.
Note: After setting snaps, close the dialog using the Close button in the dialog's upper-right corner. Do not click the Clear All button, or you'll turn off all the snaps.
Override: This label changes to display the temporary snap type used by the Override system. See Snap Override for more information.
Clear All: Clears all of the snaps.
Standard snaps
These are the standard snap types used for grids, mesh, and shape objects. Other snap types, when active, take priority over Grid Points and Grid Lines snaps: if the mouse is equally near a grid point and some other snap type, it will choose the other snap type.
Grid Points: Snaps to grid intersections. This snap type is on by default.
Grid Lines: Snaps to any point on a grid line.
Pivot: Snaps to pivot points of objects.
Bounding Box: Snaps to one of the eight corners of an object's bounding box.
Perpendicular: Snaps to the perpendicular point on a spline, relative to the previous point.
Tangent: Snaps to a tangent point on a spline, relative to the previous point.
Vertex: Snaps to vertices of mesh objects or objects that can be converted to editable meshes. Snaps to segments on splines.
Endpoint: Snaps to the end points of edges on meshes or spline vertices.
Edge: Snaps anywhere along edges (visible or invisible).
Midpoint: Snaps to the middle of edges on meshes and spline segments.
Face: Snaps anywhere on the surface of a face. Back faces are culled, so they have no effect.
Center Face: Snaps to the center of triangular faces.