Animation menu > Constraints > Look-At Constraint
Look-At Constraint constrains an object’s orientation so that it’s always looking at another object.
The Look-At constraint locks an object’s rotation so that one of its axes points towards the target object. The LookAt axis points towards the target, while the Upnode axis defines which axis points upward. If the two coincide, a flipping behavior may result. This is similar to pointing a target camera straight up.
An example of a Look-At constraint’s use would be to constrain the eyeballs of a character to a point helper. The eyes will then always look at the point helper. Animate the point helper, and the eyes follow. Rotate the character’s head and the eyes maintain their lock on the point helper.
A constrained object can be influenced by several target objects. When using multiple targets, each target has a weight value that defines the degree by which it influences the constrained object, relative to other targets.
Using Weight is meaningful (and available) only with multiple targets. A value of 0 means the target has no influence. Any value greater than 0 causes the target to influence the constrained object relative to other targets' Weight settings. For example, a target with a Weight value of 80 will have twice the influence of a target with a Weight value of 40.
Procedures
To assign a Look-At constraint:
Select the object you want to constrain.
This is the object that will be always looking at its target.
Choose Animation menu > Constraints > Look-At Constraint.
Select the target object.
To access the Look-At constraint’s parameters through the Motion panel:
Select the Look-At Constrained object.
On the Motion panel > Rotation list, double-click Look-At Constraint.
The Look-At constraint parameters are located under the Look-At Constraint rollout.
To edit weight values:
Select the constrained object.
Open the Look-At Constraint rollout in the Motion panel.
Click a target from the list.
Use the Weight spinner or enter a numerical value to adjust the weight value.
To animate weight values:
Select the constrained object.
Open the Look-At Constraint rollout in the Motion panel.
Click a target from the list.
Turn on the Animate button.
Use the Weight spinner or enter a numerical value to adjust the weight value.
Interface
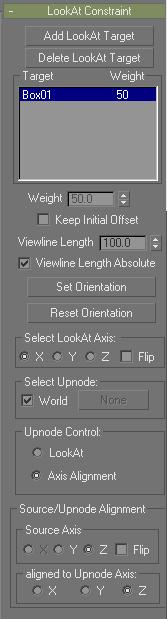
Once you assign a Look-At constraint, you can access its properties via the Look-At Constraint rollout in the Motion panel. In this rollout you can add or delete targets, assign weighting, assign and animate target weight values, and adjust other, related parameters.
Note: When you assign a Look-At constraint via the Animation menu, the software assigns a Rotation List controller to your object. In the Rotation List rollout list you will find Look-At Constraint, which is the constraint you assigned. To view the LookAt Constraint rollout, double-click Look-At Constraint entry in the list.
Add LookAt Target: Adds new targets that influence the constrained object.
Delete LookAt Target: Removes target objects that influence the constrained object.
Weight: Use to assign and animate weight values for each target. Available only when multiple targets are used.
Keep Initial Offset: Maintains the constrained object’s original orientation as an offset to its constrained orientation.
Viewline Length: Defines the length of the viewline drawn from the pivot of the constrained object to the pivot of its target. A negative value draws the line from the constrained object in the opposite direction of the target.
Note: The viewlines drawn from the constrained object to each target inherit the color of their respective target object. When multiple targets are assigned, another viewline indicates the actual, calculated orientation. The color of this line is defined by the Target Line element in the Gizmos category of the Colors panel in the Customize > Customize User Interface dialog.
Keep Viewline Length Absolute: When on, the Viewline Length setting is ignored and the viewline is always drawn between the constrained object and the target object.
Set Orientation: Use to manually define the offset orientation of the constrained object. When turned on, you can use the Rotation tool to set the constrained object’s orientation. This orientation is then maintained as the constrained object looks at its target.
Reset Orientation: Use to reset the orientation of the constrained object. This is useful if you want to reset the constrained object’s orientation after having set the orientation manually.
Select LookAt Axis: Use to define the axis that looks at the target. The X,Y,Z check boxes reflect the constrained object's local axis. The Flip check box is used to flip the directions of the local axis.
Select Upnode: The default Upnode is the world. Uncheck world to manually select an object that defines the Upnode plane. This plane is drawn from the constrained object to the Upnode object. If the look at Axis and the Upnode axis coincide, the constrained object will flip. Animating the position of the upnode object will move the upnode plane.
Source/Upnode Alignment group
Source Axis: Chooses the constrained object’s axis that is to be oriented along a certain upnode axis that is specified by the Aligned to Upnode Axis option. The Source Axis reflects the constrained object’s Local Axis. The Source Axis and LookAt Axis work together;therefore the Axis used to define the LookAt Axis will be unavailable.
Aligned to Upnode Axis: Chooses the Upnode axis that the selected Source Axis aligns to. Note that the selected Source axis might or might not be able to completely align to the Upnode Axis.