Animation menu > Constraints > Link Constraint
A Link constraint is used to animate an object linking from one target object to another.
The Link constraint causes an object to inherit the position, rotation, and scale of its target object.
An example of using a link constraint is to pass a ball from one hand to another. Assume that at frame 0 the ball is in the right hand. The hands are animated to meet at frame 50 and then spread apart until frame 100.
Procedures
Example: To assign a Link constraint:
In the Top viewport, create a sphere and a teapot.
Select the sphere.
Choose Motion panel.
Expand > Assign Controller rollout.
Select the Transform: Position/Rotation/Scale controller.
Click Assign Controller.
Choose Link Constraint.
It is recommended that you add a Link To World before linking to any target objects. This will allow you to animate the object on its own, before the first link to a target object takes place.
To access the Link constraintÆs parameters through the Motion panel:
Select the Link-constrained object.
Choose Motion panel > Link Params rollout.
Example: To assign the Link constraint and animate links:
Move the time slider to frame 0.
In the Top viewport, create a sphere, a cylinder and a box.
Select the sphere.
Choose Motion panel.
Expand the Assign Controller rollout.
Select the Transform: Position/Rotation/Scale controller.
Click Assign Controller.
Choose Link Constraint.
In the Link Params rollout, click Link To World.
Move the time slider to frame 1.
Click Add Link and select the cylinder.
It now becomes a target. The Link Constraint relationship is now active between the sphere and the cylinder.
Move the time slider to frame 50.
Turn on the Animate button and move the cylinder a good distance away from where it is.
Play back the animation.
The sphere follows the cylinder as it moves. The sphere is link-constrained.
Select the sphere.
Move the time slider to frame 25.
On the Motion panel > Link Param rollout, click Add link and select the box.
You have now added another target that becomes active at frame 25.
Play back the animation. The sphere is linked to the cylinder from frame 0 to 24. It follows the cylinder until frame 25 where it Links to the Box.
Interface
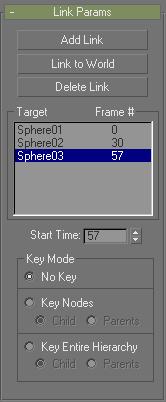
Once you assign a Link constraint, you can access its properties via the Link Params rollout in the Motion panel. In this rollout you can add and delete targets and animate the time at which each target becomes the active parent of the constrained object.
Add Link: Adds a new link target.
Delete Link: Removes a link target. Once a link target is removed, it will no longer influence the constrained object.
Start Time: The start time spinner is used to assign or edit the frame value of a target. Select one of the target object names in the list window and see the frame where the object becomes a parent. You can adjust the value to change when the link transfer takes place.
Key Mode group
No Key: When used, no keyframes are written to the constrained object or its targets. The link control happens without inserting any keys.
Key Nodes: When used, keyframes are written to the specified option. There are two options: Child and Parents. Child only sets a keyframe on the constrained object. Parents sets keyframes for the constrained object and all of its targets.
Key Entire Hierarchy: Sets keyframes up the hierarchy for the specified option. There are two options: Child and Parents. Child only sets a keyframe on the constrained object and its parents. Parents sets keyframes for the constrained object, itÆs targets, and their upper hierarchy.