Edit menu > Edit Named Selections
Edit Named Selections displays the Edit Named Selections dialog, letting you manage named selection sets.
Procedure
To edit a named selection:
Click the selection name from the list.
The defined objects are selected.
Choose Edit > Edit Named Selections.
Interface
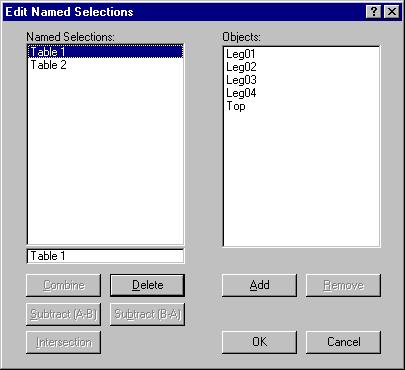
In the Edit Named Selections dialog, the window at left lists all of the current named selections. When you select any of the items in the leftmost window, those objects are listed in the window at right. The buttons beneath the windows let you delete, merge, rename, and edit the listed items.
You can use Edit Named Selections while editing sub-objects, but the dialog displays only the left half of the dialog.
Named Selections window
Lists all existing named selection sets. When a single item is selected, you can rename it by typing a new name in the field below the list.
Combine: Merges all objects from the highlighted selection sets into a single, new selection set. Select two or more selection sets, and then click Combine and enter a new name for the selection set. Use Delete to delete the original sets.
Delete: Deletes all selected items in the Named Selections window.
Subtract (A-B): Subtracts the objects contained in one selection set from another. Select one item in the Named Selections window, and then select the other. The top highlighted item in the window is operand A, and the bottom is operand B (regardless of the order of their selection). Click Subtract (A-B) to subtract the objects in the bottom item from those in the top item.
Subtract (B-A): Subtracts the objects in the top selected item from those in the bottom item.
Intersection: Creates a selection set that consists of objects in common between the highlighted selections sets. Select two or more items from the Named Selections window and click Intersection. In the dialog that appears, enter a new name and click OK.
Objects window
Displays the names of objects that are common to the named selections that have been highlighted in the leftmost window. For example, if you select two named selections that both have a torus, but all other objects in their sets are mutually exclusive, only the torus appears in the Objects window.
Add: Adds objects to the highlighted selection set(s). The Select by Name dialog appears, listing all objects in the scene that are not common to the highlighted selection sets. Choose one or more items from the dialog, and then click Add.
To add to a named selection for a sub-object, select the geometry you want to add, give it a name, then Combine the newly named geometry with an existing name in the Edit dialog.
Remove: Select one or more items from the Objects window, and then click Remove to remove that item from the selection set. Since the Objects window displays only the objects that are common to all highlighted selection sets, you can remove objects from more than one selection set at once. Remove is available only when you select one or more items from the Objects window.
To Remove geometry from a named selection for a sub-object, select and name the geometry you want to remove, then use Subtract.