
Create panel > Geometry button > Standard Primitives > Object Type rollout > Cone button
Create menu > Standard Primitives > Cone
Tab panels > Objects tab > Cone Object
The Cone button on the Creation command panel lets you produce round cones, either upright or inverted.
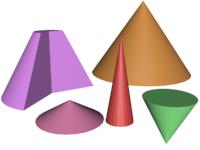
Examples of cones
Procedure
To create a cone:
In any viewport, drag to define a radius for the base of the cone, then release to set it.
Move to up or down to define a height, either positive or negative, then click to set it.
Move to define a radius for the other end of the cone. Decrease this radius to 0 for a pointed cone.
Click to set the second radius and create the cone.
Interface
Creation Method rollout
Edge: Draws a cone from edge to edge. You can change the center location by moving the mouse.
Center: Draws a cone from the center out.
Keyboard Entry rollout
See Creating Primitives from the Keyboard.
Parameters rollout
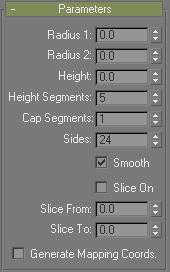
The defaults produce a smooth, round cone of 24 sides with the pivot point at the center of the base. There are five height segments and one cap segment.
Radius 1, Radius 2: Sets first and second radius for the cone. The minimum setting is 0. Minus values are converted to 0. You can combine these settings to create pointed and flat-topped cones, upright or inverted. The following combinations assume a positive height:
|
Radius Combinations |
Effect |
|---|---|
|
Radius 2 is 0 |
Creates a pointed cone |
|
Radius 1 is 0 |
Creates an inverted pointed cone |
|
Radius 1 is larger than Radius 2 |
Creates a flat-topped cone |
|
Radius 2 is larger than Radius 1 |
Creates an inverted flat-topped cone |
If Radius 1 and 2 are the same, a cylinder is created. If the two radius settings are close in size, the effect is similar to applying a Taper modifier to a cylinder.

Effect of Radius settings
Height: Sets dimension along the central axis. Negative values create the cone below the construction plane.
Height Segments: Sets the number of divisions along the cone's major axis.
Cap Segments: Sets the number of concentric divisions around the center of the cone's top and bottom.
Sides: Sets the number of sides around the cone. Higher numbers shade and closely approach true circles with Smooth selected. Lower numbers create regular polygonal objects with Smooth off.
Smooth: Blends the faces of the cone, creating a smooth appearance in rendered views.
Slice On: Enables the Slice function. Default=off.
When you create a slice and then turn off Slice On, the complete cone reappears. You can use this check box to switch between the two topologies.
Slice From, Slice To: Sets the number of degrees around the local Z axis from a zero point at the local X axis.
For both settings, positive values move the end of the slice counterclockwise; negative values move it clockwise. Either setting can be made first. When the ends meet, the whole cone reappears.
Generate Mapping Coordinates: Sets up required coordinates for applying mapped materials to the cone. Default=off.
Note: If a visible viewport is set to a non-wireframe or non-bounding-box display, Generate Mapping Coordinates is on for all primitives to which you apply a material containing a map with Show Map In Viewport on.