Make a selection. > Hierarchy panel > IK button > Auto Termination rollout
The Auto Termination controls temporarily assign terminators a specific number of links up the hierarchical chain from the selected object. This only works with Interactive IK; it does not work with applied IK or with the IK solvers.
Procedure
To use auto termination:
In the Auto Termination rollout, turn on Auto Termination.
Enter a value in the # of Links Up field.
Turn on the Interactive IK button.
Select any object in hierarchy to move or rotate.
Interface
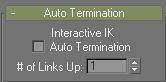
Interactive IK Auto Termination: Turns on the auto termination feature.
# of Links Up: Specifies how far up the chain the termination is applied.
For example, if you set this to 5, when you move any object in the hierarchy, the object that's five links up the chain from the object you're adjusting acts as a terminator. If you select a different object in the hierarchy, termination is switched to whichever object is five links up the chain from the newly selected object.
A setting of 1 simply locks the hierarchy, since it terminates the joint just beyond the currently selected object.