LogoWizard makes animation a breeze...
Professional Prefabs There are 20 professionally designed animations at your disposal. Just drop in your logo and you are done. If you like, you can scale your logo in X, Y and Z independently, or use the locked scaling control for distortion-free object scaling. The PreFab library allows you to add more PreFabs as they become available. PreFabs are just one way of creating great animations quickly.
The Wizard
The Wizard is another way to create quality animations without a lot of hassle. Just go step by step through the design screens, selecting only those options that you want. It's that easy! Some Wizard features are described below. Read on!
Direct Logo Motion Controls
LogoWizard gives you full logo rotation capabilities along the flight paths and motion timing controls for On, Hold and Off motion paths. You can even fade your logo in or out as you fly it. Flight paths are represented by actual rendered 3D arrows, each with a helpful description. And of course, you can scale your logo just as you can when using a PreFab.
Timing Review
Do you think you might ever need to change the total length of your animation after you have set all of your On, Off and Hold times? No problem! LogoWizard allows the logo motion settings to be frame scaled with full rippling capability.
Layers
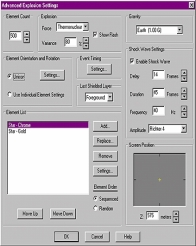
Now, for the real power of LogoWizard. This is where the similarity between LogoWizard and any other logo flying software ends. There is one foreground and eight background layers. Each one of these layers can contain up to sixteen different element objects and many instances of each, for a total of up to 1000 objects for all layers. Element objects can be independently sized and rotated using common sense controls. You have complete control over the fade in or fade out of any of the five different layer styles that LogoWizard provides:
Explosions
Imagine creating a 3D explosion with hundreds of objects and being able to select the explosion force and gravity. Now imagine being able to show a brilliant flash and then have the camera rock when the shock wave hits it. You don't need to imagine any more. LogoWizard does it all!
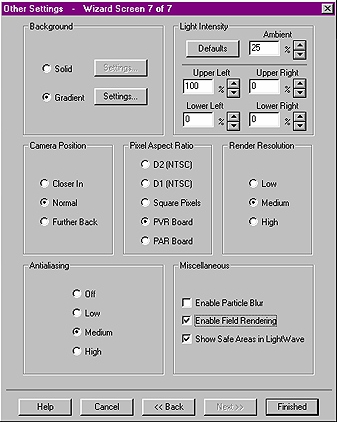
Other Settings
The Other Settings screen gives you various options for more control over the animation. The background can be a solid color or any one of twelve different gradient patterns. You also have control over lighting, camera position, render resolution, anti-aliasing and more.
Objects
Some logo flying software packages limit the objects that can be used in their animations to whatever they send you. Although LogoWizard provides over 300 objects for you to use, we know that you will probably want to use your own. LogoWizard provides you with the capability to import any valid LightWaveTM object into the element database.
Fully Compatible With Windows 95 & Windows NT 3.5x Available for Intel and DEC Alpha computer systems.
 |
 |
 |
 |
![]()
Product Name:
LogoWizard
Product Type:
Stand Alone
Product Class:
LightWave 3D
Shipping Date:
Available now.
Price:
Intel - $299.00 . . . . . . Alpha - $399.00
Distribution:
Micro-Pace, Dealers, Internet
Platform Compatibility:
Intel, Alpha
Version: 1.1
(both Intel and Alpha)
System Requirements:
Key User(s):
FOX, U.S.A.F, Marmalade,
Kingsway Productions
Key Projects: Weird TV, FOX Logos
Basic Description:
LogoWizard easily lets you enter your
animation ideas and in seconds will calculate trajectory, elliptical, linear
and nonlinear motions, compute all necessary object rotations, and then
builds the scene file. You can also select your logo and drop it into any
one of the professionally created PreFab scene files and save it.
Basic Operation:
Step One: Choose
Your Logo - Pressing the SELECT button makes a standard Open Dialog Box
appear. From here you can select the logo or object that you want to fly
around on the screen. After selecting your logo and pressing OK, your selection
will appear in the Logo box located above the SELECT and NONE buttons.
If however you do not want to use a logo or an object press the NONE button.
This will create a null object in place of a logo. A null object will not
be seen in your final animation.
Step Two:
Size Your Logo - Once you have selected your logo, LogoWizard will automatically
size it to a standard size. If you want to make the logo larger or smaller
in any axis, this is the place where you will do it. We recommend that
you leave these settings to their default values at first. If after creating
a LightWave scene file you find that the defaults are not to your liking,
you can return to here and change them at anytime.
NOTES:
Use the small arrow buttons to scale in
the X, Y, and Z axes independently. Pressing the up arrow, makes the logo
get larger, and pressing the down arrow, makes the logo get smaller. Using
the larger arrow buttons will scale the logo in all the axes at the same
time. These let you scale the logo without distorting it. All scaling is
done as a percentage of the standard size. This means, 200% equals 2 times
larger than your original logo object and so on. Also, you will see other
scaling controls just like these throughout LogoWizard. Please keep in
mind that they all work the same as these do.
Step Three:
Choose Your Design Method - The final step in creating a new project is
to select the design method. At this point you have two choices, you can
either use the WIZARD to design a custom animation or you can use the PREFABRICATED
SCENES (known as PreFabs to us) which essentially uses our professional
animator to do the work for you. Pressing the WIZARD button and clicking
OK, will invoke the Wizard. The Wizard will take you step by step through
the design process. The Wizard has been engineered to make the design process
very simple while maintaining the ability to create extremely complicated
scenes. Pressing the PREFABRICATED SCENES button and clicking OK, will
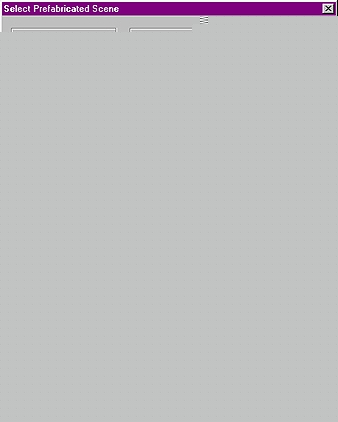
take you to our professionally animated PreFabs. Once there, you pick the
PreFab you want, choose where to save it, and you're done.
Install Procedure:
Insert the LogoWizard installation CD
into your CD-ROM drive. Insert the installation floppy disk into a drive.
From the Program Manager select the FILE menu and choose RUN. In the text
box type the drive letter of the floppy drive into which you inserted the
installation floppy, followed by LWSETUP, and then press ENTER. Be sure
to insert the LogoWizard installation CD into your CD-ROM drive.
Then press ENTER.
You will be presented with a dialog with two big buttons. The top button will install LogoWizard, and the bottom will install Win32s. Install Win32s only if necessary. If there is no need to install Win32s you may proceed with the installation of LogoWizard by pressing the top button. You will be asked to select the drive that contains the LogoWizard installation CD. The CD installation program will begin.
The first thing you will see is a splash screen. This will be displayed while Setup is initializing.
The next screen will display the Welcome dialog box. Please pay careful attention to the information and instructions contained on this dialog box.
Clicking on NEXT will bring you to the Software License Agreement dialog. Please read this agreement carefully and continue on only if you agree to comply with the terms of the license.
The next dialog requests that you enter the proper registration information. Enter your name, company name, and the software registration number, which is located on the inside front cover of this manual. This number can also be found on the back of the installation floppy disk. You will then be asked to verify the registration information that you have entered. It is imperative that this information be correct.
Continuing on will bring you to the Installation Path dialog. Here you will be required to select the path where LogoWizard will be installed. You will also be asked to verify this selection.
Next you will have the option of selecting the name of the program folder where the LogoWizard program icons will be installed. You can accept the default or change it.
The final dialog that you will see before the actual file transfer begins is the Setup Information Review dialog. Here you will be presented with all of the options that you selected for the installation. If there is something that you wish to change, simply click on the BACK buttons of each dialog until you have returned to the information that you wish to change. When all of the information in the review is satisfactory, click the NEXT button. The file transfer will begin. When all of the necessary files have been transferred, Setup with perform some other important installation functions. You will be kept informed as to what is happening by an occasional message on the screen. After the installation has finished, you will be given the opportunity to read the README file. LogoWizard is now installed on your hard drive and is ready to use.
Is there a DEMO version of LogoWizard available?: No
Are there any bugs or compatibility problems with NewTek Products: None known at this time.
Are we porting LogoWizard to other platforms?: Not at this time.