
![]()
Cinema4D is very
special, not least because of all its special objects.
The equally special John Kennedy describes how
they’ll save you both time and effort.
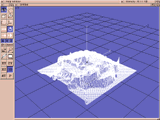 |
If you want to keep the number of pixels down to reasonable levels than apply ‘Reduction’. | Emboss Emboss takes an ordinary IFF format image file, and uses it to create a three dimensional object. Rather than mapping the image onto the outside of an object, an entirely new object is created. The object starts off as a flat plane, but the average value of the Red, Blue and Green components of the individual pixels are used to determine the height at any point. It should be remembered that even a relatively small image (say, 320 by 256 pixels) will generate far too many triangular facets for C4D to cope with, so the ‘Reduction’ setting is supplied to reduce the pixel count to more manageable levels. |
 |
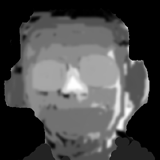
Take a wonderful photograph, and use it to create a greyscale height map. | Emboss
can be used for special effects, or for more
mundane chores such as creating a landscape.
Unlike the Fractal system, Emboss enables you to
plan your landscape down to the smallest detail.
Remember too that you can map the original (or a
different) image onto the object. Figure When creating 3D scenes, it’s often desirable to have a human being present to provide a sense of scale. This is especially true if you are designing a building, room, car or other ‘real world’ object. C4D makes it easy to add a human being by doing all the hard work for you – you only need to select ‘Figure’. |
 |
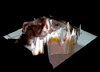 Combine the two by mapping the photograph over the embossed object and it’s enough to put you off your lunch! |
What’s more,
it’s very easy to pose the figure because it
has already been defined as an
‘Animation-ready’ object. When you
select the Drag function in the main toolbar (the
three arrow button) you can easily rotate the
figure in a realistic way. Select the arm joint,
and the entire arm including the hand will move.
Select the torso, and the head, chest and arms
will all move as well. Fractal Instant craggy islands are possible with the Fractal tool. This will create a random object which is perfect for all manner of landscapes: even lunar surfaces or gently rolling hills. |
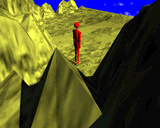 The default settings will create a very hilly object: try lowering the height for more realistic effects. |
The Fractal object is complicated, but you can speed up the redrawing from the Object Manager window. For a nice effect, map a texture onto the fractal as this gives the impression of even more detail. | You can select
the size of the new object, as well as the height
and coarseness of the facets used to make it up.
You will need to experiment with the settings:
create mountains which are too high and the
effect is an alien world. Remember that you can
treat the fractal object like any other, and so
you can apply textures or adjust the attributes.
You can also deform the fractal and adjust
individual points. Sun If you are too lazy to create a light source, or if you want to accurately model an outdoor scene, than C4D has the perfect solution: the Sun. By creating a sun object, you are creating a lightsource whose position can be altered to suit the time of day, day of the year and location: perfect for architects. The sun is not white but pale yellow. As it nears the horizon it will become more red, as it does in the ‘real world’. |
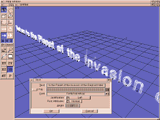 Text
can be entered in the requestor or |
 Create your own mega-epic scrolling titles with ease using Cinema 4D’s text option. |
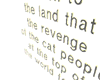
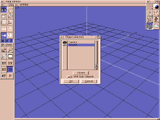
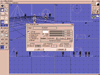
Text The Text object is a bit of a cheat, as it makes use of a set of predefined objects rather than generating font objects on the fly. However, it still works and is ideal for creating images for video work. The message you want to render can either be entered by hand, or read from a plain text file. Use the text file when you need to create long messages (“In a galaxy a long way away...”) and then move them slowly into the distance and into a slight fog for a wonderfully expensive looking effect.Two different fonts are supplied: Diamond and Helvetica, although there is nothing to stop you designing your own. To do this you should create a new directory, and inside build all the objects you need, saving them as the name of the letter they represent. For example, the object for the lower-case letter ‘a’ would be saved with the filename of ‘a’. You will also need to create a file called ‘Description’ which contains information on the size and spacing of the letters – see the files created for the existing fonts for details. |
 Use the Object Window to quickly switch the ground on and off. If you switch it off, your objects won’t fall anywhere – they’ll simply float in space. |
 Adding a little fog from the Environment Window makes all the difference to this scene, and provides a real sense of depth. |
Ground If you need a surface on which to place your objects, look no further than the ground. Sometimes you need to create your own object – a desktop for example – but if you need something solid then the instant ground object is for you. The easiest way to use it, is to open up the Object Toolbar – although the menu option under Objects will achieve exactly the same thing. Even though the ground is switched on, you won’t actually see it untilyou perform a render or specifically select it. If you do wish to select it,open up the Object Selection and pick it from there. By selecting the ground you gain the ability to apply a texture to it: for example, in theimage below I’ve applied a grid image and increased its reflectivity. |
 The
sky totally surrounds the scene – |
 Use the Object Window to quickly switch the ground on and off. If you switch it off, your objects won’t fall anywhere – they’ll simply float in space. |
Sky By default, when you render a scene there is nothing in the background and everything appears to be in the middle of a black and empty space. You can change this in several ways: from the Environment settings you can use any image as a backdrop: for example, a picture of clouds. However, if you animate the viewpoint, the backdrop remains in exactly the same place and spoils the effect. The sky is different – it is an infinitely large sphere which encompasses the scene. You can switch it on and off in a similar way to the ground (via the menu or floating object tool bar) and also apply a texture or colour to it. The sky-sphere may appear in the editing view but this is only a representation of it, as it will always appear in the distance when rendered. If you try and use fog, you will find that your images have a totally fog-coloured background, irrespective of what settings are used for the sky. This is not a bug: remember that the fog continues into infinity, and so will always eventually appear as an opaque object as you look through it. |