
Note: This workshop requires
that the following products are installed:
|
Section 1 - Configuring the IBM Agent Controller
Note: The Component Test Tools allows a developer to launch testcases on remote workstations. The Agent Controller is used to accomplish this.
___ 1. Verify the Agent Controller is configured properly.
a. Open an MS-DOS prompt and navigate to the \config subdirectory where you installed the IBM Agent Controller (e.g. c:\program files\IBM\IBM Agent Controller\config).
b. Using Notepad or another editor, edit serviceconfig.xml .
c. Verify that the PATH attribute for the EXECUTABLE java.exe contains the correct path to java.exe for the component test applications (See below)
Note: The executable remoteapp, junitrunner, and httpexecution are the three applications used in the Component Test Tools. These can be found towards the bottom of serviceconfig.xml
<Application configuration="default" executable="remoteapp" path="D:\AppDevBeta\eclipse\jre\bin\java.exe"___ 2. Start the Agent Controller.
<Application configuration="default" executable="junitrunner" path="D:\AppDevBeta\eclipse\jre\bin\java.exe"
<Application configuration="default" executable="httpexecution" path="D:\AppDevBeta\eclipse\jre\bin\java.exe"
If the path is incorrect, fix the paths so they point to the correct subdirectory.
a. From the Services panel in the Control Panel of Windows NT/2000, make sure the IBM Agent Controller service is started.
b. If you had to make any changes to serviceconfig.xml in the previous step, restart the IBM Agent Controller service.
Section 2 - Creating a Manual TestCase A Manual Test case is a set of steps that guide a human tester through a manual set of tasks. For each step the human tester performs, the tester can mark whether a step passed or failed.
Note: If you already
have the Account project in your workspace:
Highlight the Account project, click mouse button 2, and choose Delete from the pop-up menu. Make sure all contents are deleted from the file system. |
a. From WebSphere Studio, click the Open the New Wizard button___ 2. Create a Manual Test Case.
b. From the New Wizard dialog, choose Java from the left-hand pane, and Project from the right-hand pane. Click the Next> button.
c. From the next page of the wizard, specify a Project name of AccountTestCases. Click the Finish button to create the new project.
d. Using the Perspective button, open a Component Test perspective.
a. From the Definition view, highlight the Testcases folder, click mouse button 2, and choose New->Testcase... from the pop-up menu.
b. From the New Testcase Wizard, make sure AccountTestCases project is selected. Specify a Testcase name of CreateAccountProject. Click the Next> button.___ 3. Create a CreateJavaProject task in the CreateAccountProject testcase.
c. From the Testcase Attributes page of the Wizard, select Manual from the IBM Schedulers list.

Note: The Component Test Tools have many extension points. IBM will be providing three types of testcases (HTTP, Java, and Manual) but it is possible for an ISV to add their testcases as well. If an ISV did this, they could have their own testcases displayed from this list in the wizard.
d. Click the Finish button to create the CreateAccountProject testcase.
When the CreateAccountProject testcase was created, the Component Test Perspective should look something like this:___ 4. Create an ImportJavaProject Block in the CreateAccountProject testcase.

You'll notice that the Definition view shows the testcases, the Outline view shows the structure of all the tasks within a testcase, and the editor for a testcase (CreateAccountProject) will be the view where we can configure a the testcase or define a specific task.
You'll notice in the Outline view, a block has been created called Main Block. By default, a task called Main Block is always generated when a new test case is created. A Block provides an easy way to group related tasks together in a block.
a. From the Outline view, highlight Main Block, click mouse button 2, and choose New->Task->Manual from the pop-up menu.
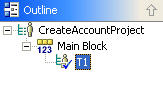
You'll notice that a new Task called T1 is displayed in the Outline View.
b. From the Outline view, select the T1 block. In the CreateAccountProject editor , change the Task Name from T1 to CreateJavaProject.

c. From the CreateAccountProject editor, click Design.
d. In the Instruction field, enter the following: (You can use cut and paste if you wish)
Note: The Instruction field allows a developer to specify instructions to a tester on how to perform a task
Create a Java Project
1. From the WebSphere Studio Menu bar, choose File->New->Project...
2. Select Java from the left-hand pane and Java Project from the right-hand pane.
3. Click the Next> button.
4. Specify a Project Name of Account.
5. Click the Finish button.
e. Hit Ctrl+S to save the CreateJavaProject task.
a. From the Outline view, highlight Main Block, click mouse button 2, and choose New->Block from the pop-up menu.___ 5. Create an ImportJavaClasses Task in the ImportJavaProject block.
You'll notice that a new Block Blk1 is created (as shown below)

b. From the Outline view, select the Blk1 block. In the CreateAccountProject editor , change the Block Name from Blk1 to ImportJavaProject .
c. Hit Ctrl+S to save the ImportJavaProject Block.
The Outline view should look similar to this:

a. From the Outline view, select the ImportJavaProject block, click mouse button 2 and choose New->Task->Manual from the pop-up menu.___ 6. Create an ExpectCompileErrors Message Task in the ImportJavaProject block.
b. Using the CreateAccountProject Editor, change the task name from T1 to ImportClasses.
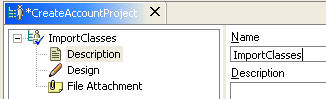
c. From the CreateAccountProject editor, click Design.
d. In the Instruction field, enter the following:
Import Classese. Hit Ctrl+S to save the task.
1. From the Workbench Select the Account Project
2. From the Menu, choose File->Import...
3. From the Import Wizard, Choose File System
4. Click the Next> button.
5. Choose a directory of \WS50STEW\hands-on\ComponentTest\Account
6. Make sure all resources are checked (so all are imported).
7. Click the Finish button.
a. From the Outline view, select the ImportJavaProject block, click mouse button 2 and choose New->Task->Manual from the pop-up menu.
b. Using the CreateAccountProject Editor, change the task name from T2 to ExpectCompileErrors.
c. From the CreateAccountProject editor, click Design.
d . Using the drop-down listbox for Type, Change the Type of the task from Status to Message.

Note: Tasks of type message are useful for notifying the tester with a message as they test a testcase.
In this case, we want to create a message which tells the tester to expect compile errors after they import the classes into the account project.
e. In the Instruction field, enter the following:
After the import completes, you should see compile errors in the task view. This is OK! This will be resolved in a subsequent task.
f. Hit Ctrl+S to save the task.___ 7. Create a ModifyProjectClassPath Task in the ImportJavaProject block.
a. From the Outline view, select the ImportJavaProject block, click mouse button 2 and choose New->Task->Manual from the pop-up menu.___ 8. Create a TestAccountProject Task in the Main Block block.
b. Using the CreateAccountProject Editor, change the task name from T3 to ModifyProjectClassPath.
c. From the CreateAccountProject editor, click Design.
d. In the Instruction field, enter the following:Modify ClassPathe. Hit Ctrl+S to save the task.
1. Select Account Project, click mouse button 2, and choose Properties from pop-up menu.
2. Select Java Build path
3. Click on Libraries tab
4. Click Add external JARs
5. Select WSADInstallDirectory\eclipse\plugins\org.junit\junit.jar
6. Click Open button
7. Click OK button
a. From the Outline view, highlight Main Block, click mouse button 2, and choose New->Task->Manual from the pop-up menu.Section 3 - Running the Manual Test Case
b. Using the CreateAccountProject Editor, change the task name from T2 to TestAccountProject .
c. From the CreateAccountProject editor, click Design.
d. In the Instruction field, enter the following:
Test Account Projecte. Hit Ctrl+S to save the task.
1. Expand the Account Project
2. Expand the com.ibm.demo.account.testcases package
3. Select the MyTestClient class.
4. Click the Run button
5. From the Launch Configurations window, Highlight Java Application, Click the New button, and Click the Run button.
6. Verify that MyTestClient executed and verify that output is displayed in the Console view
The completed CreateAccountProject Testcase should look similar to this:

You'll notice that the order of the tasks in the Outline view define the order in which the blocks and tasks in the testcase execute. You can use drag-and-drop in the outline view to reorder the tasks or blocks.
Note: Since testcases can be run on launched on a different workstation, we need to create a new host definition which defines where this test case will run.
___ 2. Prepare to run the CreateAccountProject testcase
Note: If you already have a hosts entry defined, you can skip this step but you should double-click on it and ensure the tcp/ip address is correct.
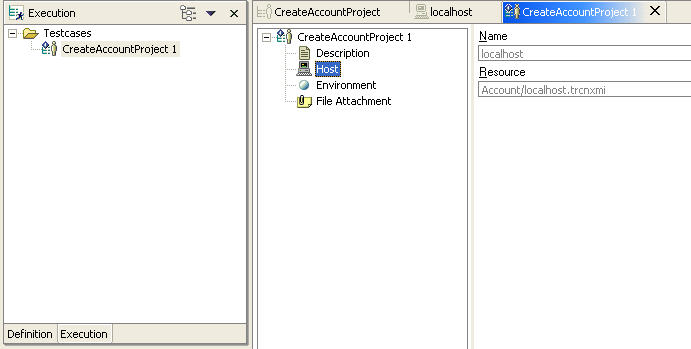
a.From the Definition view, highlight the Hosts folder, click mouse button 2, and choose New->Host... from the pop-up menu.

b. From the New Host Dialog, select the AccountTestCases project and specify a Host name of localhost. Click the Finish button to create a new Host definition.
c. From the localhost editor, enter your IP address (or use 127.0.0.1) .

d. Hit Ctrl+S to save the changes.
___ 3. Execute the CreateAccountProject Testcase
Note: Why do you have to prepare a testcase to run?
Depending on the testcase being created, there may be code that needs to be generated for a testcase. (When we create a Java TestCase in this hands-on lab, you will see this).
Additionally, a testcase will be associated with a particular host so the testcase could be run on many different workstations. (Note: The Agent Controller must be running on a particular host where a testcase will be run).
The Prepare to Run step will generate code if necessary and associate a testcase with a host.
For manual testcases, there is no code that is generated.
a. From the Definition view, select the CreateAccountProject Testcase, click mouse button 2, and choose Prepare to Run... from the pop-up menu.
b. From the Prepare to run dialog, Specify an output location of AccountTestCases. Keep the default name for the Instance Detail and leave the radio button selected on the Save instance in the definition's location.

Click the Next> button.
c. From the Hosts page in the Wizard, select a host of localhost (or the hostname which was created for you).

click the Next> button.
d. From the Environment page in the Wizard, click the Next> button.
e. From the Description page in the Wizard, click the Finish button.
You'll notice that an Execution view is shown for the execution instance of the testcase and an editor appears for the execution instance. ( Note: the execution instance editor allows a developer to modify the execution instance configuration).
a. From the Execution view, select the CreateAccountProject 1 instance, click mouse button 2, and choose Run... from the pop-up menu.___ 4. Execute the CreateJavaProject task.
b. From the Run dialog, specify an Execution name of execution1 and click the Finish button.
If all goes well, you should see the Component Test - Manual Testcase Remote Application appear (as shown below):

Note: The Agent Controller is what actually launches the Component Test - Manual Testcase Remote Application. If you receive an error, you should verify that the Agent Controller is started and the serviceconfig.xml is configured correctly (as was described earlier)
This application would be used by a tester as they test this manual testcase
a. Read and perform the Instructions for the CreateJavaProject task.___ 5. Execute the ImportClasses task.
b. When you have completed the task, use the Component Test - Manual Testcase Remote Application to change the following items:
Parameter
Value
Status
Pass
Info
No problems with this task

Click the Next button to complete the CreateJavaProject task.
You'll notice that when a task is completed, a checkmark is displayed by that task indicating it is complete

a. Read and perform the Instructions for the ImportClasses task in the ImportJavaProject block.___ 6. Execute the ExpectCompileErrors task.
b. When you have completed the task, use the Component Test - Manual Testcase Remote Application to change the following items:
Parameter
Value
Status
Pass
Info
No problems with this task
c. Click the Next button to complete the ImportClasses task.
a. Read the ExpectCompileErrors message in the ImportJavaProject block.___ 7. Monitor the execution of the Testcase.
b. Click the Next button to complete the ExpectCompileErrors message.
___ 8. Execute the CreateJavaProject task.
Note: As you have seen, the component testing framework allows a tester to run a testcase on a remote machine. As a task is completed during the testcase, the status of the testcase is sent back to the component test perspective in WebSphere Studio Application Developer.
a. Switch focus back to WebSphere Studio Application Developer and look at the Outline view (in the Compoent Test Perspective).
The Outline view should be showing the execution of this testcase. We can see through the visual tips that the CreateJavaProject task has been completed successfully (by the checkbox) and we can see that that the last task which has been performed thusfar is the ExpectCompileErrors task.

b. From the outline view, double-click the CreateJavaProject task.
c. If you look at the execution view, you'll see status of the task and a timestamp.

d. From the execution view, click on the Event Log.
You'll notice you can see detailed information (including the Info entered by the tester) for that particular task.

We'll be analyzing the actual event data in a subsequent step, but it is important to see that a developer can immediately get information about the testcase WHILE it is being executed (even from a remote machine.)
e. Switch focus back to the Component Test - Manual Testcase Remote Application .
a. Read and perform the ModifyProjectClassPath task in the ImportJavaProject block.___ 9. Execute the TestAccountProject task.
Note: If you follow the steps closely, you should encounter an error in the wording to the task.. Junit.jar is located in the org.junit_3.7.0 and not org.junit.
Go ahead and use junit.jar from the org.junit_3.7.0 folder.
b. When you have completed the task, use the Component Test - Manual Testcase Remote Application to change the following items:
Parameter
Value
Status
Soft Fail
Info org.junit folder doesn't exist. Should specify org.junit_3.7.0

b. Click the Next button to complete the CreateJavaProject task.
a. Read and perform the TestAccountProject task.Section 4 - Analyzing the Test Case Results
b. When you have completed the task, use the Component Test - Manual Testcase Remote Application to change the following items:
Parameter
Value
Status
Pass
Info
No problems with this task
c. Click the Next button to complete the TestAccountProject task.
d. Since this was the last task for this testcase, you can click the End Execution button to end the testcase.


a. From the Execution view, highlight execution1, click mouse button 2, and choose Report... from the pop-up menu.___ 2. Generate an HTML report.

b. From the New Report Wizard, select Text Report (txt) and click the Next> button.
c. From the Report Name page of the Wizard, select the AccountTestCases project and specify a report Name of CAPReport1 .
Click the Finish button.
When it is generated you'll see the text report appear in the editor. You'll see that the text report contains only very basic information. Its primary usage is to serve as an example as to how to interface with the published reporting APIs.
d. Close CAPReport1.txt.
Note: The next steps (a through c) are simply a repeat of the previous steps you did when running the manual testcase. We are repeating these steps so we have additional data.
a. From the Execution view, highlight the CreateAccountProject 1 execution instance, click mouse button 2 and choose Run... from the pop-up menu.
b. From Run Dialog, specify an Execution name of execution2 . Click the Finish button.
This will launch the Component Test - Manual Testcase Remote Application.
Using the same steps as previously performed, execute each task ( Note: you don't actually need to perform the steps. Just set the status and click the Next button.) and mark all tasks with a Status of Pass EXCEPT the ModifyProjectClassPath task. Mark the ModifyProjectClassPath task as a Soft Fail .
c. Close the Component Test - Manual Testcase Remote Application.
You should now see two executions displayed in the Execution view (as shown below).

d. Using multiple-select, select execution1 and execution2 , click mouse button 2, and choose Report... from the pop-up menu.
e. From the New Report Dialog, select HTML Report - ALL (html).

Click the Next> button.
f. From the Report Name page of the Wizard, select the AccountTestCases project and specify a report Name of CAPHTMLReport1 .
When the generation is complete, the generated HTML should be opened in the Page Designer.
g. Click on the Preview tab.

h. When you are finished looking at the report, close the WebSphere Page Designer.Section 5 - Creating a Java Testcase
| Note: A Java Test Case is
used to define a set of tasks which test a Java application/component. The
generated Java testcase is generated based on the JUnit testing framework.
|
a. Switch back to the Definition view by clicking on the Definition tab (as shown below):
___ 2. Create an instantiateAccount Task
b. From the Definition view, highlight the Testcases folder, click mouse button 2, and choose New->Testcase... from the pop-up menu.
c. From the New Testcase Wizard, make sure AccountTestCases project is selected. Specify a Testcase name of CheckingAccountTestCase . Click the Next> button.
c. From the Testcase Attributes page of the Wizard, select Java from the IBM Schedulers list.
d. Click the Finish button to create the CheckingAccountTestCase testcase.
After the CheckingAccountTestCase is created, you should see the following:

a. From the Outline view, highlight the Main Block block, click mouse button 2 and choose New->Task->Java from the pop-up menu___ 3. Create a testWithdraw Task
b. From the editor view for CheckingAccountTestCase, change the name of the task from T1 to instantiateAccount.
c. Hit Ctrl+S to save the changes.
a. From the Outline view, highlight the Main Block block, click mouse button 2 and choose New->Task->Java from the pop-up menu
b. From the editor view for CheckingAccountTestCase, change the name of the task from T2 to testWithdraw.
c. Hit Ctrl+S to save the changes.
Now that we have outlined the tasks to be performed in this Java Testcase, our next step will be to prepare the testcase to run. During this step, the component test tools will generate a Java testcase based on JUnit.___ 4. Prepare the CheckingAccountTestCase to Run
a. From the Definition view, highlight CheckingAccountTestCase , click mouse button 2, and choose Prepare to Run... from the pop-up menu.
b. From the Prepare to Run Dialog, set the Output location to the AccountTestCases project.

Keep all other defaults and click the Next> button.
c. From the Select Hosts page of the Wizard, select localhost . (or the host with your hostname).
Click the Next> button.
d. From the Environmental Settings page of the Wizard, click the Next> button.
e. From the Description page of the Wizard, Click the Finish button.
When the Finish button is clicked, the Java testcase will be generated (which we will explore in a moment). Once the Java testcase is generated, the next step is to modify the generated testcase to add the testcase logic.___ 5. Analyze the generated Java Testcase.
a. From the Outline view, select the Main Block task.___ 6. Modify the Project Build Path.
b. From the CheckingAccountTestCase 1 editor, select the File Attachment element in the Tree view (as shown below)

You'll notice that there is a File Attachment associated with this block. This is actually the generated Java class for this testcase.
c. Double click the file attachment. You'll notice that a Java editor opens for a class called MainBlock. This is the generated Java class.

As you explore the generated class, you'll notice that it is all based on JUnit. You'll also notice that there is a method generated in the class for each task you created. You'll notice that each method that was generated has a comment which indicates where code needs to be added.

Since we have generated the testcase in the AccountTestCases project and the classes we wish to test are located in another project (Account), we need to modify the build path of AccountTestCases so it references the Account project.___ 7. Add a CheckingAccount field.
a. Open or switch to a Java Perspective.
b. From the Package Explorer, highlight the AccountTestCases project, click mouse button 2, and choose Properties from the pop-up menu.
c. From the Properties view, select Java Build Path from the left-hand pane.
d. Click on the Projects tab.
e. Check the Account Project.
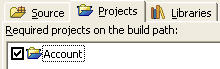
Click the OK button to modify the build path and close the Properties dialog.
f. Switch back to the Component Test Perspective.
a. From the Java Editor forMainBlock.java, add a field (as shown in bold below) just below the class definition:___ 8. Add an import statement.
public class MainBlock extends JUnitTestCase {
private static CheckingAccount ca=null;
a. Add the following import statement:___ 9. Modify the instantiateAccount() method.
import com.ibm.demo.account.*;
a. From the Java Editor for MainBlock.java, modify the instantiateAccount() method so it looks similar to this:___ 10. Modify the testWithdraw() method.
public void instantiateAccount() {
ca = new CheckingAccount(1,new BigDecimal(100));
}
a. From the Java Editor for MainBlock.java, modify the testWithdraw() method so it looks similar to this:
public void testWithdraw() {Section 6 - Running the Java Test Case. ___ 1. Modify the classpath for the testcase execution.
try {
ca.withdraw(new BigDecimal(10));
assertEquals(90.0, ca.getBalance().floatValue(), 0.0);
} catch (InsufficientFundsException e) {
}
b. Hit Ctrl+S to save the changes
c. Close the Java Editor for MainBlock.java.
Note: Why do we need to modify the classpath for this Java Test case before we execute the testcase?
Keep in mind that the Agent Controller is actually what runs the testcase. Since we have built a testcase which uses two projects (AccountTestCases and Account), we need to add a classpath so the Agent Controller can find the classes in the Account project.
If we didn't modify the the classpath, we would get an error similar to what is shown below:

a. From the Execution view in the Component Test Perspective, highlight CheckingAccountTestCase 1 click mouse button 2, and choose Open... from the pop-up menu.___ 2. Run the CheckingAccountTestCase 1
b. From the CheckingAccountTestCase 1 editor, click on the Environment element. ( Note: Make sure CheckingAccountTestCase 1 is also selected in the Outline view).

c. From the CheckingAccountTestCase 1 editor, click on the Insert new item buttonand specify the following parameters: (Note: Use a triple-click to make the cell editable)
Parameter
Value
Name
classpath
Value /Account
Position
Append

d. Hit Ctrl+S to save the changes.
a. From the Execution view, highlight CheckingAccountTestCase 1 , click mouse button 2, and choose Run... from the pop-up menu.___ 3. Analyzing the testcase results
b. From the Run Dialog, select an Execution name of execution1 . Click the Next> button.
Click the Finish button to run the testcase.
When the testcase finishes running, expand the outline view to see the results of the testcase.___ 4. Change the Java code in the CheckingAccount withdraw method()
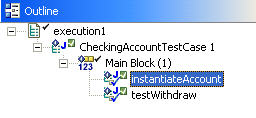
From the outline view, we can see that all the tasks in the testcase passed.
___ 5. Run the CheckingAccountTestCase 1 again.
Note: We are going to modify the code in the CheckingAccount class to cause a failure in the testcase.
a. Switch to a Java Perspective.
b. Expand the Account project and the com.ibm.demo.account package.
c. Double-click CheckingAccount.java.
d. Modify the withdraw() method so it looks similar to this: (Note: We are changing the logic so one additional dollar is withdrawn from the account each time the withdraw method is called)
public BigDecimal withdraw (BigDecimal howMuch) throws InsufficientFundsException
{
if (getBalance().floatValue()<=howMuch.floatValue())
throw new InsufficientFundsException();
setBalance(getBalance().subtract(howMuch));
setBalance(getBalance().subtract(new BigDecimal(1)));
Txn t = new Txn(howMuch, new Date(), "Withdraw");
txnHistory.add(t);
return getBalance();
}
e. Hit Ctrl+S to save the method
f. Close the Java editor and switch back to the Component Test Perspective.
a. From the Execution view, highlight CheckingAccountTestCase 1 , click mouse button 2, and choose Run... from the pop-up menu.Congratulations , you've completed the Component Test Lab for WebSphere Studio Application Developer 5.0. You should now understand the basics of how component testing works in WebSphere Studio!
b. From the Run Dialog, select an Execution name of execution2 . Click the Next> button.
Click the Finish button to run the testcase.
You'll notice that we now have a failure in the testWithdraw task of our testcase (as shown below).

If you look at the event log, you'll see that we have an assert failure because we added the logic to subtract the additional dollar.

c. Close the Component Test perspective.
