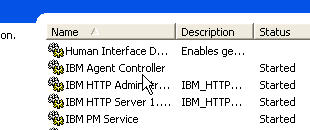
b. After reboot, Open the Services panel and verify the IBM Agent Controller is started.
c. Start WebSphere Studio Application Developer.
This workshop takes you through the steps of configuring a Remote Server within WebSphere Studio Application Developer and deploying WBOnline into the remote server.
Note: This workshop requires
that the following products are installed:
|
Note: This workshop requires
that the lab was completed:
|
___ 1. Validate the configuration of the Agent Controller
a. Open an MS-DOS prompt and navigate to the x:\IBMRAC\config subdirectory (Note: IBMRAC is the subdirectory where you installed the Agent Controller).___ 2. Set the WAS_HOME_V5 environment variable
b. Using notepad or another editor, open serviceconfig.xml .
c. Look for the line which defines wteQueryV5.exe. (as shown below)
<Application configuration="default" executable="wteQueryV5.exe" path="%WAS_HOME_V5%\
You'll notice that the path refers to the variable %WAS_HOME_V5 %. This environment variable will need to be defined in order to start and stop a remote V5 server.
d. Close the editor for serviceconfig.xml.
e. From the MS-DOS prompt, issue the command:
set WAS_HOME_V5If you get a message that the environment variable isn't defined, you'll need to set this variable.
a. From the System Control Panel under Windows 2000, double-click on System.___ 3. Reboot and Restart
b. Fro the System Properties dialog, click on the Advanced tab.
c. Click the Environment Variables button.
d. From the Environment Variables dialog, click the New button (under System Variables).
e. From the New System Variables dialog, specify a Variable Name of WAS_HOME_V5 and a Variable Value of x:\WebSphere\AppServer (Note: specify the location where you insalled WebSphere Application Server V5 Beta 4).
Click the OK button.
f. Click the OK button to close the Environment Variables dialog.
g. Click the OK button to close the System Properties dialog.
a. Reboot your operating system.
b. After reboot, Open the Services panel and verify the IBM Agent Controller is started.
c. Start WebSphere Studio Application Developer.
Note: We will be reusing the existing WebSphere configuration we created in a previous lab. This way, we can simply create a new Remote Server, and use the existing configuration we've used with the local Websphere test server.
a. From WebSphere Studio, switch to (or open) a Server Perspective.___ 2. Configure the WAS50Remote Server DataSource
b. From the Server Perspective, choose File->New->Server from the menu.
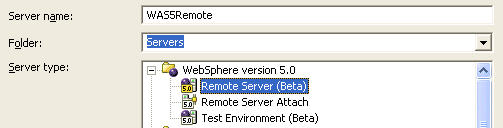
c. From the Create a New Server dialog, specify the following:
Parameter
Value
Server Name
WAS50Remote
Folder
Servers
Server Type
WebSphere version 5.0->Remote Server (Beta)
Click the Next> button.
d. From the WebSphere Remote Server Settings dialog, specify a Host Address of 127.0.0.1.
Click the Next> button
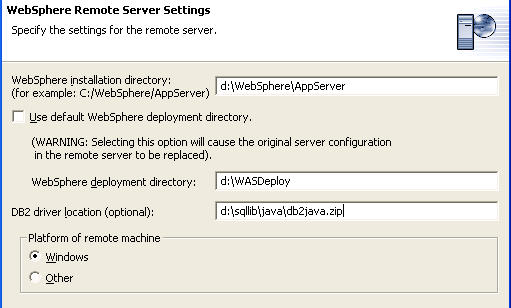
e. From the WebSphere Remote Server Settings dialog, specify the following:
Parameter
Value
WebSphere Installation Directory
x:\WebSphere\AppServer (Note: x:\WebSphere\AppServer represents the drive where WebSphere was installed)
Use default WebSphere Deployment Directory
Unchecked (Note: We don't want to replace your existing external WebSphere Configuration so we are deploying to a different subdirectory)
WebSphere Deployment Directory
D:\WASDeploy (Note: if you don't have a D drive, specify C:\WASDeploy)
DB2 driver location
x:\sqllib\java\db2java.zip (Note: x: represents the drive where DB2 was installed)
Click the Next> button
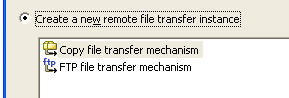
f. From the Create or Select a Remote File Transfer Instance dialog, make sure the Create a new remote file transfer instance radio button is selected. Make sure Copy file transfer mechanism is checked.
Click the Next> button
g. From the Create a New Server dialog, specify the following:
Parameter
Value
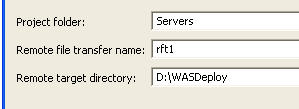
Project folder
Servers
Remote file transfer name rft1
Remote target directory
D:\WASDeploy
Click the Finish button to create the server.
h. Open a MS-DOS Prompt and create the deployment subdirectory (WASDeploy) e.g. MD d:\WASDeploy.
a. From the Server Configuration view, highlight the WAS50Remote server, click mouse button 2, and choose Switch Configuration->WebSphere v5 Unit Test from the pop-up menu. (Note: The WebSphere v5 Unit Test configuration is the configuration we've been using through most of the workshops)___ 3. Configure the WAS50Remote Server Security
b. From the Server Configuration view, double-click the WAS50Remote Server.
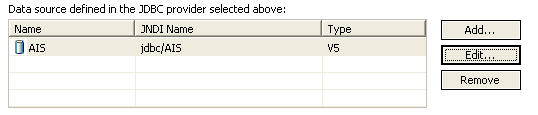
c. From the WebSphere Configuration Editor, click on the Data source tab.
Note: When doing a remote deploy with a datasource, the datasource should be defined at the server level, not node level.
d. Highlight the AIS Datasource under Node Settings and click the Remove button.
e. From Data Sources, scroll down to the Server Settings section.
d. From the JDBC provider list, highlight Default DB2 JDBC Driver from the list.
e. Click the Add... button next to the Datasource defined in the JDBC provider selected above list.
f. From the Create a Data Source dialog, click Version 5.0 data source.
Click the Next> button.
g. From the Modify Data Source dialog, specify the following:
Parameter
Value
Name
AIS
JNDI Name:
jdbc/AIS
Data source helper class name
com.ibm.websphere.rsadapter. DB2DataStoreHelper
Click the Next> button.
h. From the Modify Resource Properties, select databaseName .
i. Specify a value for the databaseName of AIS.
Click the Finish button to create the data source.
a. Frome the WebSphere configuration Editor, click the Security tab.___ 4. Configure the Path to point to the external subdirectory where WebSphere Embedded Messaging is installed.
b. From Security, check the Enforce Java 2 Security checkbox.
c. Click the Add... button next to the JAAS Authentication Entries list.
d. From the Add JAAS Authentication Entry dialog, specify the following
Parameter
Value
Alias
A Userid (Note: I usually use an alias which matches my Windows 2000 id)
User ID
The Windows 2000 userid you wish to login to DB2 with
Password
The password for the Windows 2000 userid.
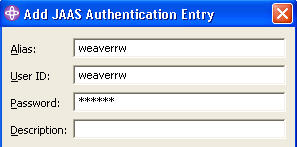
Click the OK button.
e. Click on the Data source tab
f. Select the AIS data source you created earlier and click the Edit... button.
g. Using the drop-down list for Component-managed authentication alias , select the JAAS Authentication Alias you created in the previous step.

Click the Finish button.
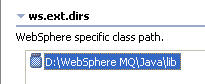
a. From the Server Configuration editor, click the Paths tab.
b. Click the Add External Folder... button next to the WebSphere specific class path list.
c. Specify a path of x:\Websphere MQ\Java\lib (Note: x:\WebSphere MQ represents the path where WebSphere Embedded Messaging was installed)
Click the OK button.
h. Hit CTRL+S to save your changes and close the WebSphere Configuration Editor.___ 5. Create the JMS Queue Manager
___ 6. Create a Source Folder for the WBOnlineUtility Java Project
Note: Why do we need to create a new JMS Queue Manager?
Since the WebSphere v5 Unit Test Configuration most likely has JMS configured (since you most likely have finished the MDB lab), you need to be aware of how WebSphere Embedded Messaging works in WebSphere.
WebSphere will automatically create Queue Managers based on the WebSphere Cell, Node, and Server name. (example WAS_weaverrw_server1).
WebSphere Studio Application Developer uses a node name of localhost, not <hostname> so when you do a remote deploy of the enterprise application which uses JMS messaging, it will try and connect to a Queue Manager of WAS_localhost_server1. Since the queue manager WAS_localhost_server1 doesn't exist, you will get errors saying it can't connect to a queue manager.
There are two workarounds:
1) Install WebSphere Application server with a nodename of localhost
2) Use the createmq.bat command to create a queue manager with the name WAS_localhost_server1.
We will use the 2nd workaround for this lab.
a. Open an MS-DOS window and change to the WebSphere\Appserver\bin subdirectory.
b. Issue the command:
createmq x:\WebSphere\AppServer WAS localhost server1 x:\"WebSphere MQ" x:\"WebSphere MQ"\WEMPS
Note: x::\WebSphere\AppServer is the location you installed WebSphere. x:\"WebSphere MQ" is the location where WebSphere embedded messaging was installed. The WEMPS subdirectory represents the location where the Publish/Subscribe was installed. If you don't have a WEMPS installed, that is ok as we are using point-to-point messaging and not publish/subscribe.
After running the command, you should see see a lot of messages displayed in the console. All should have a rc=0 displayed. Look at the console messages and see if there are any errors.
Note: If you made a mistake with the createmq command you will need to delete the Queue Manager before running the createmq command.
To delete the queue manager, open an MS-DOS window and issue the following commands:
cd \"WebSphere MQ"\bin
endmqm WAS_localhost_server1
dltmqm WAS_localhost_server1
___ 7. Modify the WebSphere Environment variables
Note: WBOnlineUtility is a Utility JAR project used in our WBOnline J2EE application. There is currently a bug in the EA release which affects remote publishing.
In essence, if a Utility JAR project does not have a source folder, the utility JAR will not get published when publishing to a remote server. This will be fixed with the GA release.
a. Switch to a Java Perspective.
b. From the Package Explorer view, select WBOnlineUtility , click mouse button 2, and choose Properties from the pop-up menu
c. Select Java Build path from the left hand pane and click the Source tab.
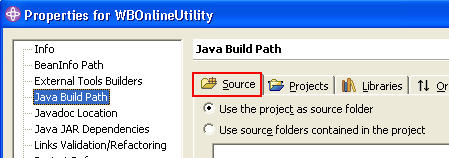
d. Select the Use source folders contained in the project radio-button.
e. Click the Create New Folder... button.
f. From the New Source Folder dialog, specify a path of src .
Click the OK button.
g. On the Message box which asks whether it is ok to set the build output folder to \bin, click the Yes button.
h. Click the OK button to close the Properties dialog.
i. On the Message box which warns that the build output has changed, click the Yes button.
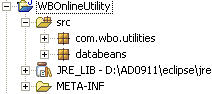
j. From the Package Explorer, select the com and databeans folders (Note: Use multiple select.)
k. Using drag-and-drop, move the com and databeans folders to the src folder
Note: Since the remote server will be an external WebSphere application server, the variables pointing to the WebSphere Embedded Messaging subdirectory must be modified.
a. From a Server Perspective and the Server Configuration view, double click WAS50Remote to open the configuration editor
b. From the configuration editor, click the Variables tab.
c. From the Node Settings section (as shown below), locate the MQ_INSTALL_ROOT variable name.
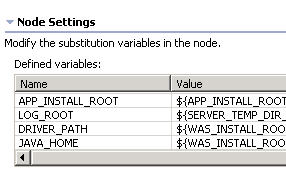
d. Highlight the MQ_INSTALL_ROOT variable and click the Edit... button.
e. From the Edit a Variable dialog, specify a Value of x:\WebSph~2 as a value. (Note: x:\WebSph~2 the subdirectory where WebSphere Embedded messaging is installed by default. Read the Note: box below for details).
Note: By default, the WebSphere Embedded Messaging is installed in a \WebSphere MQ subdirectory. WebSph~2 should be the windows short name for this subdirectory. If you open an MS-DOS window and issue the command
dir d:\websph~2You should see the contents of the \WebSphere MQ subdirectory.
We need to use the short name because the XML editor will report a syntax errors if you use the "WebSphere MQ" path.
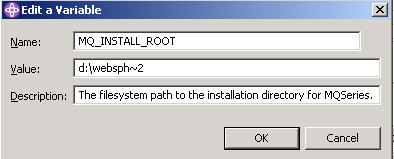
Click the OK button.
f. Using similar steps, modify the WAS_PUBSUB_ROOT variable so it has a value of x:\WebSph~2\WEMPS
g. Using similar steps, modify the MQJMS_LIB_ROOT variable so it has a value of x:\WebSph~2\java\lib
h. Hit CTRL+S to save the changes and close the editor.
a. From a Server perspective, highlight WAS50Remote in the Server view, click mouse button 2, and choose Start.___ 2. Test WBOnline
Note: At this point, the WBOnline EAR and websphere configuration will be published to the x:\WASDeploy subdirectory and the external WebSphere Server will be started via the IBM Agent Controller.
b. As the server, starts monitor the console for any exceptions that might occur.
When you see the message:
[9/19/02 5:32:58:113 CDT] 506bc936 WsServer A WSVR0001I: Server server1 open for e-business
[9/19/02 5:32:58:113 CDT] 506bc936 SystemOut O *** Server has started ***
This indicates that the external WebSphere Application Server has been started!
Note: Don't worry about any exceptions which are displayed indicating the adminconsole.ear could not be found. This is a small defect with the driver we are using (as mentioned above).
a. From the Navigator, select WBOnline, click mouse button 2, and choose Properties from the pop-up menu.___ 3. Stop the Server
b. From the Properties dialog, select Server Preference from the left-hand pane.
c. Click the Prompt for server before running radio-button.
Click the OK button.
d. From the Navigator, expand WBOnline->Web Content.
e. Select Index.html, click mouse button 2, and choose Run on Server... from the pop-up menu.
f. From the Server Selection dialog, select WAS50Remote from the list and click the Finish button..
g. After a few moments, you should see a Web Browser appear.
h. Click on the Account Activity link
i. Enter a Customer Number of 1 and click the Submit button.
You should see that WBOnline is working as expected.
a. From the Server Perspective, switch to the Servers view.Congratulations! You've deployed WBOnline to a remote WebSphere Server using the Remote Server support in WebSphere Studio Application Developer! You have now completed Part I of the Deployment lab for WebSphere Studio Application Developer 5.0! Part II of this hands-on lab will take you through the steps to deploy the WBStockPurchase Enterprise application manually to an external WebSphere Server.
b. Highlight WAS50Remote, click mouse button 2, and choose Stop from the pop-up menu.