
The View menu contains various commands to format the document window when editing an HoTMetaL PRO document.
The Character..., Separation..., and Ruler... commands allow you to set numerical parameters. These may be set from a menu or entered directly by the user in a text box. As appropriate, these values may be absolute, relative, or expressed as a percentage of some base value (this is explained below). The following units may be used:
You may use any unit wherever you are allowed to enter values. For example, point size may be expressed in points, inches, picas, etc. Descriptions of individual commands will indicate which kinds of values (absolute, relative, percentage) may be used.
Units may be specified by giving the full unit name, the abbreviation (mm or cm), or the first few letters of the unit name, as long as that specification is unambiguous.
The following are examples of valid settings:
Relative settings specify an amount to be added to or subtracted from a base setting: they have the same format as absolute settings, but are prefaced by a `+' or `-' sign. As well, you may set a value to be Adopt Current, which means that the value is to be inherited from the surrounding element. Some valid settings are:
Values may also be expressed as a percentage by affixing a percent (%) sign, the word `percent', or a suitable abbreviation e.g.:
If you select Show Tags, the start- and end-tags in your document will appear on the screen as small tag icons, and character entities will be represented as rectangular icons containing the character name; if you select Hide Tags, the tag icons will be hidden, and the character entities will appear in text form. This command is toggled: if you choose Show Tags, the menu item changes to Hide Tags, and vice versa. The tags that point to the right are start-tags, indicating the beginning of an element, while those that point to the left are end-tags, indicating the end of an element. When you create a new HoTMetaL PRO document, tags will be visible by default.
This feature allows you to display a window showing the sequence of nested elements that terminates at the current insertion point or selection.
This window will not show the structure of the entire document (see Show Structure View below) only the hierarchical context containing the current position. That is, it displays the sequence of open tags at the current position. Any attributes that have been set for elements in the sequence will be displayed.

When you invoke this command the name toggles toHide Link and Context View; this command should be used to dismiss the context view.
You can bring up a different context view for each open HoTMetaL PRO document.
This command brings up a window that shows the structure of the entire document.
You can bring up a different structure view for each open HoTMetaL PRO document. Once a structure view is displayed, it remains visible, even if you change documents, until it is dismissed.
The structure view shows the hierarchy of the document in a plain, unformatted manner. Each line in the structure view represents one element in the document. Each line shows a start tag, an end tag and possibly some text between them. The indention of the line indicates the level at which the element is nested. The text cannot be edited and typing is not recognized, but you can use all the editing commands from the Edit and Markup menus.
To select an element in the structure view, you can either click to the left of the start tag icon and drag the cursor across the icon, or click twice to the left of the start tag icon. Multiple elements can be selected by clicking the mouse to the left of a start tag and then dragging down to select successive elements.
When you invoke this command the name toggles toHide Structure View; this command should be used to dismiss the structure view.
Since text entry is not permitted in the structure view, almost all editing is done in the formatted view. The structure view is useful when rearranging whole elements or when creating an outline for your document. It can also be very useful when you are changing styles, for example, with the Character... command.
You may insert, remove, split, etc., elements while in the structure view. Any of the valid commands that you select will apply to the contents of the structure view.
Any editing you do in the structure view will appear in the formatted view provided it is displaying the same portion of the document.
Clicking on an element icon allows you to open and close elements, that is, show and hide their contents. When an element is open, all the elements it contains (but not their sub-elements) are shown as indented lines following that element's line. (To see the contents of sub-elements, open these in turn.) When an element is closed, access to its contents is not possible because the contents are not displayed in the window. Since you can insert elements in the structure view, you can use this feature to build an outline (structure) for your document before you begin to type in the text.
This command allows you to display a file (usually a bitmapped graphic file) referred to by a URL in the current element (which must be one of IMG and LINK). To view a file, invoke this command when the insertion point or selection is inside the desired element.
Show Image uses the following mechanism to determine how to process
the file--in this explanation, assume that the URL is:file:///c|/rodney/orwell/george.gif
view_gif=c:\windows\pbrush.exe $FILEc:\windows\pbrush.exe c:\rodney\orwell\george.gif(This invokes the Windows Paintbrush program.)
If you intend to use Show Image, you should ensure that the necessary configuration variables (view_gif, view_tif, view_jpg, etc.) are defined before you invoke HoTMetaL PRO, and any programs that these variables refer to are available on your system (in particular, ensure that they are in your executables path unless you use a full path in the command name).
Since Show Image uses only the filename part of a URL, the URL can specify a file on any server, provided that a file of the same name exists on your local system.
If you invoke Show Inline Images, all GIF files referred to by URLs of the elements IMG and LINK in the current document will be displayed inline (i.e., in the HoTMetaL PRO document window). The menu item will toggle to Hide Inline Images. Invoking Hide Inline Images will cause all such images to be hidden.
If the show_inline_images configuration variable is set to TRUE, GIF images will be displayed when a file is opened, and this menu item will be toggled to Hide Inline Images. Otherwise (if show_inline_images is FALSE, or not set at all), GIF images will not be displayed when a file is opened, and the menu item will be toggled to Show Inline Images.
This item allows you to change character-related formatting properties such as font, font size, and justification.
You can change the format assigned to an element in the document at any time. When you invoke the Character... command, HoTMetaL PRO gives you a dialog box allowing you to set formatting parameters for the current element (the one the insertion point or selection is in). When you change these parameters, they will change for all occurrences of the current element type. If the insertion point is not inside any element, HoTMetaL PRO gives you a dialog box to set the default format. If you move the cursor to a different element while the Characters dialog box is on the screen, the dialog box changes to reflect the formatting of the new element.
The Characters
dialog box will look like the following illustration: 
The name of the element currently being formatted appears in the lower left corner of the dialog box. (The element is P in the illustration.)
The drop-down list box for Font Family shows the current choice. You can specify the font family by name or adopt the font of a surrounding element. To select a new font family, position the cursor on the Font Family arrow. Click and drag down the list of the font family names available on your system. Release the mouse button over your choice.
The default font family can be specified with the default_font_family configuration variable. A font family specified in this manner will be the default for all open documents. The built-in default font family is Helvetica.
Sometimes you may want to change the font family you're using on the screen for many related elements. Changing the Font Family for every element would be time-consuming and tedious. You can allow changes to be inherited by taking advantage of HoTMetaL PRO's ability to pass format settings from one element to the next.
For example, if the insertion point is surrounded by the following tags:
<HTML> <BODY> <P>
and you set the Font Family to Adopt Current in the BODY and P elements, then whatever font family you establish in the HTML element will ripple through the entire structure.
Selecting the font size is similar to selecting the font family. You can open the Font Size drop-down list box and choose any size (including Adopt Current) shown. You may also enter a size in the text box to the left of the arrow. This size may be an absolute or relative value. If the size you chose is unavailable, HoTMetaL PRO will choose the next smallest font size. Relative values are added to the point size of the surrounding element.
The default font size can be specified with the default_font_size configuration variable. A font size specified in this manner will be the default for all open documents. The built-in default font size is 12 points.
The check boxes under the Font Style heading allow you to add style variations to the font family. The check boxes can be set individually or in any combination. If you want the style to be the same as the style for the surrounding element, click on the Adopt Current check box only.
As an example, consider a document with three emphasis elements: B, I, and EM. So that the contents of these elements will stand out, you could set the font family and font size to Adopt Current for each of these elements, make them all Inline (see below) and then set B to Bold, I to Italic, EM to Bold and Italic. These emphasis elements would then cause their contents to be the same font and size as the surrounding text but each would have a different style.
Superscript and Subscript raise and lower, respectively, the baseline of the font. Superscripted text is raised so that its baseline is one-third of its ascent above the baseline of the containing element. (The ascent is roughly the distance from the baseline to the top of an uppercase letter.) Similarly, the baseline of subscripted text is lowered to be one-third of the ascent below the baseline of the surrounding element. To make effective use of these style options, either choose a font size that is smaller than the size of the containing element or ensure that the line spacing of the containing element is large enough that the tops of the superscripted characters and bottoms of the subscripted characters are not cut off.
When Toggle is selected as part of the font style, the other style settings are turned off if they are turned on in the containing element. For example, an element whose font style is set to Bold and Toggle will appear as bold text within plain (Roman) surrounding text and as plain within bold surrounding text.
Adopt Current means that the font style options of the containing element are adopted in addition to those explicitly set for this element type. For example, if Adopt Current is the only option selected, then the font style for an element of this type will be identical to the font style of its containing element. Another example would be an element whose font style is set to both Adopt Current and Italic. Then the element's text will appear with a font style of italic within an element containing plain text and as bold-italic in bold text.
Underline allows you to underline the text of the element.
The Line Height specifies the vertical height from the bottom of one line to the bottom of the next line in the same element. This value should normally be set slightly larger than the font size so that the lines won't appear clipped.
You may select single, double, or triple spacing from the drop-down list box labeled Line Height. Double spacing gives twice the line height of single spacing; triple spacing gives three times the line height of single spacing. A value may also be entered directly in the text box to the right of the arrow. This value may be absolute, relative, or a percentage.
A percentage line height is understood as a percentage of single spacing. I.e., 100 percent is the same as single spacing, 150 percent is 1.5 times as high as single spacing, and so on.
If you give a relative value then the line height is equal to the single spaced line height, plus or minus the amount specified.
An absolute line height should be at least as large as the point size: otherwise, the lines will overlap. A value of about 1.2 times the point size would be normal.
If you select Adopt Current for the line height, then the element you are formatting will assume the absolute line height of its surrounding element. So if the surrounding element has a font size of 12 points and single line spacing, and you choose, say, a font size of 24 points for the current element, it will have the same line height as if it had a font size of 12 points, because that is the line height of the surrounding element. Line height defaults to Adopt Current.
HoTMetaL PRO offers four styles of text justification plus the ability to inherit the justification style from the surrounding element. You can choose the one you want by clicking on the appropriate icon. The styles are mutually exclusive: you can choose just one.
The choices are:
Left (flush left, ragged right): All the spaces between words are the same width, and the text is aligned on the left, leaving the right-hand edge uneven.
Right (flush right, ragged left): All the spaces between words are the same width and the text is aligned on the right.
Centered: all the spaces between words are the same width and the lines are centered on the midpoint of the line length.
Both (flush right and left--often called justified): Spaces between words are adjusted to force both left- and right-hand edges of the text to be even.
Adopt Current: the justification style is inherited from the surrounding element.
This group of choices allows you to specify whether HoTMetaL PRO should treat carriage return characters as spaces or as ends of lines. When Fill is selected, the lines are broken at the last space before the right indent. If you type KEY:[Return] a return character is inserted but is treated as though it were a space. When No Fill is selected, HoTMetaL PRO will not fill the lines--when you type KEY:[Return], a new line will be started.
For example, poetry and centered headings would normally be in No Fill mode, while the contents of a paragraph would be in Fill mode.
When you save a file, you may choose to have line breaks inserted after a certain number of characters in all elements that are in fill mode. See the description of the Save command in the chapter on the File menu for more details.
For the purposes of screen formatting, the elements are divided into two broad categories: Block and Inline. You can set the category for each element by clicking on the appropriate option button in the Format Type group.
Block elements:
Always start on a new line if there are any end-tags or text on the current line.
Cause any element or text that follows them to begin on a new line.
Can have all the formatting options set: justification, font family, size and style, vertical and horizontal spacing, and tab settings.
Inline elements:
Cause no line break either before or after the element. This format might be used for an emphasized word or phrase or a short quotation.
Can have only certain formatting options set: font family, size, and style. The other options are inherited from the surrounding element.
This
command lets you set the amount of vertical space that separates an
element from neighboring elements. To edit these values, move the
insertion point inside an instance of an element you want to format,
and click on the
Separation... menu item, or click inside the desired element
when the Separation dialog is already on the screen. 
Top and bottom space control the vertical separation between elements. They are available only for block elements.
Top Space determines the minimum amount of vertical white space that must precede the element. If the element before this one has a Bottom Space value, the actual separation will be the greater of the current element's top space and the preceding element's bottom space.
The top space can be specified as an absolute amount or as a percentage of one line height at the current line height. For example, if you want 1 1/2 lines of white space between paragraphs, set the top space to 150%. The top and bottom space separations are added to the normal line spacing, so if two successive elements have a bottom separation of zero and top separation of zero, respectively, the baseline of the last line of the first element and the first line of the following element will be one line height apart.
Bottom Space determines the minimum amount of vertical white space that must follow the block. The actual separation is the greater of the current element's bottom space and the next element's top space. The value is specified in the same way as for Top Space, above.
An element that has Tabbed turned on is formatted as if it started with a tab. (See Ruler..., below, for information on setting tab stops.) This command does not actually insert a tab into the text. Both block and inline elements may be designated as tabbed. This option is useful for displaying simple tabular material.
If you are using HoTMetaL PRO on a color display, this command allows you to set the color in which the text and affixes of elements are displayed. For each element, you may choose a foreground color and a background color. The foreground color is the color of the text; the background color is the color of the "bounding box" of each character.
To choose the colors for an element, put the insertion point inside an occurrence of that element, and click on the Color... command.
When the command is invoked, you are presented with a dialog box
containing two scrollable lists from which colors can be chosen, one for
the background, one for the foreground. 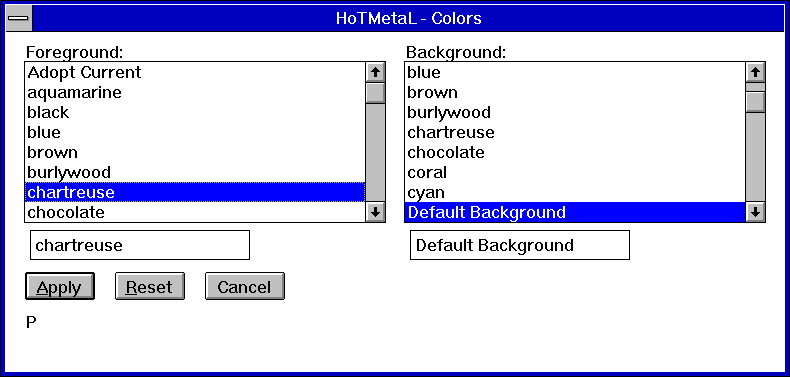
In this example, the foreground color is chosen explicitly, and
the default is adopted for the background.
These lists contain
the colors that are currently loaded into HoTMetaL PRO for the
foreground and background. In addition, the lists contain entries Adopt
Current,
Default Background, and Default Foreground.
To choose a color, click on the color in the list and it will be placed
in the text box underneath the list. Alternatively, you can
enter a color in the text box by typing it in directly. Then
click on the [Apply] button.
Adopt Current means that the color of the surrounding element will be adopted for the current element. If the choice in one of the lists is Adopt Current, then the other one will revert to Adopt Current also. You can, however, use Default Background or Default Foreground in conjunction with another color choice.
If you
specify a color name, then that name must have an entry in the color map
file (sometimes called an rgb.txt file). A color map file is a
file that associates a color name with a number that describes the color
by specifying the mixture of red, green, and blue that makes up that
color. The entries in the color map file are in the form:65 105 225 RoyalBlue
The three numeric values (which are dependent on the video card
installed for your display) indicate the red, green, and blue values,
respectively. Such an entry will cause the name RoyalBlue
to appear in the foreground and background lists in the Colors
dialog box. The color map file is identified with the rgb_txt
configuration variable. By default, this is a file called rgb.txt
in the directory where the HoTMetaL PRO software was installed. The
color names that appear in the dialog box are those that are mapped in
the color map file. If you enter a color that doesn't have an entry in
the color map file in one of the text boxes in the Colors
dialog box, that color will be displayed as the default foreground or
background color, as appropriate. The color you typed in will be entered
in the styles file anyway, so that if you subsequently update the color
map file to include an entry for the new color, it will display as
desired.
This command is used to set indents and tab stops for a block element. To obtain the dialog box, move the insertion point inside an instance of the element you want to format, and click on the Ruler... menu item, or click inside the desired element when the Ruler dialog is already on the screen.
Ruler... allows you to set
three types of indention plus tab stops. 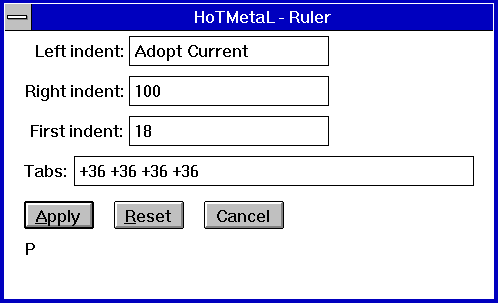
The left and right indents are used to define a column that contains the content of the element. As a result, they effectively specify the line length for the element.
The left indent specifies an amount that the element is moved to the right; the right indent specifies the point at which the lines in an element are terminated.
No indent can be set to the left of the global left margin or to the right of the global right margin. Within these limits, text can appear outside the indents of an element if a negative first indent is set (see below) or if the element's content is not being filled and it contains a long enough line. With those exceptions, left justified and justified text starts flush with the left indent, centered text is centered within the two indents, and right justified and justified text ends flush with the right indent.
An absolute or relative value may be entered in the text boxes for the different indents.
An absolute indent (a value that does not start with a plus or minus sign) is actually relative to the global margins. In this case the indent specifies the amount of space between the margins and the content of the element. Absolute indents must be positive numbers, or zero. For example, if you specify a value of zero for the left indent, the indention will be identical to the global left margin. If you specify `1 inch', the indention will be one inch to the right of the global left margin.
Relative indents (values that start with a plus or minus sign) are relative to the indention of the surrounding element. The values may be positive or negative. A positive value moves the indention to the right, relative to the surrounding indention. For example, a value of `+1 inches' for the left indent causes the indent to be one inch to the right of the left indent for the surrounding element. A negative value moves the indention to the left. For example, a right indent of `-1 inches' causes the indent to be one inch to the left of the right indent for the surrounding element.
If an indent is Adopt Current then it is given the value set for the current element's containing element. (This is equivalent to specifying a relative indent of +0.)
The indent for the first line can be different from the indent for subsequent lines: this is often done for paragraphs. If you select a relative indent, positive or negative, the value you choose will be added to the left indent. An absolute indent will be measured from the global left margin. A first indent specified as Adopt Current is the same as a relative indent of +0.
The first indent is treated as a tab stop so that a block element that has a first indent and begins with a tabbed inline element or prefix will tab to the first indent and be formatted accordingly. First indents, unlike tabs, are not inherited.
A first indent cannot be set to the left of the global left margin or to the right of the global right margin.
Tab stops allow for the specification of the positions and types of tabular columns. Tab stops are not used by browsers (except sometimes within a PRE element), so the settings you make here will affect the HoTMetaL PRO display only.
If you insert tabs into the text, each tab stop determines how the text that follows the corresponding tab is displayed. The first tab stop determines how text following the first tab that occurs in the line is positioned, the second tab stop determines how text following the second tab that occurs in the line is positioned, and so forth.
Four types of tab stop are supported:
The tab stops are specified by entering a string of tab stop specifications, separated by spaces, into the Tabs text box.
Each tab stop
specification consists of a type specifier followed by a position.
For example: |100
Here, the `|' character is the
type specifier, and `100' is the position. This specification is for a
centered tab stop located 100 pixels from the left indent.
Tab positions are measured from the left indent. The tab position can be absolute or relative. Relative values are added to the previous tab position.
The conventions for specifying the type of a tab stop are as follows:
The conventions for specifying the tab stop position are as follows:
The following string is an
example of a tab specification string:0.5i >+3.5cm |+100 c%500
This specifies four tab stops: a left tab position at a distance of 0.5
inches from the left indent, a right tab position at 3.5 centimeters
from the first tab position, a centered tab position at 100 pixels from
the second tab position and a character tab positioned 500 pixels from
the left indent, with a tab character of `%'. (A typical use for a
character tab is in decimal columns, when the character selected is a
period, but HoTMetaL PRO permits this more general specification.)
The following illustration shows how the different tab stops work. The
tab stop settings in effect are:0.5i >+1i |+1i c.+1i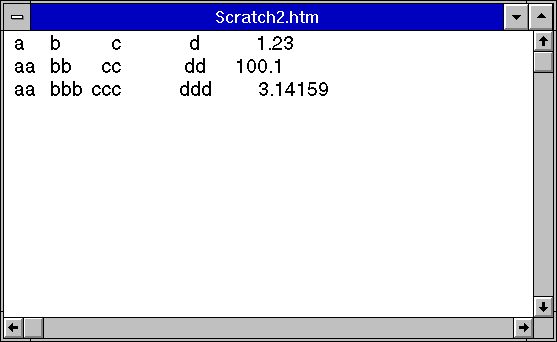
In this example, the first tab stop is a left tab 0.5 inches from the left side of the screen: as you can see, the column of b's is left-justified along this tab stop. The next tab stop is a right tab stop located one inch from the first tab stop: the column of c's is right-justified along this tab stop. The column of d's is center-justified on the third tab stop, one inch from the second tab. Lastly, the column of numbers is aligned on the decimal point, at a tab stop one inch from the third tab stop. (The column of a's occurs before the first tab, and is simply aligned with the left side of the screen.)
This command allows you to save the document styles in text format. When this command is invoked, a file selection dialog box appears, allowing you to choose a file name to save the styles in. The default directory in this dialog box is the one listed first by the ascii_styles_path configuration variable.
This command allows you to load a styles file in text format. When this command is invoked, a file selection dialog box appears, allowing you to choose a styles file. The current directory is the one listed first by the ascii_styles_path configuration variable.
Note: The binary styles file is updated with the formatting information loaded from a text styles file when the current file is saved. If you copy a styles file from one environment to another, you may experience formatting anomalies if the environments support different fonts. In this case, you may wish to open the styles file as a text file, change the font names as appropriate, and then reload the file.