|
Explosive
Fire Tutorial - by Tiny3d
Hi there all you hirez people.
I'm glad you found your way to this very new and very cool
website. I have great hopes for it and I would like to say
thank you Mongi for doing this. It is well needed. My little
treat for you today is a rather impressive fire effect.
As you all see it was originally planned to appear on Cooltype.com...
Anyways make sure to keep your eyes open for upcoming photoshop
tutorials on tiny3d.com... you can go there already today
and request tutorials you want made. Well enough talk for
now. Let's get down to business.
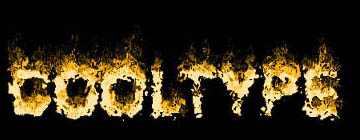
 This is the effect I am going to teach you. Looks pretty impressive
doesn't it? Well don't worry it's not very hard to accomplish.
This is the effect I am going to teach you. Looks pretty impressive
doesn't it? Well don't worry it's not very hard to accomplish.
It is based on two of the standard photoshop filters. The
Wind filter and the Ocean ripple filter. These are the only
two filters you will need to use for this tutorial. Some of
you may want to use some kind of blur aswell to get a blurred
effect on the flames. Personally I prefer to work in a somewhat
higher resolution than the end-product requires. This is due
to the fact that the flames look a LOT better when the image
is resized.
Ihaven't yet tried animating these flames. But I suspect it
can be done. If anyone of you out there give it a go, please
email me and tell me how it worked (tiny3d@tiny3d.com).
STEP 1: TEXT
Start out with a new image
with black background. Keep in mind that we will be
resizing it later so make it a little larger than you
want the final text to be.
Now create your text,
be sure to leave some free space above it for the
flames. It should be white on the black background.
I suggest storing a copy of the text layer before
you merge it with the black background layer.
Now you should have
a picture that looks somewhat like the one on the
right.
|
 |
 |
STEP 2: WIND
Ok lets get started with
the actual flames. Make sure you have a layer with white
text on a black background. If you haven't then the
wind effect won't show up correctly.
Rotate the image 90
degrees (or if you want the flames in some other direction
just rotate the image so that that direction is pointing
to either left or right).
Now apply the Wind filter.
It can be found under the stylize filters. Apply it
with a wind setting and the appropriate direction
(left or right). I suggest applying it twice to get
some height in your flames. So just press ctrl+f to
apply it again with the same settings as last time.
Your layer should now
look like the one on the left.
|
STEP 3: OCEAN RIPPLE
Now apply the Ocean Ripple
filter. You'll find it among the distort filters. Choose
a Ripple Size according to how small you want to flames
to be. Here I used a value of 3. I prefer applying wind
once again after using ocean ripple. And then finishing
off with another ocean ripple this time with a somewhat
larger Ripple Size (5).
You should now be able
to see the flames. They don't look like much in greyscale.
But don't worry we'll fix that in the next step.
|
 |
STEP 4: COLORING
To achieve a good result
your coloring will need some work. Start out by copying
your flame layer so that you won't loose the original.
Create two or more copies (depending on how many colors
you want to use in your flames).
Now use Image_Adjust_Hue/Saturation
and select the colorize option. Set the lightness
to somewhere between -10 and -25. Set the saturation
to maximum and adjust the hue slider until you find
the color you want.
How much you darken
the layer will determine how far up that color will
reach. You can also adjust this by using the Image_Adjust_Levels
method.
Here I choose to use
two colors. In the logo on the top I used three. You
can see my two 'flame' layers on the right here. The
colors may look weird but the result isn't.
We are now just about
done. Just one more final step.
|
 |
STEP 5: FINAL SETTINGS
Set your flame layers to
'screen layer' mode. You should now see the flames as
they will look in the final image. On this cooltype
logo I choose to place one of the flame layers in front
of the text to really make it burn.
As you can see on the
top image on the right I applied a quick photoshop
5 effect to my original text layer (a pillow emboss).
Now we just set the appropriate channel modes and
adjust the colors as needed to get the correct coloring.
When it all looks good, resize the image to the wanted
size to get rid of ugly details.
And as easy as that
you have created a stunning fire effect that will
make most people amazed.
|

 |
I hope you didn't have any
trouble following my instructions. This is a rather basic
version of this effect I can imagine it can be taken much
further. Perhaps with some smoke rising up and so on. It's
all up to your imagination.
If you have any questions
or comments about this you can either email me (tiny3d@tiny3d.com)
or find me on irc. I'm usually on a EFNET-server in the
channel #photoshop as 'Tiny3D'.
Feel free to use this effect
freely but give me some credit for it. If you want to put
this effect on your own photoshop page or effect gallery
just email me and I'll get back to you about it. The same
goes to anyone who wants to make a action out of this. Talk
to me before you do it.

|