FAQs-WALLS
How high can you build a retaining wall with the Anchor Windsor Wall & Aspen Wall?
How high can you build a retaining wall with the Anchor Brighton Wall?
How far apart should I place my walls when building a terrace?
How many wall stones will it take to do my project?
Can I put Anchor Windsor Stone right on top of the ground?
What kind of base do I need for my Anchor Windsor Stones?
Why do I use landscape fabric behind my retaining wall?
Should I mortar the top row of my retaining wall to prevent kids from lifting or moving them?
Does Pavestone make a cap for the Anchor Windsor Stone?
What should I use as backfill for my retaining wall?
How do I build my Anchor Windsor Stone wall along a grade change?
How do I do a 90░ inside corner with the Anchor Windsor Wall?
How do I build a 90░ outside corner with the Anchor Brighton Wall?
How high can you build a retaining wall with the Anchor
Windsor Wall?
You can build a retaining wall with the Windsor
wall product up to 2ft. high. That would be a total of 7 layers of wall because
it is recommended that you bury one full layer of wall in the ground for
stability. If you have the space you can build a terraced wall.á To build a terraced wall, you first build a
2 ft. high wall, then terrace back 4 ft. and build another wall 2 ft. high for
a total of 4 ft.
Back to the Top
How high can you build a retaining wall with the Anchor
Brighton Wall?
You can build a Brighton Wall retaining wall up
to a height of 3ft. without a tieback. Anything over that requires an
engineerÆs design using Geo Grid Fabric at various levels depending on the
height and soil conditions. In fact, a Brighton wall that is properly
engineered, can be built to heights over 3ft. It is recommended that you
bury one full layer of wall in the ground for stability and be sure to have an
engineerÆs design for any walls taller than 3ft.
Back to the Top
How far apart should I place my walls when building a
terrace?
A general rule of thumb is to take your lower
wall height and double it. This will give you the distance needed between
walls. For example if your wall is 2' high the next wall should be installed at
least 4' behind the first one to make sure that you are in solid ground to
build your next wall. Then you can build your next wall another 2ft. high. This
will give you a total of 4ft. of retaining wall. The nice thing about terracing
is that it breaks up the sheerness of the wall and allows for a beautiful planting area.
Back to the Top
How many wall stones will it take to do my project?
See the calculator on this CD or online at www.pavestone.com.
Back to the Top
Can I put Anchor Windsor Stone right on top of the ground?
Anchor Windsor stones need to be securely
anchored in the ground. How deep it needs to be anchored is dependent on
whether you are doing a short wall or a tall wall. A short wall is defined as
any wall 3 courses or less and a tall wall as any wall 4 courses or more
(remember 7 courses is the maximum recommended wall height including 1 buried
course). For a short wall we recommend burying the bottom layer 1/2 (or two
inches). On a 3-course wall this will leave you 10 inches showing out of the
ground. For a tall wall we recommend burying the entire bottom course (or 4
inches). On the maximum wall height of 7 courses this will leave you 24 inches
showing out of the ground. By burying the first row, you have created a stable
footing to support the rest of your wall and will keep movement to a minimum.
Back to the Top
What kind of base do I need for my Anchor Windsor Stones?
While not absolutely necessary, a 1in. bed of
sand in the bottom of your trench is recommended and extremely helpful. In
order for your wall to be attractive and serve it's purpose it needs to be
level. By putting a 1" bed of sand in the bottom of your trench you will
save yourself a lot of time when using your level on the bottom row. For tall
walls (4 courses or higher) you might also mix dry Portland cement in with your
sand. After your wall is built, the Portland/sand mixture will draw moisture
from the ground and help secure your bottom row creating somewhat of a footer.
Back to the Top
Why do I use landscape fabric behind my retaining wall?
The landscape fabric serves as a filter to keep
small soil particles from working their way through the wall when moisture is
present. Remember that any material used as a barrier behind your wall must
allow moisture to come through so it can help prevent your wall from failing.
Back to the Top
Should I mortar the top row
of my retaining wall to prevent kids from lifting or moving them?
We don't
recommend mortaring any of our wall products; these walls are designed to be
mortarless. A good construction grade adhesive is recommended when you need to
secure the top row to prevent kids from moving your wall pieces and is highly
advised. We have found that there are several concrete adhesives that work well
and most adhesives can be applied with a caulk gun. Go to your local Pavestone
dealer and ask for a quality construction grade adhesive. Example: PL adhesive
or Liquid Nails.
Back to the Top
Our Anchor Windsor Stone retaining wall units
come in many different colors to blend with your homeÆs exterior. And unlike
any products made from wood which rot, warp, and become insect and rodent
motels, our products are made to be durable, flexible, and timeless.
Back to the Top
Does Pavestone make a cap for the Anchor Windsor Stone?
We only make a Windsor cap at some Pavestone
locations so not all retailers will carry a Windsor cap.á Please check with your local retailer for
availability.á Most all the applications
can be done without the use of a cap.
Back to the Top
What should I use as backfill for my retaining wall?
Start your aggregate backfill once you have laid your first two courses of wall.áá Shovel clean draining aggregate directly behind the first 2 courses of stones, extending out about 12". We recommend using All Purpose rock or pea pebbles. As a general rule, the backfill zone should extend as far behind the wall as the wall is high. For example, one foot back for a one foot high wall. Next, compact this backfill zone using a hand tamp.á After each additional course of stone is laid, you need to backfill and compact again until the last course of the wall is laid.
You can also use filter fabric behind your wall with your backfill to keep the fine soils from washing through the wall.á In addition, use a drain pipe in high moisture areas to carry off the excess water. Getting the water away from the back of your wall is very important and filter fabric and drain pipes can help.
Back to the Top
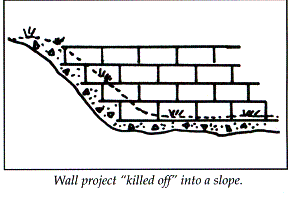
How do I build my Anchor Windsor Stone wall along a
grade change?
The first step is to dig a trench at least 12ö wide and 6ö
deep.á No matter where the trench is it
needs to be 12ö wide and 6ö deep, even up a slope.á Next step, prepare your base materials by mixing1 part Portland
cement with 6 parts Pavestone sand dry.á
The best method for mixing is to use a wheelbarrow and spade as your
mixing area. Make sure that the sand and Portland Cement are very well mixed
then shovel approximately 2 inches into your trench, dry.á
You are now ready to start laying your Anchor Windsor wall stones in the trench.á The starting point will be your lowest point on your wall.á Using a torpedo level and mini-sledgehammer place your first stone and level it.á You will need to level the stone from side to side and front to back. Continue this process until your grade starts to change and you are unable to place another stone and level it with your level. When you reach this point, go back to your starting point and begin your second course.á Once you reach the point where you left off with the previous course, use your mixture of Portland Cement and sand to fill in your base this will bring the base level to your second course.á Repeat this process until you have leveled your entire wall into your grade change.
Since the trench is 6ö deep, you will not be able to see the mixture you used to fill in the gaps and it will look like you ôkilled offö each course into your grade change.á It will make for a precise and level project that is quick and surprisingly easy.
ááááá
Back to the Top
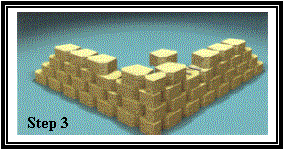
How do I do a 90░ inside corner with the Anchor
Windsor Wall?
Follow these steps to build an Anchor Windsor Wall 90░ inside corner.
Step 1
To create an inside 90░ corner, begin by placing a stone at the corner.á Then lay a second stone perpendicular to the first and continue laying out the rest of the base course working from the corner out.á Make sure to construct the base course according to standard site prep and installation procedures described in the Pavestone Wall Brochure.ááááááááá
Step 2
On the second course, place all stones on bond along one side of the corner.á Adhere the stone in place at the corner with a concrete adhesive.á Once the second course of one wall is established, begin the second course of the adjacent wall.á

Split units may be required on
this wall to maintain running bond.
Step 3
Stone placement in the corner should alternate direction with each succeeding course.á Follow the same procedure for other retaining wall products.
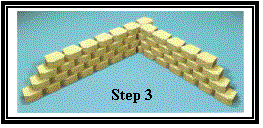
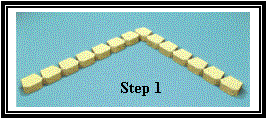
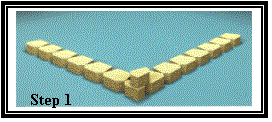
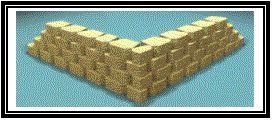
How do I build a 90░ outside corner with the Anchor Brighton Wall?
Follow these steps to build an Anchor Brighton Wall 90░ outside corner.
Step 1
To build an outside 90░ corner, begin by placing a half
stone at the corner.á Remove the lip so
that that the stone lays flat.
Step 2
Begin the second course with another half stone.á Place the second and third stones on either side of the corner stone.á Once the corner stone is in position, adhere the stone in place with a concrete adhesive.
 ááááááááááá
Step 2
Step 3
Continue to alternate the corner stone placement with each
course and always use a concrete adhesive.á
Use split stones as necessary to maintain running bond.á Follow the same procedure for other
retaining wall products.á