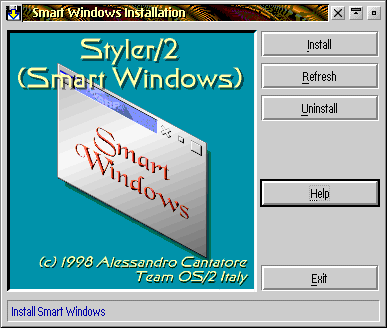
Styler/2 (Smart Windows)
![[Application logo]](/file/14183/enter_04_1999_1.iso/OS2/STYLER2/DOCS/SMW0000.GIF)
Alessandro Cantatore
alexcant@tin.it
alexcant@pandora.it
FIDONET: 2:335/705.2
http://acsoft.ghostbbs.cx
Other features include window rolling, titlebar hiding, overriding the
default size and position of maximized windows, moving windows by dragging
their frame, pushing windows behind the other windows, selection of the
entry fields contents, autofocus, mouse pointer hiding, mouse button double
click emulation and automatically moving the mouse pointer to the focus
window.
This beta version is fully functional and will work for 90 days since
installation or for 600 reboots whichever comes first.
I'm still working on version 0.9 which will be the first shareware
(registrable) version and will be renamed Styler/2.
The archive smw082.zip must be unzipped in a temporary directory preserving
the path of the archive content.
If you are using the free GNU Info-UNZIP this will be made by default:
open a an OS/2 command window, move to the temporary directory and type:
UNZIP SMW082.ZIPIf you are using a different program read the program documentation for the appropriate parameters.
 Once
unzipped the archive you must run INSTALL.EXE and click on the Install
button for a new installation or for updating your previous installation.
Once
unzipped the archive you must run INSTALL.EXE and click on the Install
button for a new installation or for updating your previous installation.
To save users' download time smw082.zip doesn't contain all
the bitmap files included in the previous versions. If you are installing
over a previous installation, you will already have all the bitmap files
in the right palces. If you are performing a new installation and still
have smw081.zip you can drag its \BITMAPS directory into
the temporary directory where you unpacked smw082.zip overwriting
the folder with the same name. Before doing that modify your system configuration
(System object, Confirmations page) checking
to Confirm on copy, move, create shadow . So you will be able to
confirm file overwriting just once for all files reather than many times
for each individual file.
If you do not have smw081.zip, you can get smwb082.zip
and install the enclosed \BITMAPS tree as described above.
If you modified some bitmap files leaving their name unchanged, rename
them or backup them before installing to prevent them to be overwritten.
(The next version of the installer will check for the file date stamps
to avoid that).
The other program buttons have the following functions:
Installation details
This is, step by step, what the happens when you click on the Install button. Please refer to this section if you cannot properly install the program on your system.
The uninstallation procedure undoes all the above described operations.
Besides that it will delete any new bitmap files you added in the \BITMAPS
subdirectories. Anyway a message box asks you to confirm the deletion of
the installation path and other files which can still be there (SMARTWIN.INI
which is created by the application or any other files you put there).
At the end of the uninstallation procedure the SMWSETUP.LOG
file will be written in the root of the boot drive.
The Smart Windows Preferences notebook consists of the following pages:
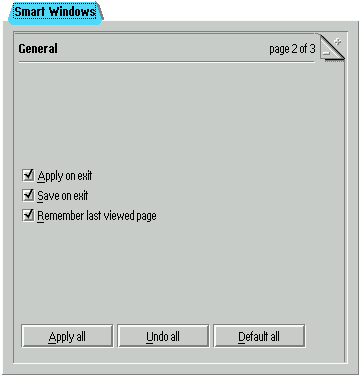
| Smart Windows - General
The settings in this page affect the behaviour of the preferences notebook itself:
|
 |
| Exceptions and Exceptions pages
Although the program integrates seamlessly with the system, generally with no problem for all the other programs, there are still some applications which cannot properly cooperate with it and which won't work properly when some Smart Windows features have been set. In order to avoid this kind of problems each page grouping a category of features is followed by a an Exceptions page which will allow you to enter the name of the programs for which that particular group of options causes conflicts. In some cases you would find more confortable just to completely disable Smart Windows enhancements for a given program. For this purpose you should use the Exception page inserted under the Smart Windows main tab. To add a program to the exception list either type its full name (i.e. including the program path) in the entry field and click on the Add button or get it from the file dialog clicking on the Find button. The Remove button will delete a file name from the list. Note: currently it is not possible to specify the name of programs whose windows are executed as a PMSHELL process. These are: all text mode programs (DOS and OS/2), all Win-OS/2 programs, all fodlers and all WPS applications (like the System clock, the color and font palettes, etc.). In future all this scattered Exceptions pages will be grouped in a unique dialog and will be possible to add program names by darg and drop or directly by the system menu of a running application and to detect the various windows belonging to the PMSHELL process. |
 |
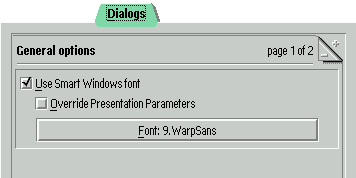
| Dialogs
Usually, when no other kind of font has been explicitly specified by the programmer, all dialog windows will use the ugly System Proportional font. Smart Windows allows to override this system behaviour and force all dialog windows to use your favourite font. Just check Use Smart Windows font to enable this function. This will work in all dialog windows which use the system default font. If you want to force all windows to use the font you selected then check Override Presentation Parameters . The Font button brings to the top the Dialog font dialog. Note: dialog controls inherit the font attribute (presentation parameter) from the dialog unless they have been explicitly set to use a different font. In this latter case the Use Smart Windows font feature won't work. |
 |
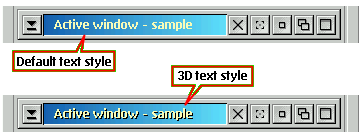
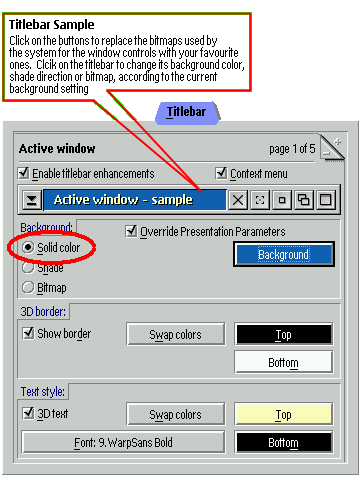
| Titlebar - Active window/Inactive window
Through this page it is possible to change completely the look of titlebars. You can use any bitmap for the titlebar background or the window controls with the following limitations:
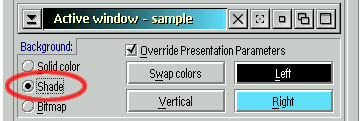
Background group: This setting allows to surround the titlebar with a 3D border. The buttons allow to select and swap the colors. Text style group:
|
|
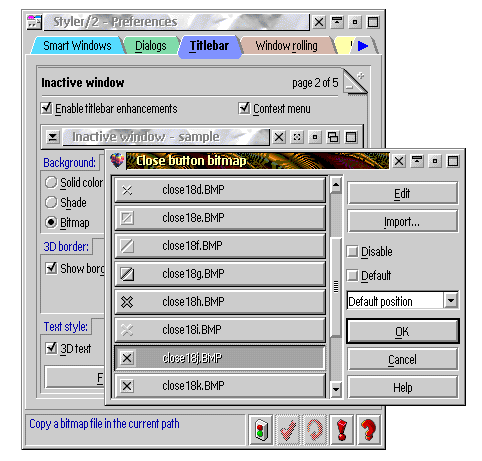
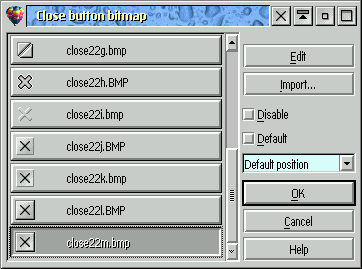
| The bitmap selection dialog
This dialog will popup when you click on the titlebar sample buttons, in the titlebar background bitmap button or in the buttons in the Titlebar hiding and Window rolling pages. This dialog is resizeable and its last size and position is saved in SMARTWIN.INI. The dialogs used for selecting the bitmaps for the close button, window roll/unroll and titlebar hide/unhide has the Disable check box which allows to remove the button from the titlebar controls. Besides that, the Close button bitmap dialog has a combobox for selecting the button position. The Edit button opens the Icon editor with the bitmap currently
selected.
Note:
|
 |
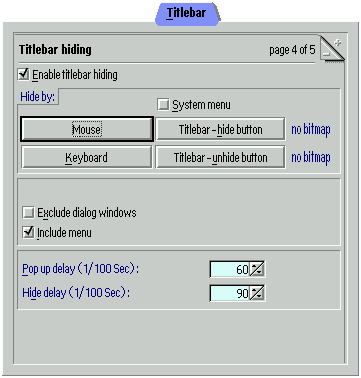
| Titlebar - Titlebar hiding
The options in this page allow to hide the titlebar and controls (optionally including the actionbar menu) of any window. The titlebar pops up again as soon as the mouse pointer moves on the upper window border and is hidden when the mouse pointer is moved away from the titlebar area downwards.
Titlebars in hidden state are hidden again only when the mouse pointer moves downwards inside the window! There is no reason to hide the titlebar of rolled windows so you get just a system warning sound if you try to do so. |
 |
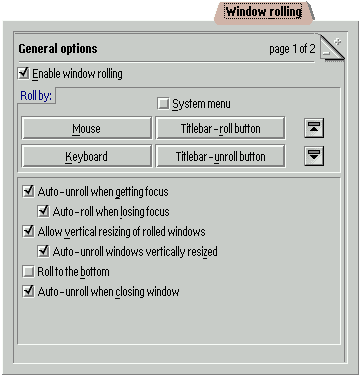
Window rolling
Note:
|
 |
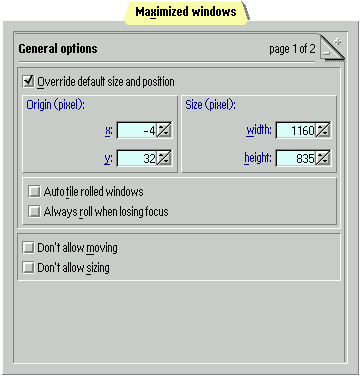
| Maximized windows
These settings allow to change the behaviour of maximized windows.
The window position can be a negative number. Note:
|
 |
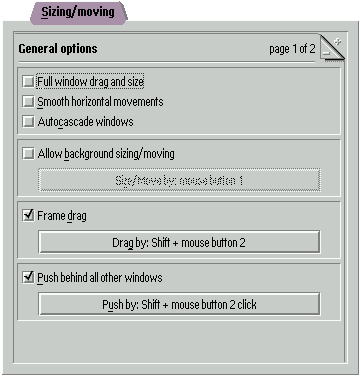
| Sizing/moving
These options control how windows are moved or resized.
Note:
|
 |
| Text controls
The only working option, at the moment is the Entry field automatic text selection . This allows to select the whole contents of any entryfield at once. The Select by: button sets your favourite combination of mouse and keyboard event to perform the operation. |
 |
| VIO windows
No options is working yet. |
 |
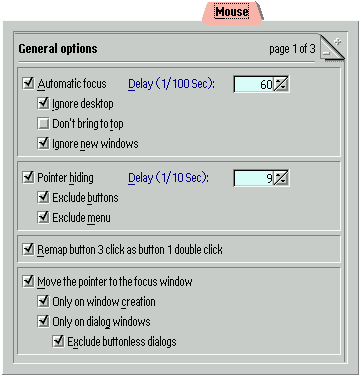
| Mouse
The options of this page are related to the mouse events.
|
 |
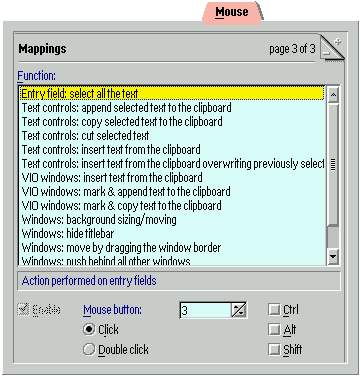
| The mouse/keyboard functions dialog
This dialog is present both as a notebook page and as an independent dialog window which will popup every time you click on a button to select the keyboard or mouse event to perform a given feature (for instance the Mouse and Keyboard buttons of the Window rolling page). As an indipendent Dialog it has the ordinary OK , Cancel and Help buttons to dismiss the dialog. Its purpose is to give the user a sort of summary of all the mouse and keyboard event which have been selected. It is not yet so useful since most of the listed features have not yet been implemented. The Function: list box shows all the features (that will
be) available.
The Keyboard Mappings page (and the Functions controlled by
the keyboard dialog) allows to associate a function key (F1-F12)
plus Insert , Delete and Backspace with
one of the modifier keys (Ctrl , Alt and Shift
).
|
 |