Learn the basics about HTML
Before you begin you will have to understand the basics of HTML.A HTML Page is a text file that is structured by HyperText Markup Tags. A tag is just some text that is enclosed by <>, eg <BODY>.
Many tags consists of a start tag and a matching end tag, eg <BODY>....some text... </BODY>. The end tag has the same name as the start tag but contains a / before the actual name.
The HTML standard specifies the names of the tags and what effect they will have when the page is rendered by a HTML browser.
An HTML Page is a text file that at least contains the following tags:

All contents in the page should be located between the <HTML> and </HTML> tag. Inside the HTML tag you should always have a HEAD tag section and a BODY tag section.
- HEAD
- Inside the HEAD tag you supply general information about the document such as the title of the document. This title is displayed in the browsers window title when you view the page. JavaScripts are also usually placed inside the HEAD tag.
<HEAD>
<TITLE>My Home Page!</TITLE>
</HEAD>You should not place any text inside the HEAD section.
- BODY
- Inside the BODY tag you enter the contents you would like to display on your HTML page.
How Do I Create a Home Page?
OK, it is now time create your own Home Page.Do This:
Select New... in the File menu.
Select Empty Page in the list of different pages in the New... dialog that is displayed.
NOTE: You may later use the other options in the list in this New... dialog to create a specific type of page.
Enter the title of the page in the Title field.
If you wish, you can also select colors for the text, background and links on your page in the Color box by clicking in the color boxes.
Click on the New button.
The skeleton of an empty HTML page is now created and is open in a new untitled window.
Position the cursor between the start and end <BODY> tag by clicking on the empty line.
Enter any text you would like to be displayed on your home page between the start and end tag.
You can also Paste or Drag and drop text from other applications.
When you are done creating some of the text you want to be displayed on your page, you could view it with your Web browser.
How do I preview a HTML page?
Your document must have been saved to disk before you can preview the page in a browser.
Save your file to disk by using the Save Command in the File menu.
Only use characters between a-z and 0-9 when you name the file, because these are the only one characters supported by all HTTP Servers on all platforms.
You should also end the name of the file with .html to indicate that it is a file containing HTML tags.
- Example:
- homepage.html
Click on the Preview button in the windows toolbar to to view it in the browser:
You may optionally use the Preview menu item in the File menu.
This command is available in the menu File:Save and Preview
If the browser doesn't launch, you may have to specify the application to use for browsing in the Browser... item in the Preferences Menu.
This command is available in the menu File:Prefs:Browser...
HTML line breaks
When you previewed your page in the Browser you might have found that all the line breaks you used to format your text were missing. The text just flowed like a very long paragraph.This happens because HTML ignores any standard Macintosh line breaks you put in your text. It also ignores any tabs and multiple spaces in the text.
To force the text to start on a new line or in a new paragraph you will need to insert one of the the following special HTML tags:
- Line break <BR>
- Paragraph <P>
- Horizontal Line <HR>
- Line break <BR>
Insert the <BR> tag to force the following text to start on a new line.
This tag is available in the menu Tags:Line Break
- Paragraph <P>
Insert the <P> tag to force the following text to start in a new paragraph. Paragraphs are usually displayed with a blank line inserted between them. The paragraph tag may optionally have an end of paragraph tag </P> efter the text in the paragraph.
This tag is available in the menu Tags:Paragraph
- Horizontal Line <HR>
This tag is available in the menu Tags:Horizontal Line...
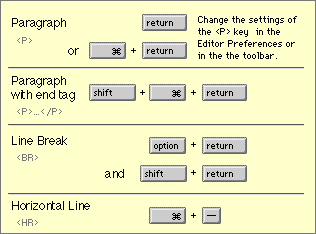
Since these tags are very common when typing text, PageSpinner has the following keyboard shortcuts for typing them:
Do this:
Add any necessery Line Break tags in the text in your Home Page.
Adding a link to another page
A link inside your HTML page gives the user the option to load and view the contents in another file just by selecting the link. We will now add a link to PageSpinner's Home Page on the Web.
Do This:
Enter the following text somewere inside the BODY section of your HTML page:
This page was created with PageSpinner.
Select the word "PageSpinner" by double clicking on it. This word will be used as the link.
Select Link in the HTML Assistant Menu in the Menu.
The Link dialog is now being displayed in the HTML Assistant Window.
The text you selected is displayed in the "Text:" field. You may modify this text if you need to.
Type the following text in the field
"Enter URL or named anchor to link to":
http://www.algonet.se/~optima/pagespinner.html
This is the address (URL) of PageSpinner's Home Page.
Click the Apply button to apply the link tags on the selected text in your document.
The HTML tags that specify a link should be inserted surrounding the text "PageSpinner". All text between the <A HREF=...> and </A> tags will act as a link to the specified page.
Click on the Preview button in the Toolbar to preview your page.
If you are connected to the Internet and the server at www.algonet.se is working you should be able to go to PageSpinner's Home by selecting the link in your own Home Page.
Transfer HTML files to a HTTP Server
Your HTML files can be transferred to a HTTP Server by the use of one of the following popular protocols:- FTP
- AppleShare
- NFS
- TELNET terminal connection and a file transfer protocol such as: ZModem, XModem or Kermit
Contact your Internet provider or local Webmaster for further information.
You should set your transfer application to use ASCII or TEXT when transferring HTML files created with PageSpinner or other HTML editors.
To transfer images, audio or video files you need to transfer these as Binary files (and not MacBinary).
You should only use the format MacBinary when you are uploading compressed Macintosh files (e. g. compressed .sit-archive files). Such files can most often only be downloaded with a MacOS based computer.
If you are saving files in the ISO 8859-1 format (default) and use Fetch to upload the files, you will need to select "Customize:Misc" in Fetch and uncheck "Translate ISO characters" to have international characters transferred correctly.
Also make sure you don't have MacBinary II enabled when transferring Text or Image files. The recommended setting to use with Fetch 3.0.1 "Customize:Preferences:Upload" is:
Default text format: TEXT
Default non-text format: Raw Data
![]() Tip
Tip
If you are using PREFORMATTED text in your HTML file: <PRE> ..TEXT...</PRE> and don't save the file with Unix Line Feeds, you should tell your file transfer application to add CR/LF after each line.
If you have FTP access to the Web directory, you can use PageSpinner's Save to FTP server menu item to tell a scriptable transfer application to transfer a page to a specified server.
A compiled AppleScript is included that tells the application Fetch to upload the current file.
We will now take a look at how you can use PageSpinner's Save to FTP server command.
Do this:
Select the FTP Server option in the preferences to specify the URL and password for the server.
This command is available in the menu File:Preferences:FTP Server
Select Save to FTP Server to save the current file on the ftp server.
If you need to change directory on the server before saving a file, press the Option key when selecting Save to FTP Server to edit the preferences.
This command is available in the menu File:Save to FTP Server
Read the file Save To FTP Server Info in the folder Settings : FTP for additional information about saving to a FTP server.
How do I use the HTML Assistant?
PageSpinner uses the HTML Assistant Window instead of modal dialogs to give you a more flexible way of creating and maintaining your HTML pages.The HTML Assistant is displayed in a non modal dialog that allows you to switch between different documents windows and other applications.
Do this:
Select the text in your document that you would like to format using HTML tags.
Bring the HTML Assistant Window to front by selecting it in the Windows menu.
This is the menu bar icon for the HTML Assistant: ![]()
HTML Assistant will present the options you can use to create a particular HTML tag.
The topics that are supported by HTML Assistant are displayed in HTML Assistants Topics pop up menu and in the Assistant menu in PageSpinner's menu bar.
While you are working in the HTML Assistant Window you can switch between the different HTML topics by using the menu items.
- Apply button
- Some topics applies formatting, linkage or information tagging of the selected the text in your document. They will also let you edit the selected text inside the Text field in the HTML Assistant window. When this is the case the button in the lower right corner will be named Apply.
- Insert button
- Other topics the HTML Assistant Window just inserts a single tag in your current document. When this is the case the button in the lower right corner will be named Insert.
![]() Tip
Tip
You can always use Balloon Help for any options in HTML Assistant if you need an explanation of a field or an option.