
Applications can and should be accessible to users with
disabilities, and making your application accessible brings it to a wider audience. Mac†OS†X contains a suite of technologies, including the
Accessibility API, for creating assistive technology solutions. With Mac OS X v10.4 Tiger,
adding support for accessibility to your application is easier than ever.
This two-part series of articles is intended to help you add accessibility to your Cocoa
application. This first article includes a general overview to the Accessibility model in
Mac OS X, and introduces the NSAccessibility protocol in Cocoa. Then, you will see
how to fully implement support for assistive applications in your own Cocoa
applications. In the second article, we will show you how to provide more extensive accessibility support in custom views (see Adding Accessibility Support in Custom Views in Your Cocoa Application).
The Mac OS X Accessibility Model
Each release of Mac OS X has brought increased support of "Universal Access" for disabled users.
Before Tiger, Apple implemented several features, such as magnification and inverting the image on the screen, and the ability to move
the mouse using the keyboard. In Tiger, Apple has added VoiceOver, a full-featured screen reader and control interface.
VoiceOver speaks screen activities, and provides keyboard access to every aspect of an application's user interface.
VoiceOver technology doesn't just open up new doors for disabled users. It also helps parents, teachers, and anyone else who
interacts or collaborates with disabled users.
The devices we use to interact with computers—keyboard, mouse, and monitor—might not be available to users with disabilities. The challenge
is to create a generic way to represent the user interface of any application, so that it can be presented in ways that will assist disabled users.
The representation—the accessibility model—must then be communicated to an external, assistive application such as VoiceOver, which handles the presentation.
Communication between your application and an assistive application is accomplished using the accessibility protocol. Specifically, the term "accessibility protocol" refers
to the set of routines developers use to write an assistive application such as VoiceOver. The accessibility model, and the accessibility protocol are built into Mac OS X.
Cocoa applications provide accessibility information through the NSAccessibility protocol, an informal protocol declared by NSObject. The NSAccessibility protocol
is implemented by the standard user interface classes in Cocoa, making all Cocoa applications automatically support a rich baseline of accessibility. If your Cocoa
application uses only standard interface objects, you will typically need to make only minor adjustments to support accessibility. Applications with custom views, however,
will need to either override certain methods of the NSAccessibility protocol, or in some cases, provide their own full implementation of the ten methods of the NSAccessibility protocol.
Accessibility Objects and Containment
The mechanism by which each user interface element is represented and communicated is the accessibility object. The concept of an accessibility object is simple and
generic, and again, it is built directly into Mac OS X. Each user interface element in your application—whether it is a Cocoa application or a Carbon
application—is represented by an accessibility object. Accessibility objects are related in a way that roughly mirrors the parent-child hierarchy of AppKit
user interface elements. For instance, take the simple example of a Cocoa application with a single window, and in that window is a single button.†
For the user, it is enough to know just this much: There is a button in a window, and the button performs some application-specific task.
Of course, the real story of what-object-contains-which user interface element is much more involved. Take the case of the button in a window,
described above. The real story is that there is an NSButtonCell object contained in a button control. The button control can be nested within a content view,
which is contained in a frame view, which is contained in a window. Now consider how the assistive application should present this
interface to the user. Obviously, there is too much information; all the user cares about is that there is a button in a window. Figure 1 shows an example of
the full Cocoa containment hierarchy placed side-by-side with the accessibility containment hierarchy.
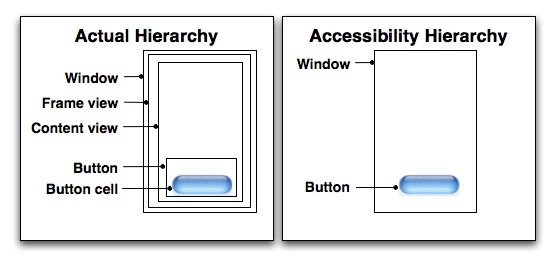
Figure 1: Containment Hierarchies
To solve this problem, the accessibility protocol allows you to specify that certain interface elements be ignored, and therefore not be represented
by an accessibility object in an assistive application. In fact, in NSView, the default implementation of the accessibilityIsIgnored: method always returns YES. Controls that contain a single cell, like NSButton, are typically ignored.
It is actually the control's cell that is not ignored. In this example, the NSButtonCell returns NO from the accessibilityIsIgnored: method.
Other, more complex view subclasses, like NSTableView, override the method to return NO.
It is important to note that ignored interface elements are not removed from the
accessibility hierarchy. Ignored elements do not generate accessibility objects, but they do implement the NSAccessibility protocol. An ignored element is
still required to report its parent and its children. Being ignored doesn't exactly mean the element is hidden. In accessibility terms, being ignored means that the element is
skipped, or passed-through. When a child of the ignored element is looking up the tree for its first unignored parent, the ignored element will report its own parent and be skipped. When a parent element is
looking for unignored children, the ignored element will be skipped, but it must still tell the parent about any child elements it contains. In later examples you will see Cocoa helper
functions that let you ask for only the unignored accessibility objects.
Faux Elements
As we've seen, sometimes items are ignored to present a simplified accessibility hierarchy.†However, sometimes the opposite is the case, and we want to provide an assistive application with
more detail than is present in Cocoa's object model.
An example of this is an NSScroller.†Although a scroll bar is a single Cocoa object, it reports to assistive applications that it has five children—four buttons representing the up and
down arrows and the scroll gutter above and below the scroll thumb, and a value indicator for the scroll thumb itself.
A Cocoa scroll bar doesn't have separate objects for these subelements—so these "faux" elements are represented by a subclass of NSObject that implements the
NSAccessibility protocol. We will see another example of a control with subelements in part II of this article.
Figure 2 shows the faux elements reported by NSScroller.
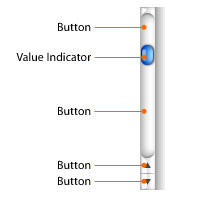
Figure 2: NSScroller Faux Elements
Accessibility Object Attributes
Accessibility objects have attributes associated with them. The number and type of attributes an accessibility object has depends on the type of
interface element it represents. An assistive application queries (and in some cases sets) the values of accessibility object attributes, and uses this
information to present the interface to the user. There are a few attributes that all accessibility objects must have. Others are optional, and some depend on
the presence of other attributes.
This section describes some of the most common attributes. A complete list of accessibility object attributes is found in the chapter on Roles and Associated Attributes in the
Accessibility Overview, located on the ADC website.
The Role and Role Description Attributes
One attribute that all accessibility objects must have is the role attribute. The value of the role attribute is a nonlocalized string that
tells an assistive application the type of interface element the object represents. The accessibility object's role is roughly analogous to the class of
the interface element it represents. The role also determines the additional attributes the accessibility object contains. There are many predefined interface
element roles in Mac OS X. These predefined roles are found in the header file NSAccessibility.h. The predefined roles cover the
majority of user interface elements and interface element behaviors.
In addition to the role attribute, some accessibility objects also have a subrole attribute. If the role is analogous to the class of an
accessibility object, the subrole attribute is analogous to its subclass. For example, the accessibility object for a text field would have a role
attribute value of NSAccessibilityTextFieldRole. The text field could be a search field, or a secure password field, in which case its
subrole attribute would be NSAccessibilitySearchFieldSubrole or NSAccessibilitySecureTextFieldSubrole, respectively.
Subroles are also defined in NSAccessibility.h.
Another required attribute is the role description. Unlike the role attribute, the role description is a human-readable, localized string. An assistive
application presents this string to the user. In a screen reader application like VoiceOver, the role description string would be spoken. Role description strings
for each predefined role are retrieved using one of the two convenience functions provided in NSAccessibility.h:
NSString *NSAccessibilityRoleDescription(NSString *role, NSString *subrole);
NSString *NSAccessibilityRoleDescriptionForUIElement(id element);
Note that both the role and subrole are taken into account when returning the role description. If an accessibility object does not have a subrole attribute,
pass nil for its subrole.
The Description and Title Attributes
While the role and role description attributes tell an assistive application what an element is, the description attribute tells the user what the element does.
The value of the description attribute is an application-specific string that will be presented to the user. As such it must be human-readable and localized.
In addition, the description string must be all lower case, and should not include the name of the role. You will see why the name of the role is not included in an example later on.
A title attribute is required if the accessibility object represents an element that displays a text title. For example, the text displayed on a button
is the value of its accessibility object title attribute. Elements that do not display a text title must either set the description attribute in their
accessibility object, or have another control provide their title, as described in the next paragraph. A common example of this is a "back" button in a web browser application.
The back button would most likely display an image of an arrow rather than text.
Very often a user interface has fields where the user may enter text. These text input controls do not contain a title attribute themselves. Instead,
the title attribute is supplied by a static text control, placed in close proximity to the input field. A blind person, or a person with diminished sight
ability, would not be able to make the connection between the two controls. This is an example of a control relationship that is conceptual rather than hierarchical.
The two controls are linked to each other by the TitleUIElement and ServesAsTitleForUIElements attributes.
The TitleUIElement is present in the accessibility object representing the input text field control. Its value is the object that will provide the title.
The ServesAsTitleForUIElement is present in the accessibility object of the static text control. Its value is the control for which it provides a title. When
the keyboard focus moves to the input text field, an assistive application will use the title attribute of the static text control as the title text of the input
field.
Relationship Attributes
Since they mirror the parent-child hierarchy of Cocoa user interface controls, all accessibility objects have parent and children attributes to link them together.
However, we already noted that sometimes the relationship between controls is conceptual. Another example of this might be a master-detail
relationship in a customer order entry system. You might have a table of customers positioned above a table of orders placed by the currently selected customer.
A blind user would not be able to make the conceptual connection between these two controls.
The LinkedUIElements attribute allows you to create conceptual relationships between controls. By examining these attributes, an assistive application can
then tell the user about the relationship. The accessibility object representing each control should contain the LinkedUIElements attribute. Its value is an
array of controls, so that you can define one-to-one, and one-to-many relationships.
Accessibility Object Actions
In addition to attributes, accessibility objects can have actions associated with them. Assistive applications use these actions to control the interface on behalf
of the user.
An assistive application is not concerned with application-specific actions of the controls in the interface. There is no way to plan or design for
every application-specific action a control might perform. Therefore, the set of accessibility object actions is small and generic. For example, your application
might have a button that sorts a table of values. An assistive application is not interested in the button's sorting capability. All
the assistive application cares about is that there is button, and all buttons support a press action.
Action attributes also have descriptions. Action description strings are human-readable and localized, because an assistive application will
present them to the user.
The actions supported by accessibility objects are defined in the file NSAccessibility.h. Each action also has a description, which you can retrieve with the
convenience function also found in NSAccessibility.h:
NSAccessibilityActionDescription(NSString *action);
An assistive application controls your application by telling an accessibility object to perform the action for the control it represents.
Your application must respond in the same way it would if the request came directly from the user interface, for example by a mouse click.
Note that an action is not always the way that an assistive application can control the user interface. Many times this is done not by triggering an action,
but by setting an attribute.† For example, the application's accessibility object (role NSAccessibilityApplicationRole) has a "hidden" attribute that is settable.
By setting this attribute to "true" an assistive application can hide the target application without triggering an action.
Access Enabling a Cocoa Application
So far we have looked at some of the general concepts of the Mac OS X accessibility model from a Cocoa perspective. The rest of Part 1 will
look specifically at what you need to do to modify or enhance the default accessibility behavior in Cocoa applications. The example application we will
use is called ImageMapExample, which you can download from the ADC website.
ImageMapExample is a small application that contains a custom control, a segmented control, and a couple of other simple user interface elements.
The custom control is an image of a food pyramid, with individual, clickable regions showing each of the food groups.
The segmented control determines the highlighting mode to use as the mouse cursor rolls over the pyramid. Figure 3 shows ImageMapExample running.
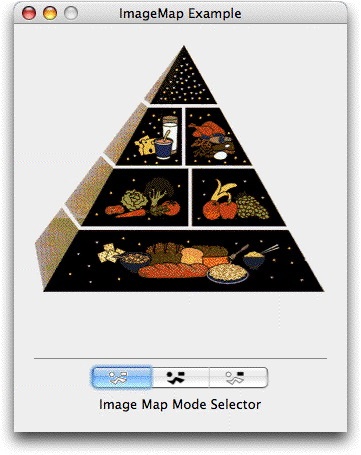
Figure 3: The ImageMapExample Application
Setting the Segmented Control's TitleUIElement Attribute
Notice the static text field with the title "ImageMap Mode Selector" in Figure 3. This text field is a specific example of the conceptual
relationship between controls, described earlier. In this case, the text field provides the title for the segmented control. To enable an assistive application
to present this relationship, you need to set the TitleUIElement attribute of the segmented control's accessibility object. The value of the attribute is
the static text control. You can set the attribute programmatically, or with Interface Builder. First, let's take a look at the easy way, using Interface Builder.
Open the ImageMapExample nib file and select the segmented control in the main window. In the inspector window, open the popup and choose Accessibility.
Figure 4 shows the Inspector window with the Accessibility options selected.

Figure 4: The Segmented Control's Inspector Window
Setting the TitleUIElement attribute is almost the same as connecting an object's outlet. First, control-drag from the segmented control to the
static text control. Next, in the Inspector window, select the AXTitleUIElement attribute, and click Connect.
Since ImageMapExample already contains code to set this relationship programmatically, disconnect the AXTitleUIElement attribute in Interface Builder.
Setting the attribute programmatically takes a little more work. To see how it's done, open the ImageMapExampleController.m file. Scroll to the
awakeFromNib: method and take a look at the following three lines of code:
// set up segmented control accessibility -
	segmentedControl and segmentedControlTitle are outlets in the controller.

id segmentedControlElement = NSAccessibilityUnignoredDescendant(segmentedControl);
id segmentedControlTitleElement = NSAccessibilityUnignoredDescendant(segmentedControlTitle);
[segmentedControlElement accessibilitySetOverrideValue:segmentedControlTitleElement
                         forAttribute:NSAccessibilityTitleUIElementAttribute];
First, we must get our hands on the accessibility object for the segmented control. Recall from the discussion above, the accessibility object
hierarchy is a simplified version of the Cocoa control containment hierarchy. Every user interface element has a corresponding accessibility object,
but some Cocoa classes in the interface are not relevant to an assistive application. The accessibility objects representing these elements are ignored by
default. To get the accessibility object for the segmented control, we use the utility function NSAccessibilityUnignoredDescendant(). Starting at the segmented
control, this function will follow the hierarchy and return the first unignored accessibility object.
The second line of code performs the same action for the static text control.
To set the TitleUIElement attribute for the segmented control, we call the accessibility protocol method, accessibilitySetOverrideValue:forAttribute:.
The attribute we are setting is represented by the string constant NSAccessibilityTitleUIElementAttribute, and we are setting the value of the attribute to be the
static text control.
Setting the Segment Description Attributes
The next thing we need to do is set the description attributes for the individual parts of the segmented control. The reason for doing this
is because the default descriptions are not particularly useful for telling the user what the individual segments of the control actually do.
In fact, the default description is a string such as, "radio button 1 of 3." We don't want VoiceOver to sound like the Borg queen on Star Trek, so we
need to change the description so that it tells the user what the control does.
As we will see in part II of this article, adding a description attribute for most user interface elements is easily done in Interface Builder by selecting the user
interface element, and entering the description in the AXDescription field of the Accessibility inspector pane (shown above in Figure 4).† However, the segments of a segmented control are one of
the exceptions to the rule, so we must set the descriptions programmatically. Again, look at the awakeFromNib: method in ImageMapExampleController.m. The last
line of that method is a function call:
SetSegmentDescriptions(segmentedControl, @"invisible hot spots", @"visible hot spots",
	@"rollover highlighting", nil);
In this sample code, hard-coded description strings are used to keep the example simple. In your code, you should use localized strings for description attributes.
The work of setting the descriptions has been factored out into the function, SetSegmentDescriptions(). The segmented control is passed in, along with
a variable number of description arguments. Let's look at SetSegmentDescriptions() in detail.
Again, we need to make sure we are working with the correct accessibility object. We use the NSAccessibilityUnignoredDescendent() function to do this:
id segmentElement = NSAccessibilityUnignoredDescendant(control);
We need to set the description attribute for each part of the segmented control, so we must ask the control for its children. We can get an array
of child accessibility objects by asking for the segmented control's NSAccessibilityChildrenAttribute.
NSArray *segments = [segmentElement accessibilityAttributeValue:NSAccessibilityChildrenAttribute];
Now we simply loop over the contents of the segments array, setting the NSAccessibilityDescriptionAttribute as we go:
id segment;
NSString *description = firstDescription;
NSEnumerator *e = [segments objectEnumerator];
while ((segment = [e nextObject])) {
      if (description != nil) {
        [segment accessibilitySetOverrideValue:description
                 forAttribute:NSAccessibilityDescriptionAttribute];
      } else {
         // Exit loop if we run out of descriptions.
         break;
      }
      description = va_arg(args, id);
}
Summary
This article looked at the Mac OS X accessibility model and protocol. We
covered accessibility objects, and how accessibility objects are
related to each other
in the accessibility hierarchy. We also covered some of the basic modifications
needed to fully access enable a Cocoa application.
In part II, we will show you how to access enable a custom control from scratch.
For More Information
Updated: 2006-10-16
|