
|
Xcode, Apple's tool suite and integrated development environment (IDE), is the fast and easy way for developers to create applications for Mac OS X Tiger. Xcode is designed to let you take advantage of all the great technologies that ship in Mac OS X. In addition, you can ensure that your application is ready for the future: starting with Xcode 2.1, you have been able to build a universal binary application that runs both on PowerPC-based Macs and Intel-based Macs. Xcode 2.2, released in November 2005, is built on the foundation of earlier versions of the Xcode project that have steadily introduced more and more features, tools and performance improvements. Xcode is a mature and robust tool set, including such technologies as fix and continue, zero link, predictive compilation, remote debugging, and distributed builds. If you have already started using Xcode, this article will show you key features available to you in the latest version. And if you aren't using Xcode already, it will show you how to get started, so you can begin creating universal binaries and take full advantage of all of the latest technologies in Mac OS X Tiger. Working With Your Code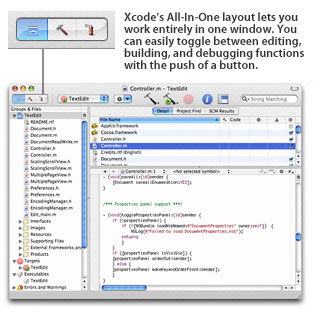
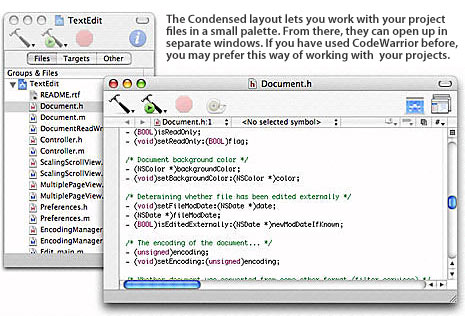
First and foremost, Xcode is designed to let you work with code by means of a intuitive, easy-to-learn user interface. Because not everyone works the same way, Xcode is a very flexible tool that provides many different ways to customize the development process. One of the most visible ways you can customize Xcode is to configure your development environment into one of the three following layouts:
No matter which layout you choose to use, there are two primary parts to the Xcode user interface in which you work with the various files and resources that make up your project: the Groups & Files List and the Detail View The Groups & Files ListThe Group & Files list provides an outline view of your project. This lets you organize and manage all the items that make up a project in manageable chunks. At the top of the list is the project group which contains all of the files, frameworks, and libraries that are used by your project. The items in the project group are not organized according to how they exist on the filesystem, but rather into more distinct and logical groups that you can modify to suit your needs. Under the project group is a set of smart groups. These groups collect files and other information that match certain rules or patterns. Xcode provides several built-in smart groups that put frequently used information a mouse-click away. For example, the Targets group contains all of the targets that a project is set up to build. The Errors and Warnings group lists all of the build warnings and errors generated by the last build. And the Project Symbols group lists all of the symbols defined in your project.
In addition, you can define your own smart groups. For example, you might want to create a smart group that shows only files that end in the The Detail ViewWhen you click on a group in the Groups & Files list, the detail view presents a flat list of the items contained in that group. For example, if you select the project group, all of the files in the project are displayed. You can easily narrow the list of files displayed in the detail list by typing into the Search field at the top right of the window. As you type, the list dynamically updates to show just those items that match the string you are typing into the search box. 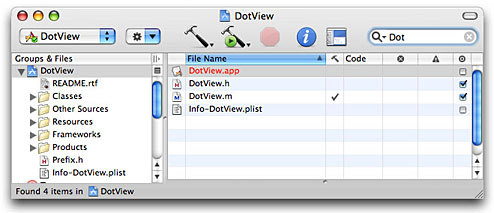
Customizable Key BindingsXcode's GUI goes a long way towards helping you get around in your projects. But, when you are working on a single file, a non-graphical component of the interface becomes very important: the keystrokes you use to navigate your code with. By default, Xcode uses a set of key bindings that builds on top of the standard set of bindings used by every application. However, if you've spent a lot of time working in another environment, your fingers might have a built-in muscle memory that you'd like to preserve. To help you out, Xcode's key bindings can be changed to one of the following sets:
In addition, you can configure your own custom set of key bindings and customize this part of your day-to-day experience any way you choose. Collaboration with Version ControlXcode provides a common interface to several version control systems: CVS, Subversion, and Perforce. Xcode makes it easy to perform most version control tasks as you work, such as updating a project and committing changes to a file. It also keeps track of what files you've modified in your local copy of the project and can indicate the status of those files to you. Integrated Unit TestingTest-first development and unit testing have become widely accepted in software development. Unit testing helps to accelerate your application's development by giving you the confidence to re-factor your application and know that it still works the way you expect. As well, unit tests can help you prevent regressions for issues in your code base that you have already taken care of. Xcode 2.1 introduced integrated unit testing directly into the IDE and comes with support for Objective-C using OCUnit, and for C++ using CPlusTest. Using either framework you can create test bundles for Cocoa and Carbon applications. You can also easily integrate other unit test frameworks as well, such as JUnit. Once created, unit tests can be run every time you build your project and will report any errors in the Build Results window, giving you instant feedback that your application is working the way that you expect. Visualizing Your Code
As a project gets larger and more complicated, it gets harder to keep the big picture in focus. The overall structure can get obscured by all the details in the code. Visual models can help snap the big picture back into focus and allow you to see the overall structure of your project. As well, they let you see relationships between components that you might not have noticed otherwise. In other words, they let you look at the architecture of a project rather than just the nuts and bolts. Visual models can also give you a way to communicate the structure of a project to other people, including those that aren't as involved in a project as you are. Xcode has the ability to create and work with two kinds of visual models: Class models and data models. You can take a class model to a colleague for an opinion about a solution to a problem. You can take a data model to a potential customer to make sure that you are solving their problem effectively. Or, you can even print out large diagrams of your project and hang them on the wall so that other people in your company can marvel in your project's progress. Class ModelsThe Xcode class modeler works with Objective-C, C++, and Java source code files and can give you a look at just a few classes, every class in your project, or even all of the classes in a framework. You can create quick one-off models to take a look at some part of your project, or you can create permanent models that are part of the project and which can be checked into and out of source control systems, such as CVS and Subversion. 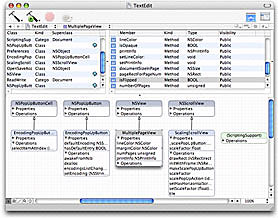
The class models that Xcode creates aren't just static representations: they are fully interactive. You can use them to navigate your code. Double-click on a property or operation and you are taken right to the relevant code. You can also browse the documentation for system frameworks directly from the class model. The models also update in real-time according to changes in the source files off of which they are based. For example, if you add a method to a class, it instantly shows up in the Operations section of that class's diagram. Likewise, if you delete an instance variable from a class, it is removed from the Properties section of the class's diagram. Once you have created a model you can zoom in and out of the diagram, change the colors of classes, move them around, set all of the classes to a consistent size, as well as tweak alignment. You are free to arrange things so that you can get the best picture of your code. Data Models
Data models go beyond graphically representing the class hierarchies in your application. Instead, they are a fundamental piece of Core Data, the object-graph management and persistence framework that makes its debut in Mac OS X Tiger. Object-graph management allows you to work with the data in your application, including full undo and redo support. It also provides a well-defined data integrity infrastructure. Object-graph persistence means that the data in your application is automatically stored to, and then retrieved from, a file on disk. Very little code is actually required to take advantage of these features. Core Data can use a data model, also known as a schema, to define the data-bearing entities in your application and then manage and store those entities for you. It takes care of all of the details of mapping the data in a persistent store to instances of objects in your application. By creating these models graphically in Xcode, you can quickly and easily define your schema without having to create and edit large XML files or write a lot of tedious boilerplate code. Finding Documentation Fast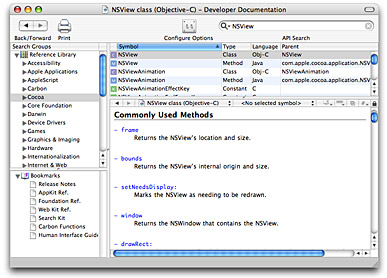
One of the most useful features of Xcode is the documentation browser. Using it, you can quickly browse the APIs for the various frameworks installed on the system as well as perform full text searches on the complete set of developer documentation installed in the Making this great feature even more useful, Xcode alerts you when new documentation in the ADC Reference Library becomes available. When that happens, you are able to download the new documentation to your local disk, updating your local copy. So you can always have access to the latest developer documentation even if you are working disconnected in an airplane at 35,000 ft. The documentation browser has also been upgraded to use SearchKit for its full text searches. This means that searches are faster and more accurate. As well, Xcode includes search indexes not just for locally installed content, but also for the documentation that is available on the ADC website and the ADC Developer DVDs. Building Quickly and EasilyOf course, the point of using an IDE is to produce applications. Xcode makes sure that builds happen quickly and easily while using the industry standard GCC 4.0 compiler. As well, Xcode uses precompiled prefix headers, predicative compilation, distributed builds, and ZeroLink to help optimize the Edit-Build-Debug cycle. Furthermore, as of Xcode 2.1, development and release builds are built to two different locations, making it easy to work on an ongoing project while periodically making release builds to share with others. 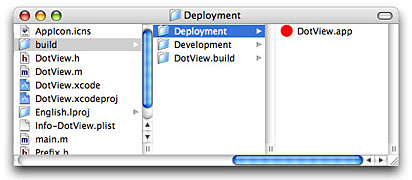
Precompiled Prefix Headers
Many of the source files in a project include a subset of common system and project header. For example, each source file in a Cocoa application will typically include Precompiled prefix headers let you define the set of common headers used by all, or most, of the source code files in your project. Xcode can then compile the prefix header once and share the results with every file that is compiled. In addition, subsequent builds of the project can use the same precompiled header to further speed up builds. Even better, precompiled prefix headers are now stored in a shared location. This lets all of your projects reuse the same data and further decreases built times. ZeroLink
ZeroLink speeds up the build process by eliminating the link process from
builds. Instead, each object Predictive CompilationAs you know, your computer resources are usually underutilized while you are typing code into a code buffer. Then, when you click the Build button, your computer runs at full steam for a while, only to return to near idle after the build is accomplished. Predictive compilation can be used to move the task of compiling source code into these lull times so that the time between when you click the Build button, and the time when the build is completed, can be significantly reduced. Predictive compilation uses the information that Xcode maintains about the build state of targets that use the native build system. At any time, Xcode knows which of the files used in building a target's product are out of date and what actions are required to bring those files up to date. When predictive compilation is enabled, a great deal of this work is performed in the background. Then, when you click the Build button, Xcode will use as much of that work as possible and commit the changes to disk, resulting in shorter build times so you can get more work done. Distributing BuildsTo a large degree, the building of a project—especially the compilation of individual source files—is parallelizable. If you have a dual-processor computer, Xcode will automatically parallelize a build across both processors. If you want even faster builds, you can enable Xcode to take advantage of other machines on the local network to bring their power to building your source code. 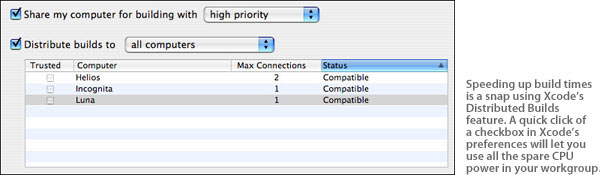
Using distributed builds requires that all machines participating use the same version of the compiler, Xcode, and Mac OS X. Other than that, all that is required is enabling each computer to participate as a compilation host. You enable this through the Xcode Preferences Window. GCC 4.0The GNU Compiler Collection (GCC), currently version 4.0, is used to build Mach-O programs, the native runtime environment of Mac OS X. GCC 4.0 contains a number of advanced optimization techniques that are designed to make your applications fly. The most significant of these is the use of Tree SSA (Single Static Assignment) from the older Register Transfer Language (RTL). Tree SSA is designed to be both language and target independent and allows a level of code analysis and optimization that is impossible with RTL. These optimizations include:
One of the most impressive of these optimizations is auto-vectorization. This technique, borrowed from the world of supercomputing, allows your code to easily take advantage of the Velocity Engine in the PowerPC G4 and G5 processors as well as SSE on Intel processors. C++ Enhancements
In addition to generated-code optimizations and other new features, GCC 4.0 features an entirely new C++ parser. The new parser is tremendously faster than the one in the previous version (GCC 3.3) used in Xcode 1.5, and has a noticeable benefit when building C++ based projects. Most importantly, it brings with it the C++ standard library in the form of In order to use the C++ standard library in previous versions of Mac OS X, you had to statically link it with your application. In Tiger, libstdc++ is provided as a dynamic library on the system. This means that your applications will be smaller and can leverage the latest improvements to the C++ standard library automatically. Customizing Your BuildsOften, you'll need to tweak build settings on a project, target, or even file level. Build configurations, introduced in Xcode 2.1, let you do this, and more. They let you build two or more "flavors" of a product without having to create separate targets. This can save you work, and remove the need to worry about managing versions of files. A common use of build configurations is to build a target into two versions of a product, a debug version and a release version. New Xcode projects contain these two predefined build configurations. Generally, the predefined build configurations are enough for most people. You can edit those build configurations or define new build configurations of your own. By contrast, if you were to create two targets—one for debugging and one for the final build—you would have to remember to keep both targets in sync. When you added a file to one target, you would have to remember to add it to the other, and so forth. With a build configuration, you can build using a different group of build settings without changing the target's build phases or build rules. It is much simpler to create build configurations containing the build settings whose values you wish to change, and then build the appropriate configuration. What's more, configurations can be saved as external files allowing you to share configuration settings among multiple projects. Debugging PowerfullyThe open source GDB debugger, part of the GCC 4.0 toolset, sits behind Xcode's debugger interface. You can debug either inside the Xcode debugger user interface, at the command line, or you can use both. The debugger allows you to pause the execution of a program and examine its contents and then locate and fix problems in your code. Breakpoints and WatchpointsGoing far beyond defining breakpoints that stop the flow of execution in your program at a specific line of code, Xcode's breakpoint features let you pause program execution at a function call, method call, or even when a particular condition is fulfilled. As well, you can set a watchpoint that will pause program execution when a variable changes. Instead of simply halting the execution of your program, you can also have Xcode perform additional actions, such as logging information to the console, execute a shell command, or alert you by playing a sound. 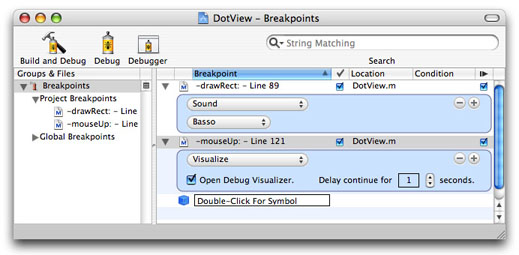
Visual Class DebuggerIn Xcode, you can visualize the flow of execution of your program in an entirely new way. As your application runs, you open the Debug Visualizer and it displays a class hierarchy of your application showing the class and method that execution is occurring in. As your application executes, the visualizer highlights the methods called, giving you a visual sense of what is going on in your application. Fix and ContinueTypically, when you find a problem in the debugger, you have to stop the execution of your program, rebuild, and then relaunch. The fix command lets you, in many cases, avoid this step and patch the running application with new functionality. How this works is that GCC is used to build the new binary functionality and then, while the application is paused, GDB changes the code in the running instance of the application. When you restart execution, you'll see the new functionality. Remote DebuggingThere are many situations in which it simply isn't practical to debug an application on the same machine on which it is running. For writing full-screen games, for example, it is pretty hard to use a debugger on a computer, where the game is occupying the entire screen. Or, you might be working on a problem with GUI event handling. For these situations, Xcode provides remote debugging. Enabling remote debugging requires three relatively simple steps:
Once these steps have been completed, you can debug an executable on a remote machine as easily as on a local machine. Migrating from CodeWarriorIf you are currently using CodeWarrior for your projects, now is the time to make the migration. This article has given several reasons why you should be using Xcode, but the most important one is that you will need to use GCC and Xcode to build universal binaries so that your application can run natively on Intel-based Macs. Migration of CodeWarrior project files to Xcode is ensured by Xcode's support for CodeWarrior-style project-relative references. The cost of transition from CodeWarrior to Xcode is lowered by Xcode's compatibility with CodeWarrior-style inline assembly code, which enables developers to hand-tune performance-critical parts of their applications. To be sure, it will still take time to transfer your projects from CodeWarrior to Xcode, but it will be time well spent, as it will leave you ready for the future. ConclusionThe latest release of Xcode has added a number of significant new features to the product, both building on the foundation of previous versions and enabling future capabilities. The visual modeling tools represent a new way of working with your projects and communicating them to others. The workspace layouts mean that you can be more comfortable with your code. And the GCC 4.0 compiler means that your finished applications will run faster than ever. As well, it's the only way to be let your application work on Intel-based Macs. How You Can Get StartedGetting started couldn't be easier. The first thing you should do, if you haven't already, is to become an Apple Developer Connection member. A free ADC Online membership provides access to the latest Xcode updates and other developer tools. An ADC Select Membership goes further by providing shipping versions of Mac OS X Tiger and Xcode 2 on disc, along with download access to Mac OS X Tiger Server. Select membership also includes direct, one-on-one consultation with Tiger support engineers, a discount on hardware through the ADC Hardware Purchase Program, and ongoing access to pre-release software. For More Information
Updated: 2006-03-07 |
|
Get information on Apple products. Copyright © 2010 Apple Inc. |