
The Ruby on Rails web application framework has built up a tremendous
head of steam over the last year. Fueled by some significant benefits and
an impressive portfolio of real-world applications already in
production, Rails is destined to continue making significant inroads
in 2006. Simply put, Ruby on Rails is an open source tool that gives you the advantage of
rapidly creating great web applications backed by SQL databases to
keep up with the speed of the web. And with the release of Rails 1.0
kicking off the new year, there's never been a better time to climb
aboard.
It should come as no surprise that Mac OS X is a favored platform for
Rails development. Rails and its supporting cast of web servers and
databases thrive on the rich Mac OS X environment. A popular text
editor used by many Rails programmers is TextMate,
a Cocoa application. And all members of the Rails core development
team work with Macs.
This article introduces you to Ruby on Rails by building a trivial web
application step by step. Consider it a ride on the express
train—an overview of what Rails can do, including a look at
features new to Rails 1.0. In the end you'll be better equipped to consider the advantages of powering
your web application with Rails.
Why Ruby on Rails?
First, you might be wondering: Web application frameworks are a dime a
dozen, so what's different about Rails? Here are a few things that
make Ruby on Rails stand above the crowd:
-
Full-Stack Web Framework. Rails is an MVC web framework
where models, views, and controllers are fully integrated in a
seamless fashion. That means you automatically get all the
benefits of an MVC design without the hassle of explicitly
configuring each component to play well with the others.
-
Real-World Usage. The Rails framework was extracted from
real-world web applications. That is, Rails comes from real
need, not anticipating what might be needed. The result is an
easy to use and cohesive framework that's rich in functionality,
and at the same time it does its best to stay out of your way.
-
One Language: Ruby. Everything from business logic to
configuration files (there aren't many) are written in the Ruby
programming language. With just one language, you hope it's a
good one, and Ruby doesn't disappoint. Ruby is a full
object-oriented language with clean syntax and it has a way of
making programming truly fun. Using one language means you
don't have to juggle between multiple languages and dialects as
you're building your application.
-
Convention over Configuration. Rails works hard to take
care of all the repetitive and error-prone chores associated
with starting to build a web application, and maintaining it
over time. Rails uses simple naming conventions and clever use
of reflection to make your work easier with near-zero
configuration.
-
It's Productive! At the end of the day, Rails is all
about helping you stay productive. And in a world where being
the first to market and keeping customers happy adds up to
increased revenues for you, it pays to pick a tool aligned with
those goals. Many
real-world applications are already reaping the benefits.
All that being said, the best way to judge Rails is to experience it
while building an application. So let's get right to it.
Installing Rails
The version of Ruby that shipped on Mac OS X Tiger prior to v10.4.6 did not work
well with Rails. If you're running an earlier version of Tiger, you'll need to
either upgrade to 10.4.6 or upgrade your copy of Ruby to version 1.8.4 or later using
the open source distribution.
And to do any serious Rails development you'll want to
install a production-quality web server, database server, and a few other
goodies. Thankfully, a golden-path installation guide is already
available.
NOTE: If you already have MySQL, you can get everything else by using Locomotive,
a drag-install of all the relevant pieces.
Walk through the step-by-step instructions outlined in
"Building
Ruby, Rails, LightTPD, and MySQL on Tiger". It starts by
installing Ruby 1.8.4 without overwriting the system-installed Ruby
(it puts the new version in /usr/local). That way, the
default system works as expected for other users or programs already
coded for the system-installed ruby. It also installs
the RubyGems package manager,
Rails,
the LightTPD web server, and
the MySQL database server (with
native bindings), all of which we'll use in this tutorial. And the
instructions have even been tuned to work well for those of you that
are using the latest Intel-based Macs. By the end you'll have an
ideal development and production environment.
Once you have a working version of Ruby and RubyGems installed, you
can upgrade to future versions of Rails simply by typing
$ gem install rails --include-dependencies
Finally, we recommend that you download and install the 30-day
trial of TextMate to use
throughout this tutorial. It's a popular editor for Rails
developers on Mac OS X.
Creating a New Rails Application
We're going to build an online expense tracking application. You
could use this for tracking expenditures for your personal budget, a
small company, a group or club, etc. Say, for example, our club
organizes fund-raising campaigns and we need to make sure expenses are
in line with the budget for each event. The old paper and pencil
system broke down last month, so we've decided that we need an online
web application that everyone can share.
First we need to create the application. All Rails applications have
a consistent directory structure so that Rails can find stuff without
needing to be told where to look. Create a skeleton directory
structure and a set of files for our expenses application by typing
$ rails expenses
Next, open the new project directory with TextMate by typing
$ mate expenses
In the TextMate Project Drawer, shown in Figure 1, you should see the
directory structure that the rails command created.
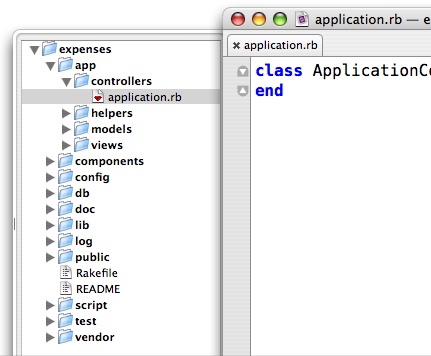
Figure 1:
Application Directory Structure (as shown in TextMate)
We'll peek inside these directories a bit later. But first, we're
ready to run our application for the first time. Change directory to
the expenses directory, then type:
$ script/server
You've just started a web server. If you have the LightTPD web server
installed, Rails will attempt to use it by default. Otherwise
WEBrick, the pure-Ruby web server that comes with Ruby, will be used.
Either web server works well for development purposes.
Now point your web browser
at http://localhost:3000. You
should see a web page welcoming you aboard Rails. That tells us that
the application is running, but it doesn't help our fund-raising
campaign. Let's fix that.
Jump-Starting the Application
Now we're ready to put some meat on the bones of the generated
directory structure. Ultimately (in the next few minutes) we want to
end up with a web interface that lets us track expenditures for
accounts. For starters, we need to create and configure a database to
hold those accounts and expenses.
Setting Up the Database
Telling Rails which database to use and how to connect to it is one of
the few times you'll need to touch a configuration file. In
the config/database.yml file you'll notice that Rails has
pre-configured three database
connections—development, test,
and production—that correspond to three runtime
environments. We're doing development now, so have a look at that
particular section of the config/database.yml file.
development:
  adapter: mysql
  database: expenses_development
  username: root
  password:
  socket: /tmp/mysql.sock
By default, Rails assumes we're using the MySQL database server with a
database called expenses_development. If you set a MySQL
password for the 'root' user to something other than the default
(which is always a good idea), then set that password as the value of
the password field. Also, if your mysqld.sock isn't
in the usual place, you can explicitly set it in the socket
field.
The default database.yml file includes example configurations for other
databases. The following database servers are currently supported by Rails:
MySQL, PostgreSQL, SQLite, SQL Server, DB2, Firebird, and Oracle.
Now we need to actually create the expenses_development database. Feel free to
use whatever tool you're comfortable with. Here's how to create the database
using the mysqladmin command-line tool:
$ mysqladmin -u root -p create expenses_development
We'll test the database connectivity a bit later.
Creating the Database Schema
We've created the database, but it doesn't have any tables yet. We
need to store accounts in an accounts table, so let's start
there. Rather than using raw DDL or a SQL administration tool, we'll
use a Rails migration to create the accounts table.
Migrations are database-agnostic representations of database schemas,
which means we can easily switch to another database server later, if
necessary. Better yet, migrations let us conveniently evolve a schema
over time.
First, create the migration using the Rails migration generator.
$ script/generate migration accounts
That command creates a db/migrate/001_accounts.rb file that
defines an empty migration. We need to fill it in to create
an accounts table with two columns: a name that identifies
the account (a text string) and a budget (we'll use a float for the
sake of simplicity). Update the db/migrate/001_accounts.rb
file as follows:
class Accounts < ActiveRecord::Migration

  def self.up
    create_table :accounts do |table|
      table.column :name, :string
      table.column :budget, :float
    end
  end

  def self.down
    drop_table :accounts
  end
end
This may be your first look at Ruby code. The file defines a class
with two class-level methods—up and down.
The up method moves the migration forward by creating
the accounts table and its columns; the down method
rolls the migration backward by dropping the accounts table.
Note that unless told not to, create_table will implicitly
create a primary key column.
Now let's apply the migration. We'll use Rake (Ruby's equivalent of
Make) to run a task that's available in every Rails application.
Simply type:
$ rake migrate
Our expenses_development database should now have
an accounts table. (Running 'rake migrate' is also a
handy way to test database connectivity, so if the migration failed
it's probably because your database isn't configured properly.)
Migrations are also reversible. For example, if you wanted to migrate
the schema back to its original form, you'd simply type 'rake
migrate VERSION=0'.
Putting Up Scaffolding
Now that we have a database and a schema for storing accounts, we need
to start creating accounts. The fastest way to get from a database
schema to a web interface is to use what Rails
calls scaffolding. Scaffolding is the initial support for
building an application—models,
controllers, and views that handle the basic CRUD
(create/read/update/delete) operations of any database-backed web
application. Unlike tools that generate code that's never intended to
be modified by humans, Rails scaffolding is generated with the express
intent of encouraging you to tweak it. And just like scaffolding used
to support the construction of a building, gradually the application
scaffolding disappears.
Generate the scaffolding by typing
$ script/generate scaffold account expenses
That command generates a number of files for us; files we'd rather not
create by hand. The first parameter (account) specifies the
name of the model, which is generated in
the app/models/account.rb file. The second parameter
(expenses) specifies the name of the controller, which is
generated in the app/controllers/expenses_controller.rb file.
The scaffold generator also created template files for the views of
our application. We'll look at how all these components work together
a bit later.
Let's see how close scaffolding get us to a web interface for managing
accounts. If the application is still running, press CTRL-C in the
terminal where it's running. You may have changed the database
connection, which requires a restart, so restart the application by
typing
$ script/server
Then point your web browser
at http://localhost:3000/expenses.
You should see the web page that lets you create new accounts. Go
ahead: create an account, click the "Create" button, and the
new account will show up in the account listing. From there you can
show, edit, or delete the account. Figure 2 shows example accounts
for our fund-raising campaign.
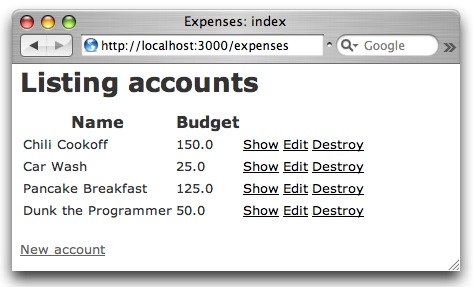
Figure 2:
Using scaffolding to manage accounts
This interface won't win any web design awards, but it's functional
and gives us a jump-start on our application. With no explicit
configuration, the model, views, and controller work together to give
us a quick and dirty web interface.
Tiptoeing Through the Generated Code
How does all this work? At the core it uses simple naming conventions
to eliminate most configuration. Take, for example, the
"Show" hyperlink for the account with an id of 1. The URL
for this link is:
http://localhost:3000/expenses/show/1
The first part of the URL path, expenses, is the name of the
controller responsible for handling the incoming request. The second
part of the path, show, is the name of an action defined by
that controller. The last part of the path, 1, is the id (in
this case, the database primary key) of the account to be shown.
Figure 3 shows the MVC components in play, and their file equivalents.
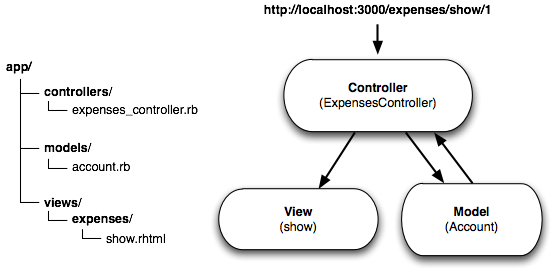
Figure 3:
MVC components and their files
So, using those URL path parts (called a route) as a guide,
Rails will invoke the show method of
the ExpensesController, supplying the account id in the HTTP
request parameters. The controller code is found in
the app/controllers/expenses_controller file.
class ExpensesController < ApplicationController

  def show
    @account = Account.find(params[:id])
  end

  # plus other action methods for creating, reading,
  # updating, and deleting accounts
end
The show method uses the account id supplied
in params[:id] to find and populate an Account model
object containing the values of the row in the accounts
database table corresponding to the account id. The
resulting Account model object is referenced by
the @account instance variable. (Ruby identifies instance
variables as variables starting with an @ symbol.)
The Account model class itself lives in
the app/models/account.rb file.
class Account < ActiveRecord::Base
end
At first glance, this class appears to do nothing, but in fact it
already has a lot of functionality inherited through its parent
class ActiveRecord::Base. Rails uses reflection and naming
conventions to transparently map relational tables into model objects.
The Account model encapsulates access to
the accounts table in our database. An instance of
an Account model class represents a row in
the accounts table, with each table column mapping to an
attribute of the Account instance.
After fetching and populating an Account model object and
assigning it to the @account instance variable,
the show action renders the template found
in app/views/expenses/show.rhtml. Rendering this template is
all implicitly done with naming conventions. If an action doesn't
explicitly render a named template, then a template matching the
action's name is used.
<% for column in Account.content_columns %>
<p>
  <b><%= column.human_name %>:</b>
  <%=h @account.send(column.name) %>
</p>
<% end %>

<%= link_to 'Edit', :action => 'edit', :id => @account %> |
<%= link_to 'Back', :action => 'list' %>
The template is a mix of HTML and Ruby code. Any expression
between <%= and %> is evaluated as Ruby code
and the result is substituted for the expression. Notice that
the show template has access to the @account
instance variable that was set in the show action of the
controller. The show template simply outputs the value of
each attribute of the @account object with its associated
column name. Hyperlinks to the edit and list
actions are generated using the built-in link_to helper. The
resulting web view is shown in Figure 4.
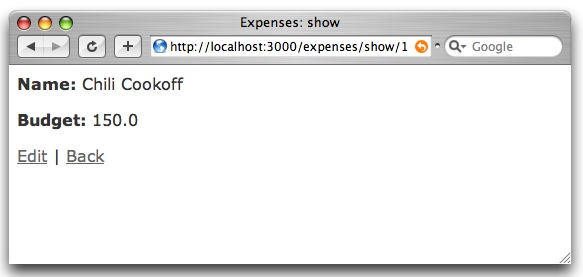
Figure 4:
The 'show' action renders the 'show' template
Again, this template doesn't output the most visually appealing
interface, but it's easy enough to change to your liking.
Customizing: Validating Models
You may have noticed that the web form used to create and edit
accounts will let you enter anything in the fields, and even let you
leave required fields blank. Maintaining the consistency of the
application's data is a model's job, so let's add some validations to
ensure the account has a name and a valid budget amount.
Thankfully, running the scaffold generator created a set of working
files that we can incrementally tweak. Update
the app/models/account.rb file as follows:
class Account < ActiveRecord::Base
  validates_presence_of :name
  validates_numericality_of :budget
end
Now try to get past the web form by leaving the name field blank or
using anything but a number in the budget field. You should see
something similar to the web form shown in Figure 5.
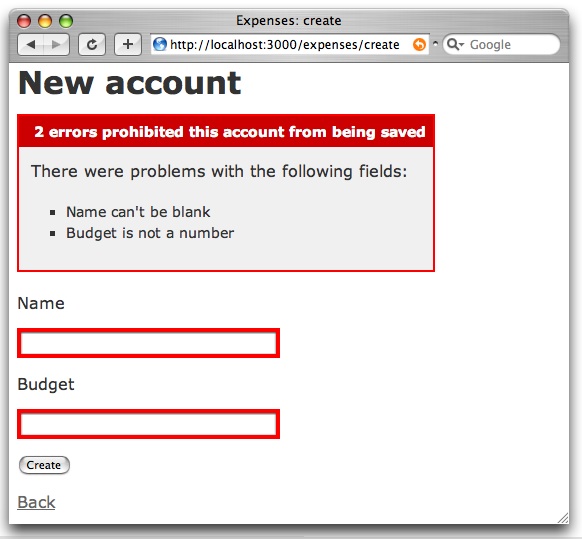
Figure 5:
Model validations at work
Linking Models Together
Account management is working well, but we're missing the ability to
add expenses to accounts. An expense is comprised of the date on
which it was paid, a string identifying who it was paid to, and the
amount paid. We need to store expenses in their own database table,
which calls for another migration. Create the expense migration by
typing
$ script/generate migration expenses
Then fill it in by updating the
resulting db/migrate/002_expenses.rb file as follows:
class Expenses < ActiveRecord::Migration

  def self.up
    create_table :expenses do |table|
      table.column :paid_on, :date
      table.column :payable_to, :text
      table.column :amount, :float, :default => 0.0
      table.column :account_id, :integer
    end
  end

  def self.down
    drop_table :expenses
  end
end
Notice that in addition to expense data, rows in the expenses
table have a foreign key reference (account_id) that links
the expense to its account. Apply the migration by typing
$ rake migrate
Next we need an Expense model to wrap the expenses
table. Use the generator to create the model by typing
$ script/generate model expense
That command gives us an empty Expense model class. Now we
have to tell Rails that a relationship exists between
the accounts and expenses tables. (Rails can't
accurately derive relationships simply by looking at the database
schema.) Specifically, an expense belongs to an account.
Declare that relationship in the Expense model by updating
the app/models/expense.rb file as follows:
class Expense < ActiveRecord::Base
  belongs_to :account
end
The belongs_to declaration dynamically adds methods to
the Expense class, including methods for assigning an account
to the expense and returning the account that the expense belongs to.
For that to work, Rails assumes that the account_id column in
the expenses table references the id column of
the accounts table. It's another example of how Rails uses
naming conventions to keep external configuration at a minimum, and
you can always override the default behavior.
That takes care of one side of the relationship. We also need to tell
Rails about the link in the opposite direction: an account has
many expenses. Declare that relationship in the Account
model by updating the app/models/account.rb file as follows:
class Account < ActiveRecord::Base

  validates_presence_of :name
  validates_numericality_of :budget

  has_many :expenses, :order => "paid_on"
end
The has_many declaration dynamically adds several methods to
the Account class for managing an account's expenses. Note,
however, that it's not required that we add relationships to both
the Account and Expense models. Setting up
relationships in both directions just means that we can access and
operate on the relationships from either side.
Accessing Your Application Through the Back Door
$ script/console
That command loads the application into an interactive environment,
and prompts you to enter Ruby code. Let's add two expenses to an
existing account. Using one of the account names you created through
the web interface, type the following lines, with each line followed
by a Return:
>> account = Account.find_by_name("Chili Cookoff")
>> account.expenses.create(:paid_on => Time.now, :payable_to => 'Parties R Us', :amount => 75.00)
>> account.expenses.create(:paid_on => 1.day.ago, :payable_to => 'Fire Department', :amount => 25.00)
>> account.expenses(true)
(After entering each line and pressing Return, it will show the value
of each expression. Use quit to exit the session.)
First we use a dynamic finder (find_by_name) to find
an Account model object in the database. Dynamic finder
methods work for any database column
(e.g., find_by_budget(150)). Then we create and add
two Expense model objects to the expenses
relationship of the account. Finally, we
call account.expenses(true) to get a collection of all
expenses belonging to the account, ordered by the date the expenses
were paid. (Using true forces the expenses to be reloaded.)
Now that we have an account with expenses, it would be helpful if we
listed the expenses on the account detail page.
Dressing Up the View
The account detail page is still being generated by the show
template that was created by the scaffolding. So when we show an
account, we don't see any expenses. But we can easily change that by
customizing the show template slightly. Add the following
snippet to the bottom of the app/views/expenses/show.rhtml
file:
<% if @account.has_expenses? %>
  <h3>Itemized Expenses</h3>
  <table>
  <% for expense in @account.expenses %>
    <tr>
      <td><%= expense.paid_on %></td>
      <td><%= expense.payable_to %></td>
      <td align="right"><%= number_to_currency(expense.amount) %></td>
    </tr>
  <% end %>
  </table>
<% end %>
The template loops through all the expenses for the account,
generating an HTML table row for each expense. Notice the use of the
built-in number_to_currency helper to display the expense
amount as dollars. Navigating to the account detail page for the
account you added expenses to using script/console
previously, you should now see a page similar to the one shown in
Figure 6.
Figure 6:
An account has many expenses
Working with Web Forms
We don't yet have a way to record expenditures for an account using
the web interface, so let's add an HTML form that captures the
expense. We'll have the form post the expense to the record
action in the ExpensesController.
First, add the following snippet to the bottom of
the app/views/expenses/show.rhtml file:
<%= start_form_tag :action => 'record', :id => @account %>
  <p>
    On <%= date_select 'expense', 'paid_on', :order => [:month, :day, :year] %>
    to <%= text_field 'expense', 'payable_to', :size => 25 %>
    in the amount of $<%= text_field 'expense', 'amount', :size => 9 %>
  </p>
  <%= submit_tag 'Record!' %>
<%= end_form_tag %>
This creates an HTML form using built-in form helpers.
The start_form_tag helper generates an HTML form that, in
this case, posts to the record action of
the ExpensesController with the current account id assigned
to the :id URL parameter. The date_select helper
generates a date selection widget bound to the paid_on
attribute of the "thing" named expense. (Stay
tuned for what we mean by "thing".) The text_field
helper generates an <input> tag of type text
bound to the payable_to attribute of the thing
named expense. Finally, the submit_tag generates a
submit button.
Reload a show page and you should see a page similar to the
one shown in Figure 7.
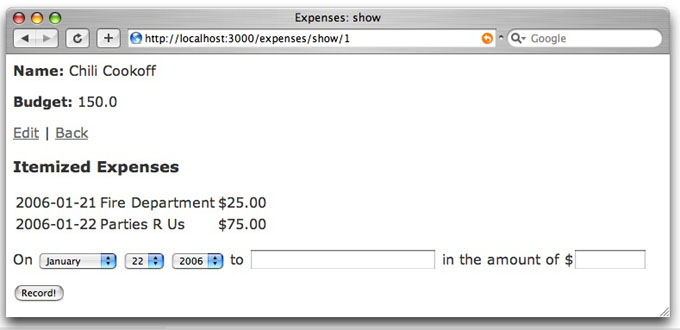
Figure 7:
Recording expenses through a web form
If you try to submit the form, Rails complains that it can't find
the record action to handle the form post. We need to define
that action in the ExpensesController. Add the following
action method to the app/controllers/expenses_controller.rb
file:
def record
  Account.find(params[:id]).expenses.create(params[:expense])
  redirect_to :action => 'show', :id => params[:id]
end
Remember we said that the date and text were bound to a thing called
"expense"? Just what is that "thing?" Well, in
this case, it simply means that we can reference all
the expense fields in the form by
referencing params[:expense]. First we find the account
corresponding to the account id supplied by the form
(in params[:id]). Then we create an Expense model
object from the form data (available in params[:expenses])
and add the expense to the account's collection of expenses. Finally,
we redirect the browser to the show action to display the
updated account details, including the newly-added expense.
Go ahead and use the web form to add expenses to your accounts. You
can get insight into what's going on behind the scenes (including what
SQL is being run) by watching the log file. In a separate terminal,
type:
$ tail -f log/development.log
Note that if script/server started with the LightTPD web
server (rather than falling back onto WEBrick), the log will be tailed
automatically for you.
Adding Business Logic
We have an account budget and a list of expenses, now all we need to
do is total the expenses to see if we're within budget. That
calculation is business logic that belongs in the Account
model. So add the following method to
the app/models/account.rb file:
def total_expenses
  expenses.inject(0) {|total, expense| total + expense.amount }
end
We use the expenses relationship to iterate through the
account's expenses and accumulate the total. Don't worry about the
syntax used here. The inject method is a Ruby idiom for
accumulating while stepping through a collection of objects.
The total_expenses method then returns the value of the last
expression, which is the total of the expenses.
Using Helpers
At this point we need to update the view to show the total. But
there's a bit of view logic that has to happen: If the expense total
is greater than the account budget, then we want to display the total
in red. Otherwise, we'll display the total in black. (The club
treasurer likes it better this way.) We could put this logic in the
template itself, but it's wise to keep logic out of the template.
Instead, view-specific logic is best kept in a custom helper method.
Add the following method to
the app/helpers/expenses_helper.rb file:
def total(account)
  style = account.total_expenses > account.budget ? 'color: red' : 'color: black'
  %(<span style="#{style}">#{number_to_currency(account.total_expenses)}</span>)
end
This helper method simply generates styled HTML to show the total
expenses for an account, depending on whether the account is within
budget or not.
Finally, modify the template in
the app/views/expenses/show.rhtml file to display the total
using the total helper by adding a row to the bottom of the
itemized expenses table, as follows:
<tr>
  <td align="right" colspan="3">
    <strong>Total</strong>: <%= total(@account) %>
  </td>
</tr>
Reload a show page, add enough expenses to bust the budget,
and you should see a page similar to Figure 8.
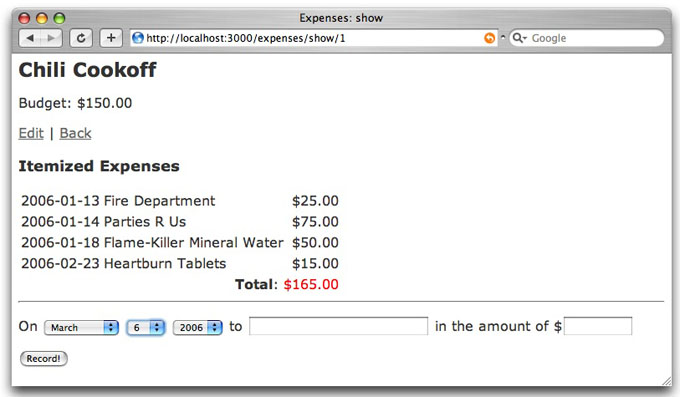
Figure 8:
Using business logic and a helper to show total expenses
Now that we have business logic, trivial as it may be, we're wise to
test it.
Writing Tests
Rails makes doing the right things easy. One of those things is
testing. In fact, when we generated the scaffolding Rails went ahead
and created unit tests for our models and functional tests for our
controllers. But the tests won't run until we create the test
database.
Remember that Rails has three default runtime environments. When you
run tests, they're run with Rails configured according to
the test environment. In our case, the default database
configured in the config/database.yml file for
the test environment is called expenses_test. To
create that database using the mysqladmin command-line tool, type
$ mysqladmin -u root -p create expenses_test
Now let's add a new unit test to cover the total_expenses
method we added to the Account model. Add the following test
method to the test/unit/account_test.rb file:
def test_total_expenses
  account = Account.new
  account.expenses.create :amount => 10.00
  account.expenses.create :amount => 20.50

  assert_equal 30.50, account.total_expenses
end
The test adds two expenses to an account, then checks that the total
expenses is the sum of both expenses. Run all the unit tests by
running 'rake test_units'.
$ rake test_units
...
Finished in 0.084544 seconds.

3 tests, 3 assertions, 0 failures, 0 errors
Rails encourages you to test more by making it easy to write and run
tests. In addition to unit tests, functional tests let you easily
generate simulated HTTP requests against a controller, then assert
that the controller works as you'd expect. To run all the unit and
functional tests in one fell swoop, simply run rake. (As it
stands, the functional tests fail because we've modified
the ExpensesController and its test is now out of step with
the code.)
Ship It!
We're done with version 1.0 of the application. Now it's time to
deploy it onto a production server and share it with the world. We
need to do at least two things: configure a web server on the
production machine and deploy our code onto that machine.
Configuring a Web Server
The easiest path is to use the LightTPD (or "lighty") web
server: a production-quality web server that's very popular in the
Rails community. In fact, Rails 1.0 will use the LightTPD web server
by default if it's installed on the local machine.
The first time you start the application by
typing script/server, a LightTPD configuration file is
created in the config/lighttpd.conf file. By default, your
Rails application will run in the development runtime
environment. To switch to the production environment, simply
update the config/lighttpd.conf file and set
the RAILS_ENV environment variable as follows:
"RAILS_ENV" => "production"
The production environment changes the runtime characteristics of the
application to suit production needs: the application runs faster,
logging is less verbose, users see friendlier error pages, etc.
Deploying the Application
When it comes to deploying the code to the production server, and
re-deploying your application with each new release, you're in for a
treat. Capistrano (formerly SwitchTower) is
an automated deployment utility that makes deploying Rails
applications a breeze. To summarize, after installing Capistrano,
deploying a new version of your application to one or more deployment
machines is as simple as typing
$ rake deploy
If there's a problem with that version, you can easily roll back to
the previous version by typing
$ rake rollback
When you run a SwitchTower task such as deploy
or rollback, it's run in parallel (and atomically) on all
machines that are assigned to that task in the Capistrano recipe
file. Think about that: As the number of machines and processes in
your deployment environment increases, your deployment procedure
remains constant at a single command.
For complete instructions on how to configure LightTPD and use
Capistrano, see the online recipe Deploying
Rails with LightTPD.
Features for Version 2.0
In a short amount of time we've built a functional expense-tracking
application. Our treasure's job is already made easier. Indeed,
we're off to a good start, but here are just a few ideas we could
implement by the end of the day:
-
Add Expense Categories. We may well want to associate
expenses with expense categories. For example, an expense for
printing flyers might go in the "Advertising"
category. To do that, we'll need a relationship between
the Expense model and a new Category model,
for example.
-
Make the Interface More Dynamic. Currently, recording a
new expense forces a reload of the page. Using the Ajax
libraries and helpers integrated with Rails, when a new expense
is added we could dynamically add the expense to the list of
itemized expenses, update the total, and highlight the new item.
All that would happen without needing to reload the page.
-
Export Accounts and Expenses. To integrate with other
systems, users may want to export their data as XML, CSV, PDF,
etc. To do that, we'll need to use builder-style templates
supported by Rails. Instead of generating HTML, builder
templates use Ruby code to generate output in arbitrary formats.
-
Support Multiple Users. If we want to bring this
application to the masses, we'll need to add the concept of an
account owner. Users should only be able to add expenses to
accounts they own. To do that, we'll need to
use sessions and filters to support logging in
users and restricting their access.
Conclusion
Ruby on Rails is a highly-productive and industrial-strength web
application framework. It scales from the simplest expense tracking
application we built to full-featured applications with respectable
numbers of users. As with any useful tool, it's not suited to handle
every job, but it's a great complement to your Mac OS X development
environment.
For More Information
This article has introduced you to Ruby on Rails. The following
references will help you dig in deeper:
Updated: 2006-06-08
|