
With Apple now shipping Intel-based Macintoshes, the remaining software
developers still using the CodeWarrior Integrated Development Environment (IDE) have realized it's time to
move their applications to the Xcode IDE. The reason is simple: by moving
existing CodeWarrior applications to Apple's Xcode, they can create universal
binaries—applications that include executable code that runs on both PowerPC
and Intel-based Macintosh computers. Developers using Xcode are able to compile their applications to work on
Intel-based as well as PowerPC-based Macs.
If you currently use CodeWarrior, you will find that porting
your application to Xcode opens up new opportunities while providing a
sophisticated development environment that is comfortable to use, and relatively easy to learn. This
article can help you get started: it looks at some of the top-level issues
involved, offers some guidance on how to proceed, and discusses some issues that you
may encounter when you begin the process. It can help you as a CodeWarrior
developer understand what you need to know so that you can move your C/C++/Objective-C application to
Xcode quickly and without disruption to your work flow.
Similarities and Differences
CodeWarrior and Xcode are both high quality, feature-rich IDEs that allow you
to build solid, high-performance Mac OS X applications. Although the tools
differ slightly in their details, the key concepts remain the same. Both Xcode and
CodeWarrior include an editor, compiler, linker, and debugger. Both allow you to
manage projects using a Graphical User Interface (GUI) that groups source code
files, resource files, and existing libraries into logical groups for inclusion
in the finished product.
There are some key differences between CodeWarrior and Xcode, both on the surface
and down in the internals, and the degree to which they affect your application
and how easily it builds will depend on several factors. In some cases, and depending on your application's complexity,
the differences may not affect you directly. For example, Xcode uses the open
source GNU Compiler Collection (GCC) 4 under the hood to build and link
applications. In contrast, CodeWarrior includes a custom compiler, which has
its own strengths, weaknesses and differences. If you use compiler-specific directives in your CodeWarrior
project, you may need to replace or remove those directives. You may also have
some tweaking to do because GCC 4 is more standards-compliant than CodeWarrior,
and may flag issues in your code that the CodeWarrior compiler passes over.
Access/Search Paths
Project management details differ somewhat. For example, CodeWarrior allows separate
User and System Access Paths, allowing you to include files from one or more
locations using both relative and absolute search paths, as shown in Figure 1.
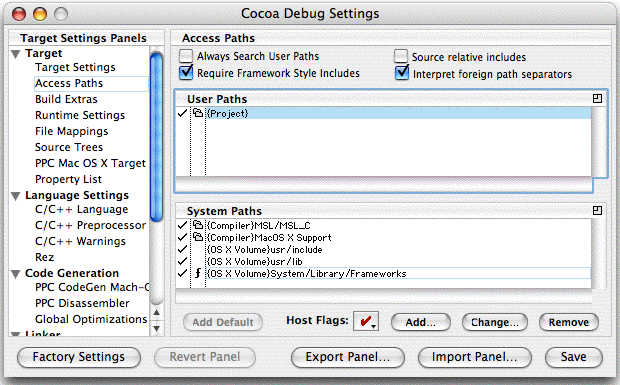
Figure 1: CodeWarrior Project Access Paths
Xcode includes Access Paths (called Search Paths) and expands on the concept
by offering separate Header, User Header, Library, and Framework Search Paths,
which can also be specified as absolute or relative paths, as shown in Figure 2.
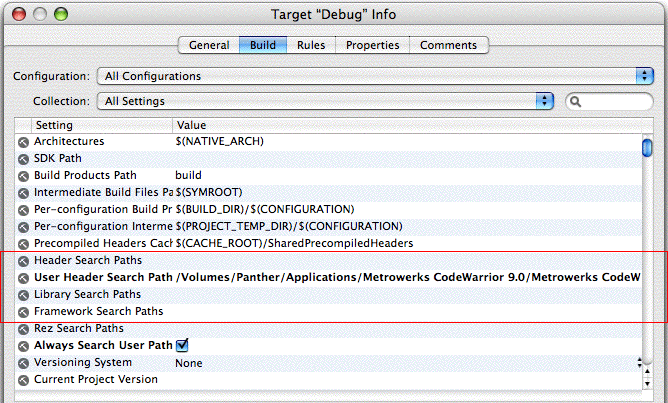
Figure 2: Xcode Project Search Paths
Source Trees
CodeWarrior source trees allow you to assign an alias to a path, and then
include the alias in the target Access Path. Figure 3 shows a target-specific source tree definition in CodeWarrior.
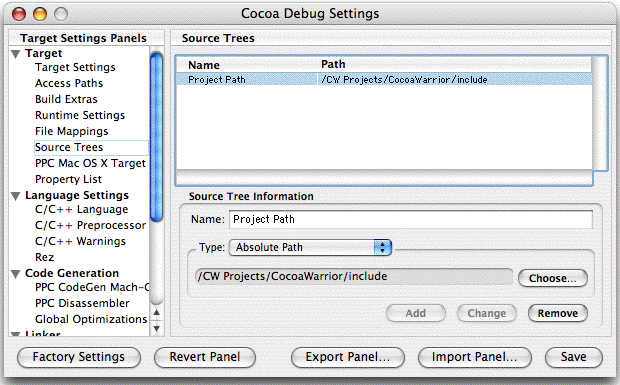
Figure 3: CodeWarrior Project Source Tree Setting
Xcode also supports source trees
through the Xcode Preferences dialog. Source trees in Xcode are global in scope, meaning
they may be used across all projects. The entry shown in Figure 4 is the actual path to the CodeWarrior folder, and
was created automatically by the project importer.
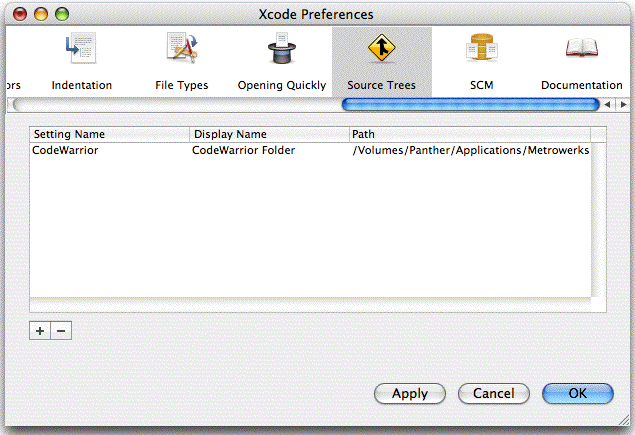
Figure 4: Xcode Source Tree Preference
After you define the Source Tree alias
in the application preferences, it is available for use in the project target
settings.
Build Configurations
You will find additional Xcode features that make development easier, such as
build configurations. Xcode build configurations provide flexibility in managing
multiple configurations for each build target. With CodeWarrior, each target has
only one configuration, which is specified in its build settings: if you want to
vary the build you need to create a new target. But with Xcode, each target can
have multiple configurations build settings, allowing you to define more than
one way to build, for example, the Debug target. While you are exploring the
potential of build configurations, you can still reap the benefits because when
you import a CodeWarrior project, Xcode automatically creates a build
configuration named "Imported CodeWarrior Settings" for each target, and uses
that as the default, as shown in Figure 5.

Figure 5: The Default Build Configuration for an Imported Project
Fix and Continue
Both IDEs include interactive debuggers, but the Xcode debugger includes the
unique Fix and Continue feature, which allows you to make a code change while
the application is paused in the debugger, recompile that file, and restart
debugging from the point where you paused.
The similarities between Code Warrior and Xcode are numerous, and Xcode's
additional features will help you quickly become productive while you get
familiar with the differences between the two IDEs.
Import Into Xcode
The first step in importing a CodeWarrior project into Xcode is to prepare
the project while in CodeWarrior. If you have not already done so, convert the
CodeWarrior application to Mac OS X and Mach-O before moving it to Xcode. Since
Mach-O is the only binary format supported on Mac OS X, you should make sure
that the Mach-O version of your CodeWarrior project builds and runs. This will
reduce the number of headaches and build errors you experience during and after
importing, when you are trying to deal with build errors in a new IDE.
You should clean up the CodeWarrior project by removing unused targets (e.g.,
Windows) and files. Any source trees defined in project settings should be moved
to the CodeWarrior application preferences, and removed from the project
settings, because the importer can import global source trees: there is an Import Global Source Trees checkbox in the importer dialog that controls this behavior, as shown in Figure 6. The importer ignores project-specific source trees.
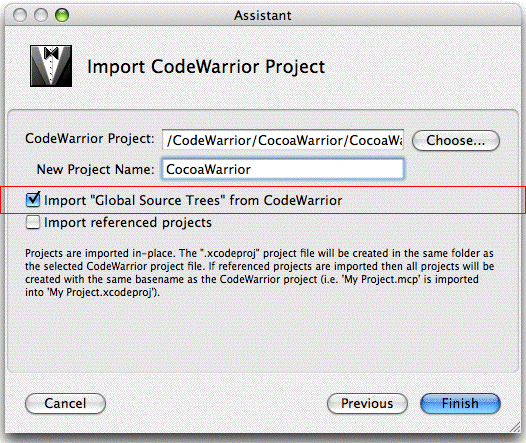
Figure 6: The Import Global Source Trees Checkbox
The second step is to import the project into Xcode. To assist you, Xcode
includes an importer (under File > Import Project...) that can
specifically import CodeWarrior projects. It creates an Xcode project structure
and converts many project settings to their Xcode equivalents, reducing the
amount of rework you need to perform. However, the importer is not foolproof, so
you will likely have some post-import work to do.
One tool that can help you tremendously during the import is
/Applications/Utilities/Console.app. The Console displays errors
encountered during the import process (see Listing 1), so you should check it while or after the
importer executes. The details in the Console messages may allow you to resolve
many import problems.
Listing 1: Importer Error Messages Logged In The Console
2005-10-27 13:26:35.685 Xcode[217] Couldn't find file "crt1.o" for addition to target                        \
                                                                        "Toolbox Mach-O Debug"... skipping
2005-10-27 13:26:35.691 Xcode[217] Couldn't find file "MSL_All_Mach-O_D.lib" for addition to target          \
                                                                        "Toolbox Mach-O Debug"... skipping
2005-10-27 13:26:37.177 Xcode[217] Info.plist file for target 'Toolbox Mach-O Debug' not generated for the   \
                                                                                       following reason: {
    NSAppleScriptErrorBriefMessage = "File CodeWarrior:CarbonApp:::SimpleHello Debug.app:Contents:Info.plist \
                                                                                       wasn't found.";
    NSAppleScriptErrorMessage = "File CodeWarrior:CarbonApp:::SimpleHello Debug.app:Contents:Info.plist      \
                                                                                       wasn't found.";
    NSAppleScriptErrorNumber = -43;
    NSAppleScriptErrorRange = <00000000 00000000 >;
}
After importing the project into Xcode, try building your project. Building
in Xcode is similar to the make process in CodeWarrior, and a preprocessor,
compiler, and linker are all included. If the build is not successful, then you
may need to resolve import problems with header files, libraries, symbols, or
non-compliant code.
Application-Specific Issues
The type of application you are importing partially determines how much
effort will be required to get it up and running. A simple C/C++ Mach-O console
application, created from the CodeWarrior Mac OS C or C++ Stationery, may
require no changes. After importing, it may simply require a rebuild, and then
run as expected. A Carbon Mach-O or Cocoa project may require a little more
tweaking.
Sometimes the importer may not find or import every file. For example, if
your CodeWarrior project included a MainMenu.nib file, but it does
not appear in the Xcode project, then you need to manually add it before running
(though the project should build without the .nib file). The easiest way
to add an existing file to an Xcode project is to use the Finder: drag and drop
the file onto one of the file groups on the left-side of the Xcode project
window. Once you drop the file on the project, Xcode creates (and manages) a
reference to the file, and includes it in the build.
In addition, Xcode stores application properties in the
Info.plist file instead of CodeWarrior's .plc file.
CodeWarrior includes a project setting to compile an Info.plist
from the .plc file (see Figure 7), so your built CodeWarrior application may
already include the Info.plist, even though you cannot see it in
the project.
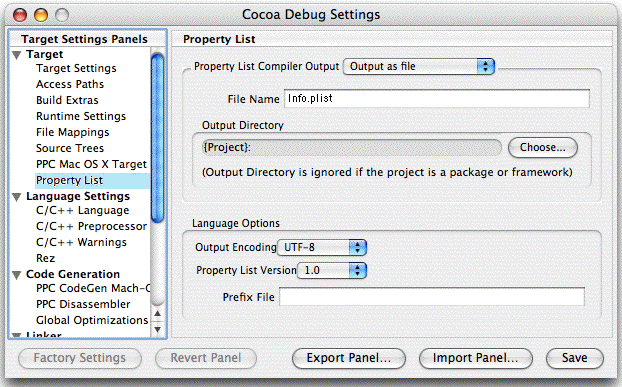
Figure 7: The CodeWarrior Setting For Generating an Info.plist File
Finding the file may be a little tricky, since it may be inside the
application bundle. In the Finder, you can right-click on the application icon
and select Show Package Contents to display the bundle contents, as shown in Figures 8a and 8b. Copy
Info.plist to another folder, and then add it to the Xcode project.
Typically you will add Info.plist under the Resources group in the Xcode project.
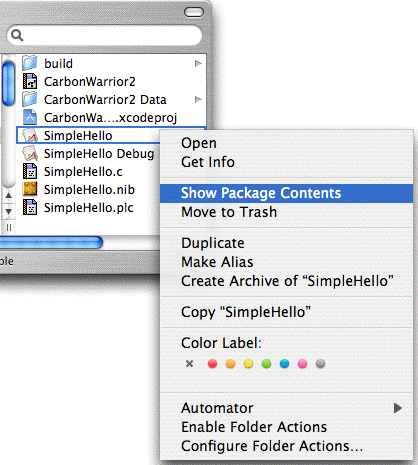
Figure 8a: Selecting Show Package Contents...
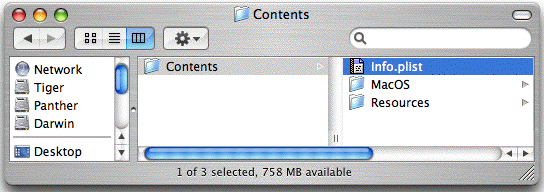
Figure 8b: ...Opens the Package Contents in a New Window
You may also need to tweak the path setting for the project
Info.plist. This is easy enough using an Xcode Inspector window.
Double-click on the desired build target (listed under Targets) in the
project window, select the Build tab in the window that, and scroll down to the
setting Info.plist File. Click the Edit button, and then specify the path to
the file. If it is in the root project folder, you can simply type in
Info.plist, click OK, and then rebuild or rerun.
If your CodeWarrior project uses statically-linked C runtime libraries, such
as crt1.o (the Metrowerks Standard Library), those libraries may
get imported into the Xcode project under the Libraries group. You may need to remove these from the Xcode
project to get it to link.
PowerPlant is the CodeWarrior framework and class library that lets you
quickly build applications that conform to standard Mac OS appearance and
behavior. If your application is a PowerPlant project, you can still import it
into Xcode, but you may find that it requires substantially more work than the
console, Carbon, and Cocoa applications discussed above. You need to import the
PowerPlant libraries into the Xcode project, and include them in the build. More
details are available in the document Porting CodeWarrior Projects to Xcode.
Get Ready Now
Xcode is a first-class IDE, and includes many of the same features you're familiar with in
CodeWarrior. It's flexible and powerful and in addition, Xcode can build applications that run on both PowerPC
and Intel-based Macintosh computers. Apple continually updates Xcode with new features,
frameworks, and APIs, enabling you to deliver cutting-edge applications to your
customers. If you currently use CodeWarrior, you will find that moving your
application to Xcode opens up new opportunities while providing a comfortable
development environment that is relatively easy to learn. But don't wait. The first Intel-based Macintosh
computers are already shipping to customers, and they will be looking for applications that make the most of the new architecture. Make sure that your application is ready.
For More Information
If you are ready to learn more, visit the Developer
Transition Resource Center, where you will find resources that provide
everything you need to make sure your applications are ready for both the
PowerPC and Intel architectures. The DTRC includes introductory articles,
in-depth technical publications, WWDC session videos, and tools for download.
To download the latest version of Xcode, see the Tools topic page.
Posted: 2005-11-28
|