Using MacPorts: An Open Source Software Collection
With its rich UNIX heritage, Mac OS X includes many open source projects, libraries, scripting languages, debuggers and compilers. But while this rich set of resources is beneficial, open source projects are highly specialized and are designed to work in concert with other projects. These sometimes complex dependencies can be difficult to manage. As a result, there are many efforts within the UNIX community to collect and organize open source software. One such effort is the MacPorts collection.
This article gives you a tour of using the MacPorts collection on Mac OS X. We'll show how the MacPorts collection is influenced by another open source management system, the FreeBSD Ports collection. We'll look at how an application (a "port") is packaged, how it is installed, updated, and removed. We'll take a look at one of the graphical front-ends that have been created for MacPorts, and finally, we'll show how to use a library installed from MacPorts in your own Xcode project.
The Background of MacPorts
Mac OS X and FreeBSD share a common branch in the UNIX family tree, with the Ports system first appearing in FreeBSD 2.0, released in 1995. It's not surprising that MacPorts shares many of the same concepts and features as the FreeBSD Ports system. Both systems have one primary goal in mind: to make installation of software consistent and easy. A subsequent goal is that managing of installed software should likewise be consistent and easy.
The FreeBSD Ports system and MacPorts are really about more than just installing software. These systems are about building software. In fact, this is why the word "port" came into usage to describe an individual project. The word "port" means taking software written for one platform, and building it to run on another platform—in this case, Mac OS X. Developers have limitless choices when it comes to building their applications. There are many different tools and approaches, such as UNIX Make and shell scripts. The common thread is: managing the complex dependencies of a program. If a program depends on libraries, then you must ensure that those libraries are present, and that they are compiled to run in your environment before you can build the program itself. Libraries themselves might have their own dependencies—for example, on tools and scripts used to build them.
So that is really the purpose of the MacPorts system. It helps you find the software you need, then it helps you build that software by automatically retrieving and building all of its dependencies, and then building the entire system in the most appropriate and consistent way for your version of Mac OS X. MacPorts then helps you manage (upgrade, remove, etc.) your installed software by maintaining a software component database.
Note: We talk mainly from the perspective of building standalone applications, but really a "port" can be anything. It can be a single executable program, a suite of such programs, or, as is often the case, it can be a library that other programs link to. Also note that while MacPorts is developed and primarily used on Mac OS X, it can be used on other UNIX systems (it has, in fact, already been ported).
Working with MacPorts
Conceptually, there are two parts to the MacPorts system. First, there is the MacPorts manager itself, which is called port. Second, there is the collection of available software that port knows about.
Installing MacPorts
This is the easy part. Simply go to the Macports website, and download the installer. The installer will copy the MacPorts programs to the directory /opt/local, and since it is primarily a command-line tool, it will set up your path and shell environment for you.
If you plan on developing software that uses the
X Windows system, you will also need to install the X11 SDK, from Xcode
tools. You can verify whether you have the X11 SDK installed by
examining the directory /Library/Receipts/boms. Look there
for the file com.apple.pkg.X11.SDKLeo.bom.
Note: The MacPorts website contains additional instructions for Mac OS X 10.4 and earlier.
Day-to-Day Tasks
Using the port system is thoroughly documented on the MacPorts website. In this article, we will show you just some of the most common commands you can use to get running quickly. MacPorts commands conceptually follow what you would expect to be your daily tasks in working with a software management system: look for applications, install applications, remove applications, upgrade applications, and so on. Table 1 summarizes these tasks with brief examples of each command.
| Task | Command | Example |
|---|---|---|
| Get a list of available ports |
list |
$ port list |
| Update the MacPorts system |
selfupdate |
$ sudo port selfupdate |
| Search the ports collection with partial names |
search |
$ port search rrd |
| Show the dependencies of a port |
deps |
$ port deps erlang |
| Install a port |
install |
$ sudo port install erlang |
| Show the contents of an installed port | contents |
$ port contents erlang |
| Show all installed ports | installed |
$ port installed |
| Show the ports that depend on a given port | dependents |
$ port dependents erlang |
| Upgrade an installed port | upgrade |
$ port upgrade erlang |
| Remove an installed port | uninstall |
$ port uninstall erlang |
Table 1 Tasks and Commands Recognized by MacPorts
You can experiment with the commands in the Example column of Table 1—use the -v flag to get verbose output. The port command recognizes a number of additional commands to those shown in Table 1. The full set is documented on the MacPorts website, along with usage examples.
Graphical Interfaces to MacPorts
The MacPorts command-line interface is relatively simple to navigate. However, some users might prefer to use a graphical front end to the system. The Versiontracker website lists three such programs available, the most popular of which is a freeware program called Porticus. Porticus provides a Cocoa graphical interface to MacPorts functionality.
Figure 1 shows the Porticus window with the "devel" group selected in the left pane. All ports in the group are shown in the upper right pane, and finally, the description of the selected individual port, libsockets, is shown in the lower right pane.
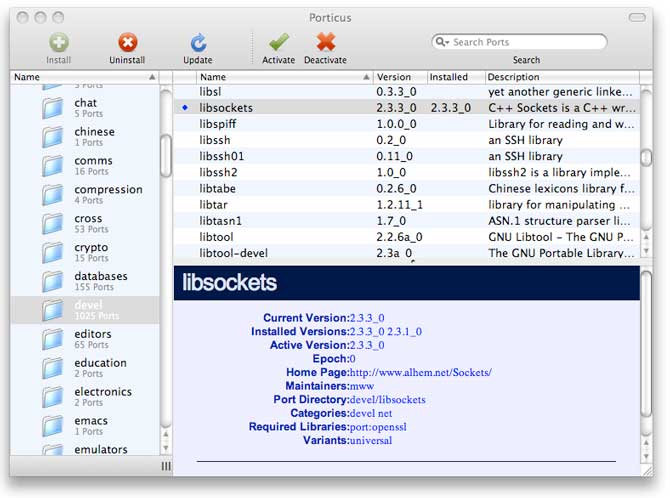
Figure 1 The Porticus Main Window.
As seen in Figure 1, Porticus also provides a search field, which utilizes the search command seen in Table 1. You can type any string in the search field, and Porticus will show the matching list of ports. Figure 2 shows a search in progress for ports that are related to openssl, which happens to be a dependency of libsockets.
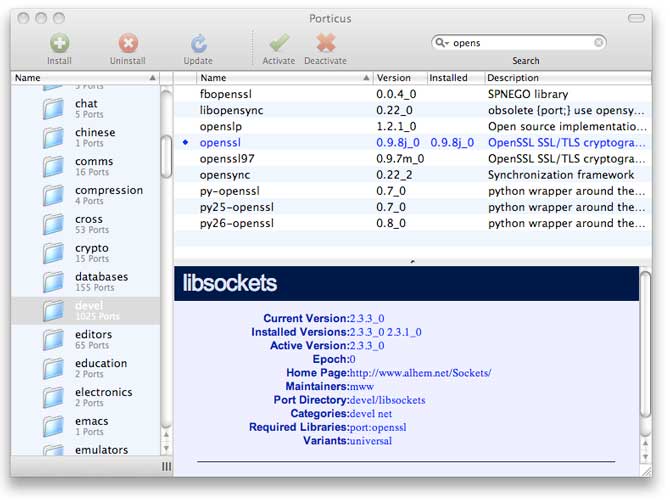
Figure 2 Searching for ports related to openssl.
Anatomy of a Port
Each port project is represented by a file that describes the port's dependencies, and contains its build and installation instructions. This file is called—not surprisingly—a portfile. Under the hood, a portfile is a TCL script. Usually the portfile contains key/value pairs documented on the MacPorts website, however, it may also contain more complex procedures for software that has special build or installation requirements. Both the key/value pairs and procedures are expressed in TCL. Some default installation behavior and settings are provided by MacPorts itself. Therefore, a portfile does not necessarily have to be a complete description. You can override the default behavior and settings if you need to. See the documentation on the MacPorts website for details; here we'll provide a high-level summary of the main concepts involved with creating a portfile.
Installation Phases
Inside the portfile, you use TCL to describe what should happen during various installation phases. For example, there are phases defined for fetching source files from remote sites, comparing checksums to verify the downloaded source files, build the software, install the built software, and so on. Behavior for some phases is defined, but your portfile can override that behavior, and even eliminate a phase altogether. Table 2 lists each phase with a brief description.
| Phase | Description |
|---|---|
fetch |
Retrieve the port's distribution files from defined locations |
checksum |
Compare checksums in the portfile with checksums of the fetched files |
extract |
Unzip and untar the fetched files |
patch |
Apply optional patch files to the port's source code prior to compilation |
configure |
Execute the configure command |
build |
Execute the make command |
test |
Execute commands to run test suites that are bundled with the port |
destroot |
Execute the command make install |
archive |
Use tar to archive a port's files |
install |
Copy a port's built files to the destination directory |
activate |
Set hard links pointing to the MacPorts staging area to the port's actual installation directory. This enables multiple port versions to be installed on the same host. |
Table 2 MacPorts Installation Phases.
Port Dependencies
The port's dependencies are also specified in the portfile. A port can have different dependencies associated with installation phases. There are three different kinds of dependencies that are related to phases, and these are library, build, and run dependencies. Library dependencies are those libraries (and their header files) that are required both at build-time, and at run-time (for shared libraries). Build dependencies are those files that are needed at build-time, but not at run-time. Run dependencies are those files that are needed at run-time.
Each of the three major dependency types has two subtypes: port dependencies, and file dependencies. Port dependencies are, as you would expect, satisfied by reference to another port. Port dependencies are preferred, because dependencies should be provided by MacPorts whenever possible. When it isn't possible to satisfy a dependency with another port, then you can reference specific (usually vendor-supplied) files.
Using an Installed Port
In this section we will look at a specific example. We will install a port called libsockets, which is a C++ interface to BSD sockets, and then show how to use it in an existing Xcode project.
For any particular port, there are two pieces of information you want to see: What the port depends on, and where the port installs itself. For this example, we need to know where libsockets
installs itself so that we can set the include file paths and add the library to our Xcode project.
You can check the dependencies of libsockets with the command:
plague:~ jcb$ port deps libsockets
libsockets has library dependencies on:
	openssl
The command shows that libsockets depends on openssl, so we can expect openssl to be installed as a side effect.
We did not show the deps command for openssl, but openssl does have a dependency on zlib, so zlib will be installed as well.
You install libsockets with the command:
plague:~ jcb$ sudo port install libsockets
--->  Fetching zlib
--->  Verifying checksum(s) for zlib
--->  Extracting zlib
--->  Applying patches to zlib
--->  Configuring zlib
--->  Building zlib with target all
--->  Staging zlib into destroot
--->  Installing zlib 1.2.3_1
--->  Activating zlib 1.2.3_1
--->  Cleaning zlib
--->  Fetching openssl
--->  Verifying checksum(s) for openssl
--->  Extracting openssl
--->  Applying patches to openssl
--->  Configuring openssl
--->  Building openssl with target all
--->  Staging openssl into destroot
--->  Installing openssl 0.9.8i_0
--->  Activating openssl 0.9.8i_0
--->  Cleaning openssl
--->  Fetching libsockets
--->  Verifying checksum(s) for libsockets
--->  Extracting libsockets
--->  Applying patches to libsockets
--->  Configuring libsockets
--->  Building libsockets with target all libSockets.dylib
--->  Staging libsockets into destroot
--->  Installing libsockets 2.3.1_0
--->  Activating libsockets 2.3.1_0
--->  Cleaning libsockets
Now to find out where libsockets installed itself. The default installation location for ports is under the subtree /opt/local (this is also where MacPorts is installed by default). Individual ports can override this, however.
We execute the command:
plague:~ jcb$ port contents libsockets
Port libsockets contains:
  /opt/local/bin/Sockets-config
  /opt/local/include/Sockets/ajp13.h
  /opt/local/include/Sockets/Ajp13Socket.h
  /opt/local/include/Sockets/AjpBaseSocket.h
  /opt/local/include/Sockets/Base64.h
  /opt/local/include/Sockets/Debug.h
  /opt/local/include/Sockets/Event.h
  /opt/local/include/Sockets/EventHandler.h
  /opt/local/include/Sockets/EventTime.h
  /opt/local/include/Sockets/Exception.h
  /opt/local/include/Sockets/File.h
  /opt/local/include/Sockets/HttpBaseSocket.h
  /opt/local/include/Sockets/HttpClientSocket.h
  /opt/local/include/Sockets/HttpdCookies.h
  /opt/local/include/Sockets/HttpDebugSocket.h
  /opt/local/include/Sockets/HttpdForm.h
  /opt/local/include/Sockets/HttpdSocket.h
  /opt/local/include/Sockets/HttpGetSocket.h
  /opt/local/include/Sockets/HttpPostSocket.h
  /opt/local/include/Sockets/HttpPutSocket.h
  /opt/local/include/Sockets/HttpRequest.h
  /opt/local/include/Sockets/HttpResponse.h
  /opt/local/include/Sockets/HTTPSocket.h
  /opt/local/include/Sockets/HttpTransaction.h
  /opt/local/include/Sockets/IBase.h
  /opt/local/include/Sockets/IEventHandler.h
  /opt/local/include/Sockets/IEventOwner.h
  /opt/local/include/Sockets/IFile.h
  /opt/local/include/Sockets/IHttpServer.h
  /opt/local/include/Sockets/Ipv4Address.h
  /opt/local/include/Sockets/Ipv6Address.h
  /opt/local/include/Sockets/ISocketHandler.h
  /opt/local/include/Sockets/ListenSocket.h
  /opt/local/include/Sockets/Lock.h
  /opt/local/include/Sockets/MemFile.h
  /opt/local/include/Sockets/Mutex.h
  /opt/local/include/Sockets/Parse.h
  /opt/local/include/Sockets/ResolvServer.h
  /opt/local/include/Sockets/ResolvSocket.h
  /opt/local/include/Sockets/SctpSocket.h
  /opt/local/include/Sockets/Semaphore.h
  /opt/local/include/Sockets/SmtpdSocket.h
  /opt/local/include/Sockets/Socket.h
  /opt/local/include/Sockets/socket_include.h
  /opt/local/include/Sockets/SocketAddress.h
  /opt/local/include/Sockets/SocketHandler.h
  /opt/local/include/Sockets/sockets-config.h
  /opt/local/include/Sockets/SSLInitializer.h
  /opt/local/include/Sockets/StdLog.h
  /opt/local/include/Sockets/StdoutLog.h
  /opt/local/include/Sockets/StreamSocket.h
  /opt/local/include/Sockets/TcpSocket.h
  /opt/local/include/Sockets/Thread.h
  /opt/local/include/Sockets/UdpSocket.h
  /opt/local/include/Sockets/Utility.h
  /opt/local/include/Sockets/uuid.h
  /opt/local/include/Sockets/XmlDocument.h
  /opt/local/include/Sockets/XmlException.h
  /opt/local/include/Sockets/XmlNode.h
  /opt/local/lib/libSockets.1.0.0.dylib
  /opt/local/lib/libSockets.a
  /opt/local/lib/libSockets.dylib
We see that libsockets installed its header files in /opt/local/include, and it installed its libraries (static and shared) are in /opt/local/lib. Additionally, note that the two dependencies, openssl and zlib, also installed their own header files in this directory.
Creating a Project
For this exercise, we're going to create an Xcode project that is a simple C++ command-line tool. In Xcode's New Project Assistant, select C++ Tool, and click Choose.
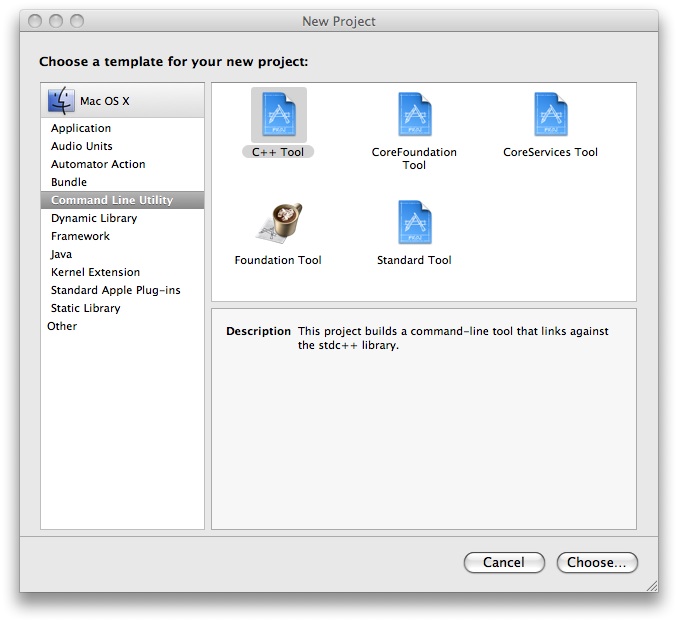
Figure 3 The Xcode New Project Assistant
We'll call the project mpproj, and save it in a local projects folder.
Now we need to do two things to the Xcode project: add the libsockets library, and set the path for its #include files. To add the library, libSockets.dylib to the target:
- In the project window, right-click on the project, and select Add, then Existing Files...
- In the Open panel, press shift-command-G to open the Go To panel.
- Type in the path to the library:
/opt/local/lib/libSockets.dylib - Click Add.
Next, we need to add the path /opt/local/include to the header file search path:
- Open the Inspector Panel for the project.
- In the search field, type the word Header.
The list of settings will narrow down, and in the Search Paths section you will see User Header Search Paths.
- In the User Header Search Paths field, enter the path to the
libsocketsheader files:/opt/local/include
Figure 4 shows the Inspector Panel with the User Header Search Paths field highlighted
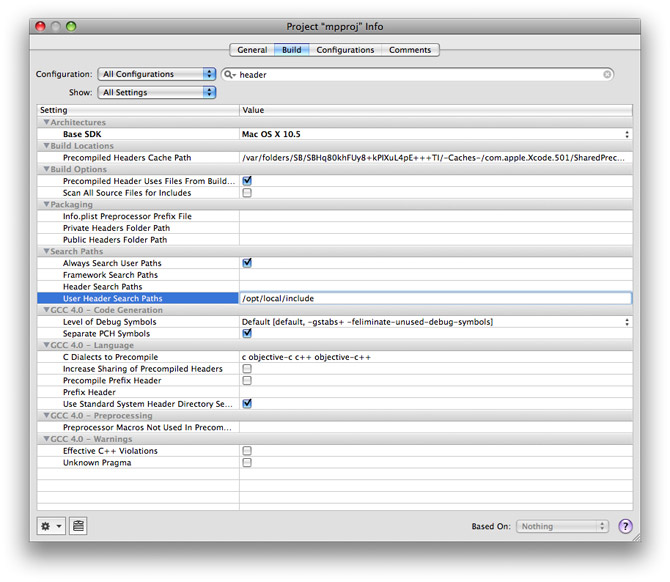
Figure 4 The Project Inspector Panel
- Close the Inspector panel.
That's it! Now the project knows where to find libsockets. When you need to include a header file from libsockets in your code, you would do so with a statement such as:
#include "Sockets/HTTPSocket.h"
Note: Incidentally, if you were developing a program to use Apple's X11 SDK, you would add the X11 libraries, and set the search path for the X11 header files as described above. The paths are /usr/X11/include for the header files, and the X Windows libraries are located in /usr/X11/lib.
See the MacPorts website for more information, including documentation, downloadable ports and support.
Posted: 2009-02-13