
The Java Native Interface (JNI) lets developers mix Java code with C or C++
source code. It provides access to platform-specific features that Java does not
provide, so that Java applications on Mac OS X can take advantage of the wide range of powerful Apple-only
technologies to provide the best possible user experience. Using the JNI, your
Java application can access a user's Address Book, make Spotlight queries, take
advantage of Core Image and Core Video, and leverage many other rich features unique to
Mac OS X.
This step-by-step tutorial explains how to use the JNI to integrate Java and C
code using a single Xcode project with multiple targets. In addition, the
resulting JNI library will be a universal binary, allowing the Java application
to run properly on both Intel-based and PowerPC-based Macs.
Note: Java applications that wish to access native
code on both Intel-based and PowerPC-based Machintosh computers must provide
universal JNI libraries since the Java Virtual
Machine does not run under Rosetta. See
Technical Q&A QA1295 for more information.
What You Need to Know to Get Started
To get the most out of this article, you'll need a basic grasp of Xcode, some
knowledge of both C and Java, and at least a limited understanding of the JNI.
Review Apple's
Xcode documentation for
more on Xcode. Sun has excellent documentation for both Java and the JNI
available online on the Sun Java website, and
Technical Note TN2147 discusses the details
of JNI programming on Mac OS X.
We'll be using Xcode version 2.2 for this article with the All-In-One window
configuration. Be aware that the screen shots in this article may look a bit
different that what you see on your screen if you're using a different version
of Xcode or you have the window configuration set up differently.
Most of the source code for our example project comes from the ADC Sample Code
project MyFirstJNIProject.
If you've explored that sample already or you attended the JNI session at last
year's (2005) World Wide Developers Conference, then the code should look familiar. However, we're going to cover some
additional information in this article beyond what was discussed at that WWDC. In
particular, we'll explain in more detail how to build a universal version of the
JNI library so that your Java application will run on both
Intel-based and PowerPC-based Machintosh computers. In addition, we'll show how to control whether or not
the JNI library gets loaded based on whether or not your Java application is
running on Mac OS X or not.
About Our JNI Project
In this article, we're going to start with a standard Swing Application project.
As we proceed through the tutorial, we'll make small modifications to the source
and project settings. We'll add two additional targets to build a header file
for the native method and the native library itself. For the native code
portion, we're going to follow the MyFirstJNIProject sample and retrieve the
current user's full name using the Address Book framework.
Step-by-Step Guide
We'll start by creating a Java Swing Application project in Xcode.
Creating the Initial Application
Launch Xcode and select "New Project..." from the File menu. Scroll down and select "Java
Swing Application" from the list (Figure 1). Give the project a name (we've
chosen MyFirstJNIProject) and set the Project Directory (Figure 2). We're
building ours on the Desktop for simplicity.
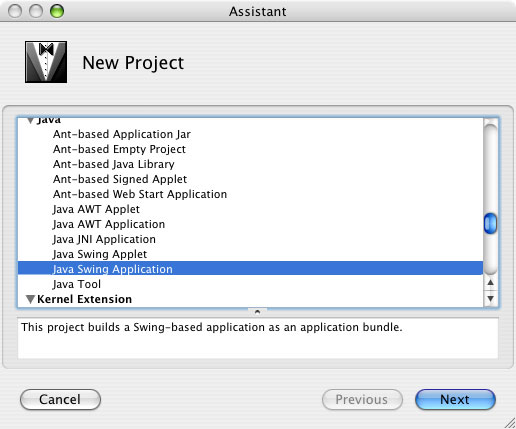
Figure 1: Choosing the Java Swing Application Project Template.
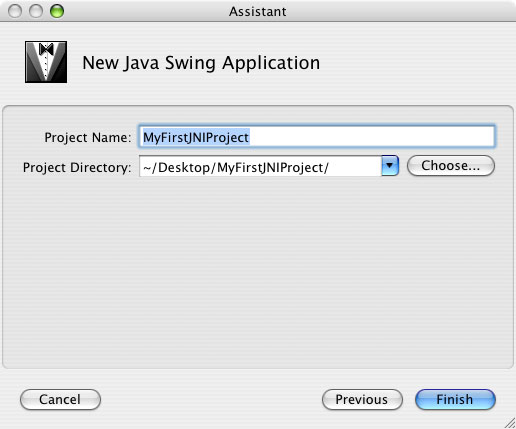
Figure 2: Creating a project named MyFirstJNIProject on the Desktop.
If you build and run this new project, you'll notice one of two things. If
you've already upgraded to Java 1.5 (also called J2SE 5.0) and you see an error
in the Run Log that says "Unsupported major.minor version 49.0", you'll need to
open the Xcode target settings for the MyFirstJNIProject target and change the
Target JVM Version in the Info.plist settings from 1.4* to 1.4+ (see Figure 3).
If you don't see the error (or you've already fixed the JVM version), you should
see a small window with "Swing Example" drawn in it as shown in Figure 4.
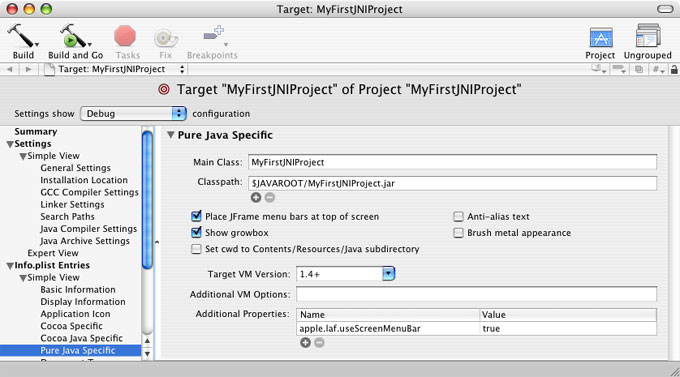
Figure 3: Setting the Target JVM Version.
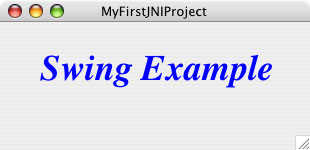
Figure 4: The Java Swing Application Window.
Adding the Native Method Declaration and Call
Now that we've got the sample up and running, we're ready to add our native
method. Open up the MyFirstJNIProject.java source file and find the paint()
method. Add the following native method declaration just before the paint()
method.
public native String getMyFullName();
Also change the paint() method to call getMyFullName() instead of
resbundle.getString("message"). At this point, we've declared a native method
and called it in the code that repaints our component. With that code in place,
the project should build and run. However, the application window will be blank
and you should see the stack trace from a java.lang.UnsatisfiedLinkError in the
Run Log (see Figure 5).
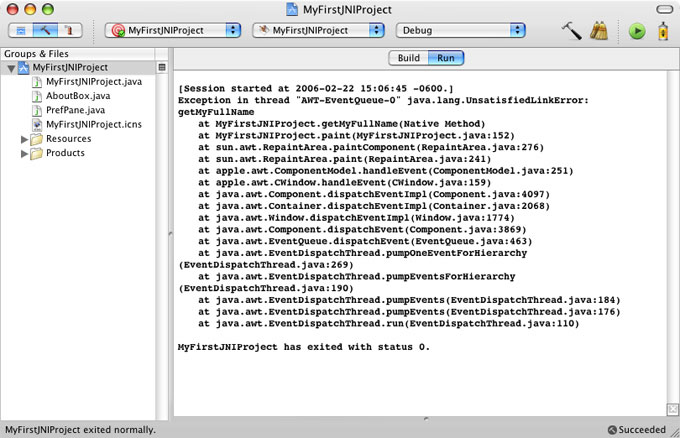
Figure 5: The Exception You'll See if You Run the Project without the System.loadLibrary() Call.
Loading the Dynamic Library
The problem is that unlike Java class files, Java native libraries don't get
loaded automatically. We'll need to add one more line of Java code to load the
JNI library that contains the native implementation of the getMyFullName()
method. Add this block of static code to load the JNI library:
static { System.loadLibrary( "MyFirstJNILib" ); }
The final code should look like Figure 6.
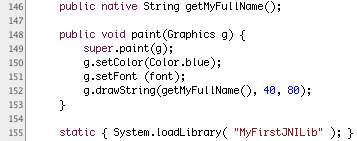
Figure 6: The Modified Code for MyFirstJNIProject.java.
The static code will load the library as soon as the MyFirstJNIProject class is
loaded so that the library will be ready for our call to getMyFullName(). If you
build and run the project now, you'll see a different UnsatisfiedLinkError due
to the fact that we haven't created MyFirstJNILib yet. In order to be able to
build our JNI library, however, we'll need to build a header file to bridge
between our Java code and the native library.
Creating the Header File
Add a new target to your project by selecting New Target... from the Project
menu and choosing Java Package from the list (Figure 7). Call the new target
JavaHeaders and add it to the MyFirstJNIProject project (Figure 8).

Figure 7: Creating the JavaHeaders Target.
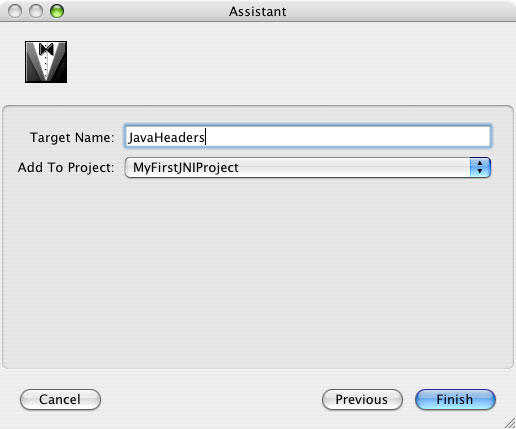
Figure 8: Naming the Target.
The purpose of this target is to create a header file, MyFirstJNIProject.h, that
contains the declaration of the getMyFullName() native method. We'll then use
that header file in the next section to create the JNI library. In order to
create the header file, we'll need to tell the target which Java files have
native methods. In this project, there is only one native method, but in a real
application you might have many native methods. In general, you'll want to
concentrate those native methods into as few isolated Java classes as possible
and then add the associated Java source files to the JavaHeaders target. For our
sample, you'll need to drag all three Java files (AboutBox.java, PrefPane.java,
and MyFirstJNIProject.java) to the Compile Sources build phase of the
JavaHeaders target. Take a look at Figure 9 to see where to drop the files.
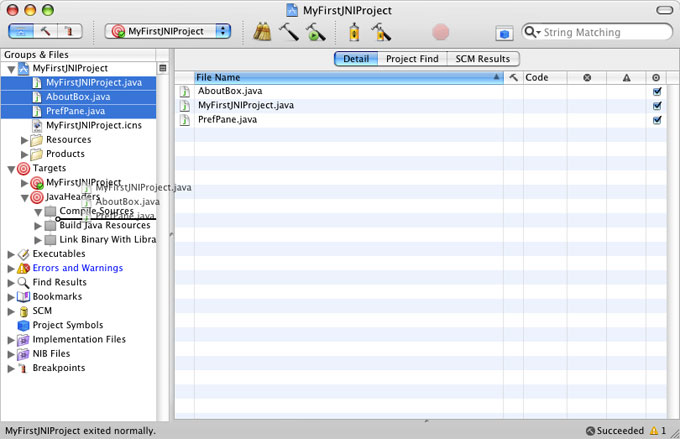
Figure 9: Dragging the Java Files to the JavaHeaders Target.
The JavaHeaders target now knows which files to build but we've got to tell it
how to produce the corresponding header file. Add a Run Script Build Phase to
the JavaHeaders target by selecting the JavaHeaders target in the Groups & Files
pane, pulling down the Project menu, and selecting "New Run Script Build Phase"
from the "New Build Phase" submenu as shown in Figure 10.
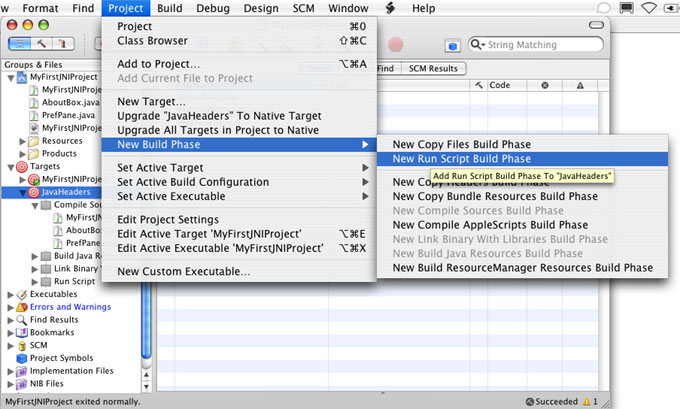
Figure 10: Adding the Run Script Build Phase from the Project Menu.
You can also bring up
the contextual menu for the JavaHeaders target (control-click or right-click)
and select "New Run Script Build Phase" from the "New Build Phase" submenu in
the Add submenu as shown in Figure 11.

Figure 11: Adding the Run Script Build Phase from the Contextual Menu.
Whichever way you choose to add the new build phase, Xcode should bring up the
information window for the new phase. Type the following shell script (all on one line - a simple copy and paste will break the script into two lines) into the
Script text box (see Figure 12):
	javah -classpath "${BUILT_PRODUCTS_DIR}/JavaHeaders.jar"
	   -force -o "${BUILT_PRODUCTS_DIR}/MyFirstJNIProject.h" "MyFirstJNIProject"
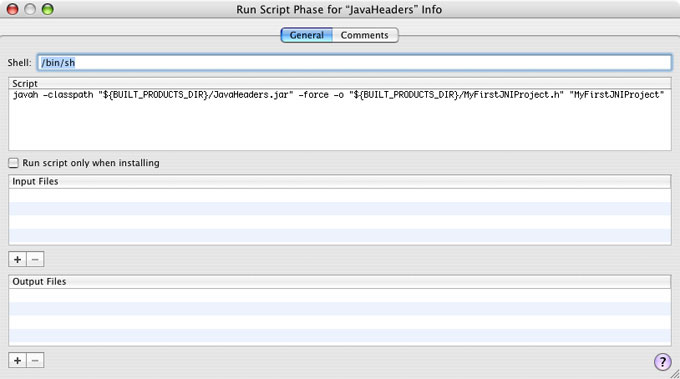
Figure 12: The JavaHeaders Shell Script.
If you switch over to and build the JavaHeaders target (see Figure 13), Xcode
will work for a bit and then produce the MyFirstJNIProject.h header file. You'll
need to navigate to the built products directory in the Finder to find it,
though, since it doesn't automatically show up in the Products Group in Xcode.
In our example project, the JavaHeaders target creates the header file in
~/Desktop/MyFirstJNIProject/build/Debug/MyFirstJNIProject.h. I.E. inside the
folder for the current build style (Debug) inside the build directory for the
project. Find the header and drag it into the Products group in Xcode for easy
access.
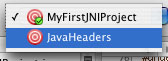
Figure 13: Selecting the JavaHeaders Target from the Target Popup Menu.
The new header file should contain a lot of machine-generated code and
definitions but the important part is about halfway down. Search for
getMyFullName and you'll find the C declaration for our native method:
	/*
	 * Class:     MyFirstJNIProject
	 * Method:    getMyFullName
	 * Signature: ()Ljava/lang/String;
	 */
	JNIEXPORT jstring JNICALL Java_MyFirstJNIProject_getMyFullName(JNIEnv *, jobject);
Notice that the machine-generated version has prepended "Java" and the name of
the project onto the name of the native method. Also notice that there are two
parameters to the C function: a pointer to the JNI environment (JNIEnv*) as well
as an object reference (jobject). We'll need the pointer to
the JNI environment in order to make a few calls that allow us to pass data back
and forth between Java and C. The object reference points to the object making
the native method call. In the case of a static native method, the jobject
parameter would be replaced by a jclass reference.
Adding the JNI Library Target
We're finally ready to create the JNI library. Add a new BSD Dynamic Library
target (Project -> New Target... -> BSD Dynamic Library) to the project and name
it MyFirstJNILib. Close the information window for now. We'll come back to the
properties for the library once we've written the code. Note that JNI libraries must be BSD dynamic libraries. Static libraries won't work.
Add a new C file to the MyFirstJNILib target by selecting the target and
selecting New File... from the File menu. Choose the BSD C File option (Figure
14) and name the file MyFirstJNILib.c. Make sure to uncheck the Also create
"MyFirstJNILib.h" checkbox (Figure 15) since we'll use the MyFirstJNIProject.h
header created by JavaHeaders target. Finally, make sure that the new C file is
added to the MyFirstJNILib target as opposed to the JavaHeaders or
MyFirstJNIProject targets (also shown in Figure 15).
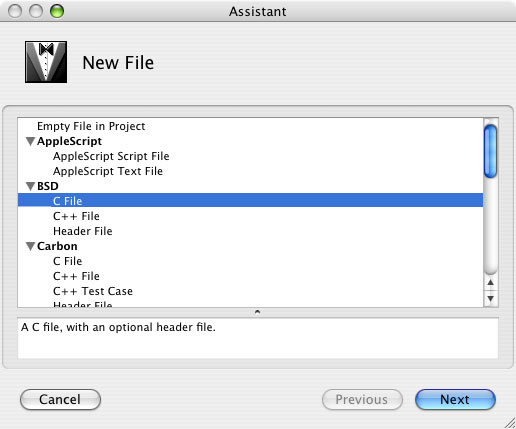
Figure 14: Adding a New BSD C File to the MyFirstJNILib Target.
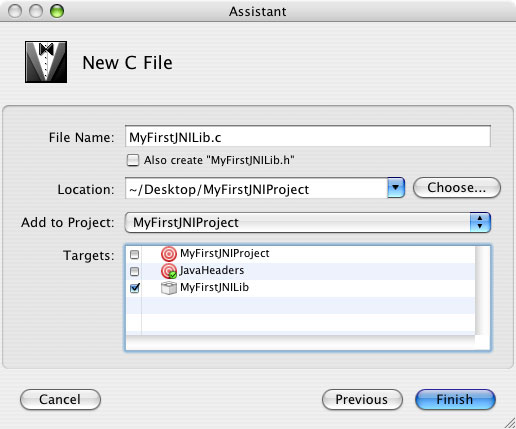
Figure 15: Do not Create MyFirstJNILib.h.
Open the MyFirstJNILib.c file, delete the #include "MyFirstJNILib.h" line, and add the following lines to include the necessary headers:
	#include "MyFirstJNIProject.h"
	#include  <AddressBook/AddressBook.h>
Open the MyFirstJNIProject.h header file and copy the declaration for
the native function we need to implement over to MyFirstJNILib.c. We also need to add names for the
JNIEnv and jobject function parameters since the prototype doesn't provide them. The code
(minus an implementation) should look like this:
	/*
	 * Class:     MyFirstJNIProject
	 * Method:    getMyFullName
	 * Signature: ()Ljava/lang/String;
	 */
	JNIEXPORT jstring JNICALL Java_MyFirstJNIProject_getMyFullName(JNIEnv *env, jobject obj)
	{
	}
For the implementation of this native function, we'll turn to the
MyFirstJNIProject sample code. Paste in the following code between the curly
braces:
	//	Find myself in the Address Book
	ABAddressBookRef book = ABGetSharedAddressBook();
	ABPersonRef me = ABGetMe( book );

	//	Retrieve my first and last name
	CFMutableArrayRef names = CFArrayCreateMutable( kCFAllocatorDefault, 0, &kCFTypeArrayCallBacks );
	CFStringRef firstName = ABRecordCopyValue( me, kABFirstNameProperty );
	CFStringRef lastName = ABRecordCopyValue( me, kABLastNameProperty );

	if ( firstName && CFStringGetLength( firstName ) > 0 )
	{
		CFArrayAppendValue( names, (const void*)firstName );
	}

	if ( lastName && CFStringGetLength( lastName ) > 0 )
	{
		CFArrayAppendValue( names, (const void*)lastName );
	}

	//	Merge the first and last names into one CFString
	CFStringRef firstAndLastName =
		CFStringCreateByCombiningStrings( kCFAllocatorDefault, names, CFSTR( " " ) );

	//	Release the first and last name strings
	CFRelease( firstName );
	CFRelease( lastName );

	//	Retrieve the Unicode characters from the CFString
	CFIndex strLen = CFStringGetLength( firstAndLastName );
	UniChar uniStr[ strLen ];
	CFRange strRange;
	strRange.location = 0;
	strRange.length = strLen;
	CFStringGetCharacters( firstAndLastName, strRange, uniStr );

	//	Make a jstring from the full name's bytes
	jstring javaName = (*env)->NewString( env, (jchar*)uniStr, (jsize)strLen );

	//	Clean up
	CFRelease( names );
	CFRelease( firstAndLastName );

	//	Return the Java string
	return javaName;
Now, add the native frameworks to the project that the MyFirstJNILib target
needs: AddressBook.framework, CoreFoundation.framework, and the
JavaVM.framework. The easiest way to do this is to control-click on the
MyFirstJNILib target and select Existing Frameworks... from the Add submenu in
the contextual menu (see Figure 16).
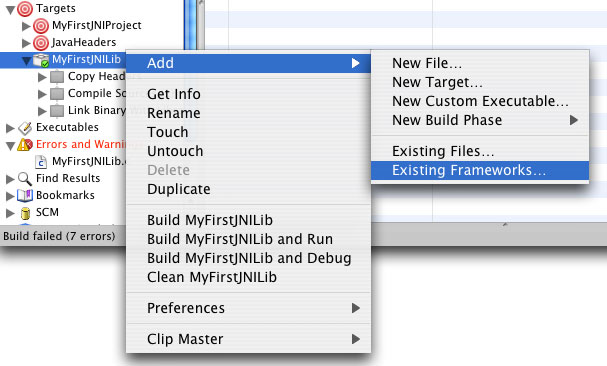
Figure 16: Adding Frameworks to the MyFirstJNILib Target.
In the standard file dialog box that
follows, you can select the frameworks one at a time or all three at once. When
you add the frameworks, you'll see a dialog box like the one in Figure 17.
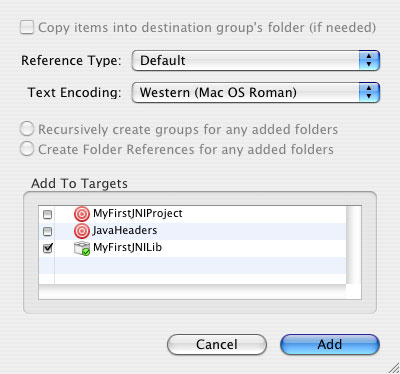
Figure 17: Making Sure that the Frameworks Get Added to the Correct Target.
Make sure that only the MyFirstJNILib target is selected. You can verify that the
frameworks were added correctly by looking under the Link Binary With Libraries
entry under the MyFirstJNILib target (Figure 18).
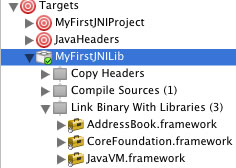
Figure 18: The Three Frameworks Added to the MyFirstJNILib Target.
In order to compile the native library code, we'll need to make one more set of
changes, this time to the MyFirstJNILib target settings. Open the target
info window by double-clicking on the MyFirstJNILib target or by selecting the
target and picking Get Info from the contextual menu. You should see a window
like the one in Figure 19.
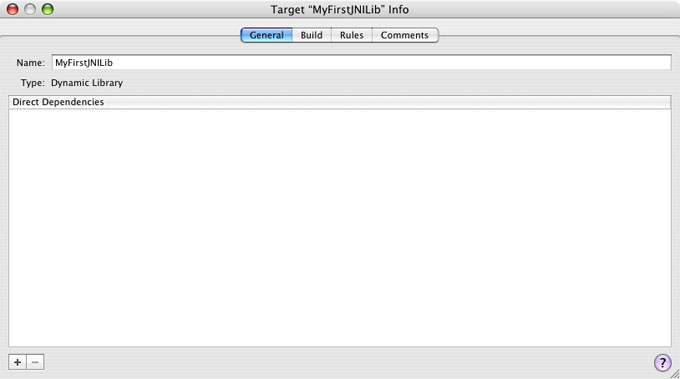
Figure 19: The Info Window General Tab for MyFirstJNILib.
First, add a dependency on the JavaHeaders target by clicking the small plus
button at the bottom of the window, selecting the JavaHeaders target, and
clicking the Add Target button. The JavaHeaders target should appear as the only
item in the Direct Dependencies list. Then, switch to the Build tab (shown in
Figure 20), ensure the Configuration pull-down menu is set to "All Configurations",
and edit the Header Search Paths entry. You can double-click in the
entry column on the Header Search Paths row or select the row and click the edit
button. Due to the fact that the machine-generated MyFirstJNIProject.h header
file implicitly includes the JNI header (jni.h), we need to add the following
header directory to the search paths:
$(SDKROOT)/System/Library/Frameworks/JavaVM.framework/Headers
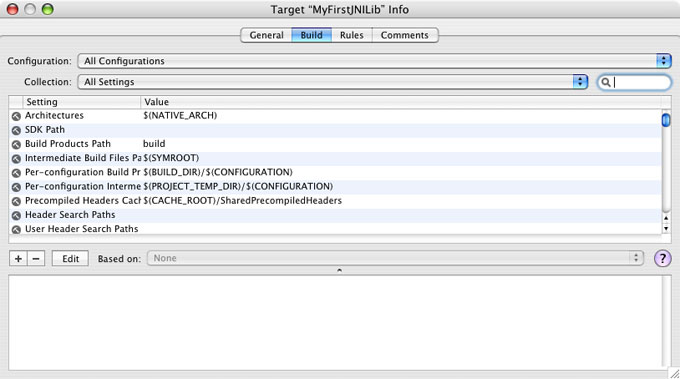
Figure 20: The Info Window Build Tab for MyFirstJNILib.
Once you've edited the entry, the dialog should look like Figure 21.
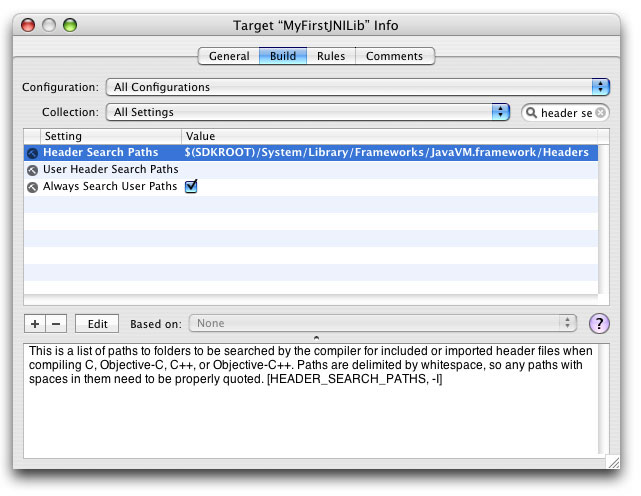
Figure 21: The New Header Search Paths Entry.
If you've changed the names of any of the files or libraries as you've been
following along, there are several very important connections to watch out for.
First, the Product Name field must match the string that you passed into the
System.loadLibrary() call in MyFirstJNIProject.java. The easiest way to check is
to ensure that the Collections pull-down menu is set to "All Settings", type "product name" into the search
field in the MyFirstJNILib Info window
(see Figure 22), and verify the setting. Second, the Executable Prefix must be
set to "lib". Again, you can type "executable prefix" into the search field and
verify the setting (see Figure 23).
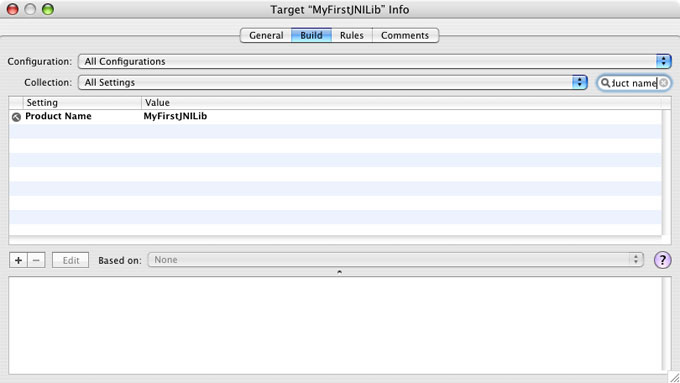
Figure 22: Checking the Product Name Setting.
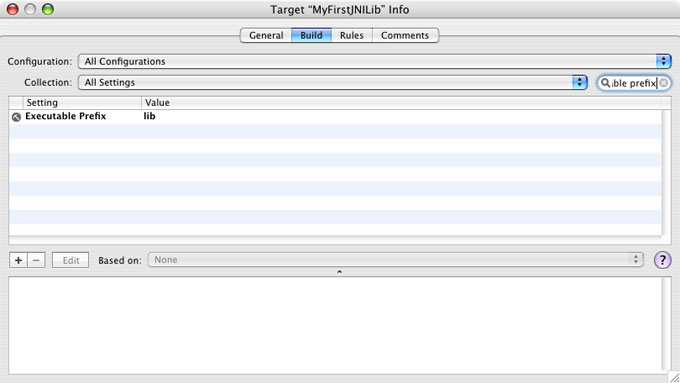
Figure 23: Checking the Executable Prefix Setting.
There are two more settings that you need to change in this dialog. The
Executable Extension defaults to dylib for BSD Dynamic Library targets but we'll
need to change the extension to "jnilib" in order for the JNI to load the
library. Type "executable extension" into the search field and change the
setting to "jnilib" (see Figure 24).
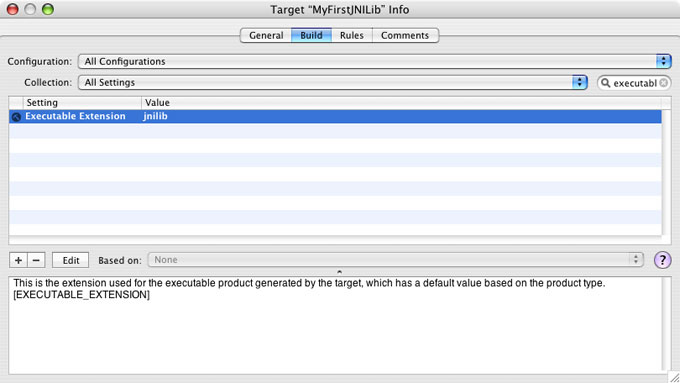
Figure 24: Changing the Executable Extension to jnilib.
At this point, a placeholder for the JNI library should appear under the
Products group in the Groups & Files view. Assuming that you're using the same
file and project naming convention, the entry should be named
libMyFirstJNILib.jnilib and it should be red since it hasn't been built yet (see
Figure 25).
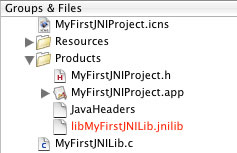
Figure 25: The Placeholder for the Unbuilt JNI Library.
The other setting that you need to change for the MyFirstJNILib target is the
Architectures setting (remember that we need to build a universal binary). Note
that you may need to clear the search field (click the small x) in order to see
the Architectures setting. Once you can see the setting, which should currently
be set to $(NATIVE_ARCH), double-click on the row or select the row and click
the Edit button. Check both the PowerPC and Intel checkboxes in the small sheet
that appears (see Figure 26). Once you dismiss the sheet, the Architectures
setting should change to "ppc i386", indicating that Xcode will build a
universal binary for our library.
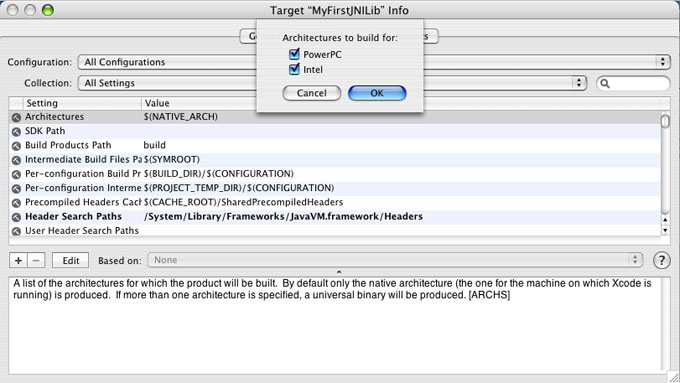
Figure 26: Building a Universal Binary.
There is one final setting we need to change: the
Cross-Development Target SDK, which is at the project level. In order to build universal binaries, you need two
things: Architectures must be set to "ppc i386" and the target SDK must be set
to a universal SDK. The only universal SDK available at the moment is "Mac OS X 10.4 (Universal)".
Open the settings for the project by double clicking on the
MyFirstJNIProject entry in the Groups & Files pane or by selecting Edit Project
Settings from the Project menu. In the General tab of the Project Info dialog,
change the Cross-Develop Using Target SDK setting as shown in Figure 27.
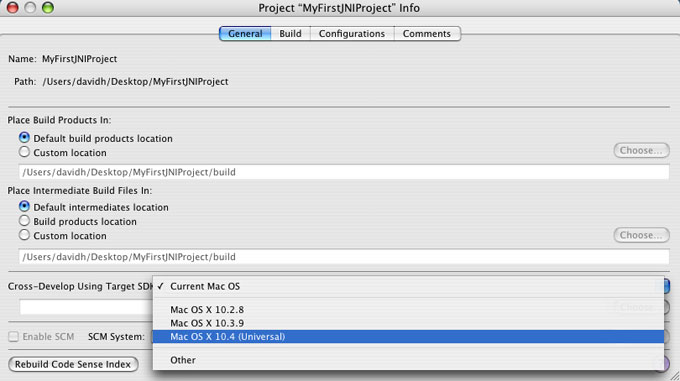
Figure 27: Changing the Target SDK to Mac OS X 10.4 (Universal)..
Now we can finally build the MyFirstJNILib target and verify the results. Select
the MyFirstJNILib target from the target menu and click build. If all goes well,
the build should complete successfully and the MyFirstJNILib placeholder in the
Products group should turn black, indicating that the library has been built. If
you're a skeptic, switch to the Finder, navigate to the project's build/Debug
directory, and get info on the libMyFirstJNILib.jnilib file. In the Get Info
window, check the Kind field. If the library is universal, you should see
"Document (Universal)".
Connecting Everything Together
We can build each target individually, and the MyFirstJNILib target depends on
the JavaHeaders target, but it would be nice if we could just build the main
target and have it build the other two as needed. We can tie the three together
by adding a dependency to the application target, MyFirstJNIProject. Select
MyFirstJNIProject in the Groups & Files list and bring up the Info window (Get
Info from the contextual menu or the File menu). Click the plus button at the
bottom of the General tab and select MyFirstJNILib from the target list to add
the dependency.
Our three targets will now build in the correct sequence but we'll need to add
one last step in order to build a complete application. Building the
MyFirstJNIProject target will indeed produce an application, but the JNI library
won't get copied into the application bundle automatically.
Note: if you build and run the application at this point, it will run just fine
from within Xcode. However, if you copy the application somewhere else, it will
fail with the same UnsatisfiedLinkError that we saw earlier. It turns out that
when you run the application from within the build/Debug directory, Java
loads the JNI library that it finds alongside the application. Once you copy
the application out of that directory, though, Java cannot find any
libMyFirstJNILib.jnilib to provide the implementation of our native method.
Adding a Copy Files Build Phase to the MyFirstJNIProject target will take care
of that. Select the MyFirstJNIProject target and choose New Copy Files Build
Phase from the New Build Phase submenu of the Add contextual menu (Figure 28).
In the Info window that appears for the new build phase, change the destination
folder to Java Resources (Figure 29). Make sure you leave the Path field blank.
Finally, drag libMyFirstJNILib.jnilib item
from the Products group into the Copy Files build phase of the MyFirstJNIProject
target (Figure 30). The final target list should look like Figure 31.
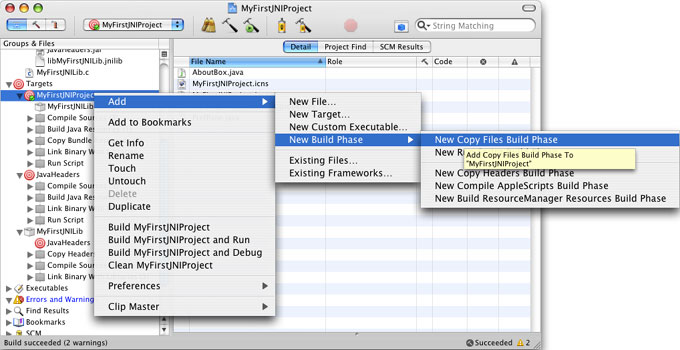
Figure 28: Adding a New Copy Files Build Phase to the MyFirstJNIProject Target.
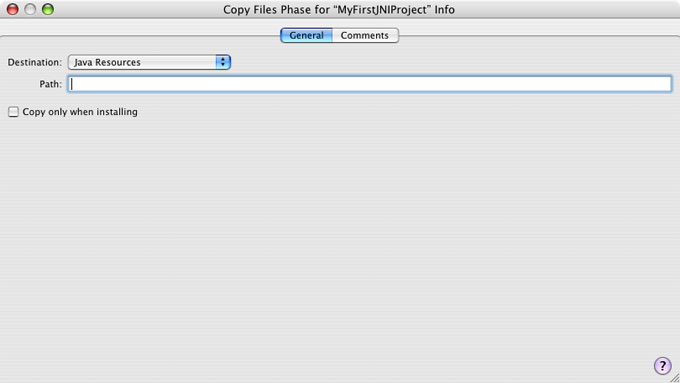
Figure 29: Changing the Destination to Java Resources.
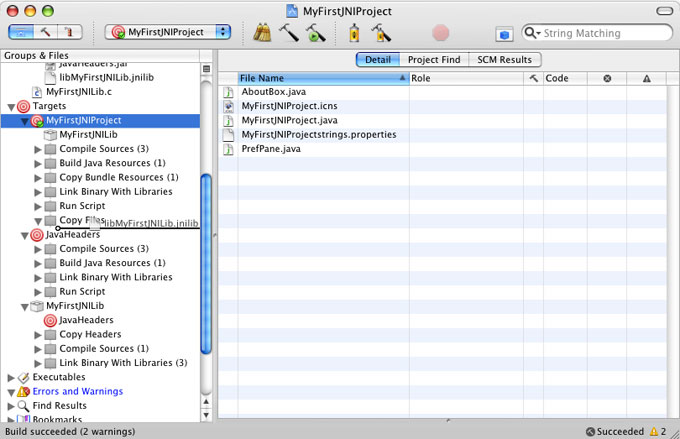
Figure 30: Dragging the libMyFirstJNILib.jnilib Dynamic Library to the Copy Files Build Phase.
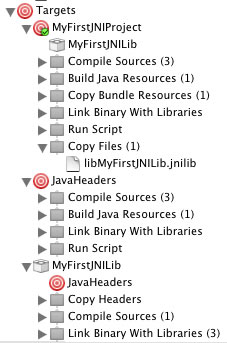
Figure 31: The Final Target List.
Clean all of the targets, select the MyFirstJNIProject target from the target
menu, and build the project. Note: the Clean All Targets item is under the Build menu.
Xcode will produce the header file, use that file
to build the dynamic JNI library, build the application, and copy the JNI
library into the Java Resources directory. Run the application and you should
see the Java Swing Application window, except you'll see your user name in the
window instead of "Swing Example" (Figure 32).
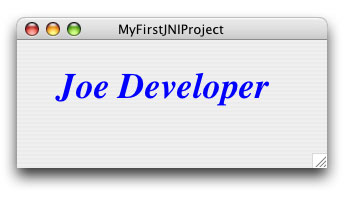
Figure 32: The Final Result.
Variations on This Theme
There are three approaches you may wish to consider as you build and use your
JNI libraries.
First, in this example, we built both our native code and the system libraries
into a single BSD Dynamic Library target. Depending on your requirements, you
may wish to keep the system libraries separate from your native code, although
the difference is mostly organizational.
Second, if you are already using an IDE other than Xcode for your Java
development, you can still use the techniques described in this article to build
your JNI library by isolating the Java code in your application that makes
native calls. Partition those classes out into one or more separate classes and
incorporate only those classes into your Xcode project. If you don't need to use
Xcode to build a Java application (perfect for testing your native library), you
can also leave out the Java Swing Application target and focus on the
JavaHeaders and JNI library targets.
Third, for cross-platform applications, you can even make sure that your Java
application only loads the Mac OS X version of your JNI library when you are
running on Mac OS X. Add the following line of code in a static block in your
main application class so that it runs before any other classes are loaded.
boolean MAC_OS_X = System.getProperty("os.name").toLowerCase().startsWith("mac os x");
In any class that makes native calls or loads native libraries, check the value
of the MAC_OS_X flag and branch appropriately. If you've got native libraries
for a particular feature on all of the platforms your application supports,
you'll most likely want to simply load the correct library at runtime in the
static code block. However, if you're using the JNI to access functionality only
found on Mac OS X, you'll want to set things up a bit differently. One easy way
is to encapsulate all of the native methods into a single class and only load
that class if you're running on Mac OS X. You can do this with code like that
shown below:
	public String methodInAnotherClass ()
		{
			if (MAC_OS_X)
			{
				return com.companyname.nativewrappers.NativeAddressBookAccess.getFullName();
			}
			else
			{
				return "The AddressBook is only available on Mac OS X";
			}
		}
In this way, the only reference to the class containing the native getFullName()
method is contained within the if (MAC_OS_X) block and the
NativeAddressBookAccess class (and therefore its JNI library) will only be
loaded if your code is running on Mac OS X.
Conclusion
In this article you've learned how to apply Xcode and the JNI to integrate Java
and C code using a single Xcode project with multiple targets. In addition,
we've built the resulting JNI library as a universal binary, allowing the sample
Java application to run properly on both Intel-based and PowerPC-based Macs. And
finally, we've created a Java application that takes advantage of one of the
many Mac OS X-specific technologies, the Address Book framework, to provide a better user
experience. This article serves as a starting point—you can use this knowledge now to add other Mac OS X technologies
to enrich and expand your Java application.
Resources
Updated: 2006-03-27
|