
In Part I, we covered the installation and configuration the Jakarta Tomcat servlet container on Mac OS X. In this session, you’ll see how to use Javaserver Pages (JSP) with Tomcat. You’ll also learn a bit about reusable components called Taglibs, which are supplied by the Jakarta project. Finally, you’ll see how to make a simple database-driven web applications on Mac OS X using JDBC, Tomcat, and the open-source database MySQL.
JSP with Tomcat on Mac OS X
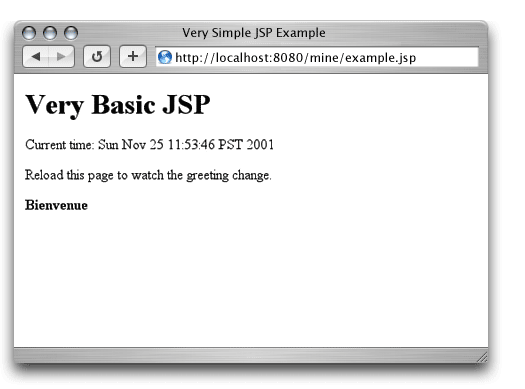
JSP provides an easy way for developers to combine executable code with static HTML, and Tomcat comes pre-configured with JSP support. Part I showed you how to create a web application called “mine”. Now you’ll add a simple JSP page to that application. Create a file called example.jsp in your webapps/mine directory with the following contents. If you’re new to JSP syntax, please note the HTML comments in the code below.
<html><head><title>Very Simple JSP Example</title></head>
<body bgcolor="white">

<h1>Very Basic JSP</h1>

<!-- displaying a single value -->

Current time: <%= new java.util.Date() %>
<br><br>

Reload this page to watch the greeting change.
<br><br>
<b>

<!-- including several lines of Java code in an HTML page -->

<%
	int um = (int)( Math.random() * 5 );
	switch ( um )
	{
		case 0: out.println("Welcome"); break;
		case 1: out.println("Bienvenidos"); break;
		case 2: out.println("Bienvenue"); break;
		case 3: out.println("Bienvenuti"); break;
		case 4: out.println("Willkommen"); break;
		default: out.println("Huh? " + um);
	}
	out.println("<br>");
%>
</b>

</body>
</html>
When you reload the page, you’ll see the current time, as well as a different, randomly-selected greeting.

The above example, like all the examples in this article, shows only a tiny fraction of what JSP can do. I encourage you to learn more about JSP.
Jakarta Taglibs
If you’re already a web developer, you know that there are certain tasks you end up repeating again and again for different projects. Perhaps you’ve already written your own reusable classes or code snippets to make this repetitious work easier. You’re probably also seen archives of other people’s code around the Web.
In this spirit, the Jakarta project has created the Taglibs repository. Taglibs (Tag Libraries) are sets of custom, re-usable tags which perform some common actions, such as regular expression parsing and session handling. You can use existing Taglibs in your JSP pages, or create new Taglibs for your own use or to share.
Using Taglibs with JSP
In the following example, I’ll show you how to use a tag library for date and time functions. First, you’ll want to download the datetime tag library from http://jakarta.apache.org/builds/jakarta-taglibs/releases/. Then you’ll want to extract the .tar.gz file (at the time of this writing the most recent release was jakarta-taglibs-datetime-1.0-B1.tar.gz). When uncompressed, you can copy the tag library descriptor file to your WEB-INF directory.
liz@localhost:datetime-1.0-B1>
cp datetime.tld /usr/local/jakarta-tomcat-4.0.1/webapps/mine/WEB-INF/
Next, copy the tag library JAR file to the WEB-INF/lib directory of your web application:
liz@localhost:datetime-1.0-B1>
cp datetime.jar /usr/local/jakarta-tomcat-4.0.1/webapps/mine/WEB-INF/lib/
Finally, you’ll need to add taglib directives to your web.xml file:
<taglib>
	<taglib-uri>
		 http://jakarta.apache.org/taglibs/datetime-1.0
	</taglib-uri>
	<taglib-location>
		 /WEB-INF/datetime.tld
	</taglib-location>
</taglib>
Now you’re ready to make use of the new tag library in a JSP page. Create a page called tagex.jsp in your application root directory (webapps/mine).
<html><head><title>Simple Taglib Example</title></head>
<body bgcolor="white">

<h1>Simple Taglib Example</h1>

<%@ taglib uri="http://jakarta.apache.org/taglibs/datetime-1.0"
	prefix="dt" %>

<b> Months of the Year </b>
<br>

<ul>
 <dt:months id="mon">
  <li> <jsp:getProperty name="mon" property="month"/>
 </dt:months>
</ul>


</body>
</html>
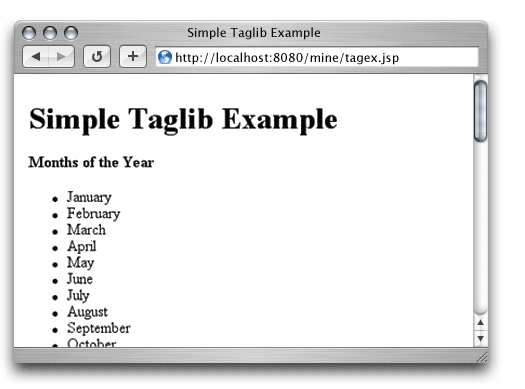
You’ve just used a tag library to automatically generate a list of the months of the year. The datetime taglib has other functions for displaying date and time information, of course. It can display information about the current date and time as well as create lists like the above which can be useful for generating HTML forms, dynamic pages, and the like. The Jakarta Project has many more taglibs available for your use.
Tomcat, MySQL, and JDBC
So far, you’ve seen how to use server-side Java to deal with user-entered and static content, but most interesting web applications require persistent and updatable content. Usually, this content is kept in some kind of database. The rest of this article covers using Java on Mac OS X along with the open source database MySQL.
If you don’t have MySQL running on your OS X platform already, you can follow the directions in Internet Developer’s article on the subject. Once you’ve gotten MySQL up and running, you’ll be ready to continue.
Java objects are able to connect to databases like MySQL via the Java Database Connectivity (JDBC) API. Mark Matthews has created an open-source (LGPL) JDBC driver for MySQL, available via http://mmmysql.sourceforge.net/. Once you’ve downloaded the driver, you can extract it and copy it into the WEB-INF/lib directory for your web application:
liz@localhost:mm.mysql> jar vx < mm.mysql-2.0.7-you-must-unjar-me.jar
liz@localhost:mm.mysql> cp mm.mysql-2.0.7-bin.jar
/usr/local/jakarta-tomcat-4.0.1/webapps/mine/WEB-INF/lib/
Example JDBC Servlet
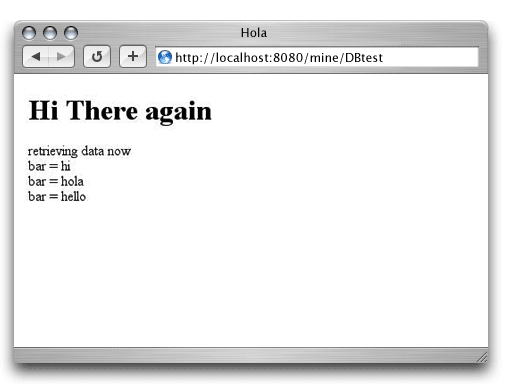
Now that you have installed an appropriate driver, you can create a basic servlet that connects to MySQL. First, in MySQL, create a test table, and enter a few sample values:
mysql> create table foo (bar varchar(16), foo_id int auto_increment not null primary key);

mysql> insert into foo (bar) values ("hi");

mysql> insert into foo (bar) values ("hola");
At this point, create a file in mine/WEB-INF/classes called DBtest.java.
Next you’ll want to add these directives to your web.xml file:
    <servlet>
      <servlet-name>DBtest</servlet-name>
      <description>
        Testing Connection to MySQL
      </description>
      <servlet-class>DBtest</servlet-class>
    </servlet>

<!-- then, in the mapping section -->

    <servlet-mapping>
       <servlet-name>DBtest</servlet-name>
        <url-pattern>/DBtest</url-pattern>
    </servlet-mapping>
To compile your new servlet, you’ll need to add the mm.mmysql jar file to your CLASSPATH (once again, for everything but the simplest projects, I recommend the Jakarta Project’s Ant build tool). Here’s the command for adding the CLASSPATH to the bash or sh shells. (Note: In order to insure proper wrapping in a variety of browsers, the following two commands include line breaks which must be removed before using them in a shell.)
liz@localhost:~> export CLASSPATH="/System/Library/Frameworks/
JavaVM.framework/Versions/1.3/Classes/classes.jar:/usr/local/
jakarta-tomcat-4.0.1/common/lib/servlet.jar:/usr/local/jakarta-tomcat-4.0.1/
webapps/mine/WEB-INF/lib/mm.mysql-2.0.7-bin.jar"
Or for tcsh shell:
liz@localhost:~> setenv CLASSPATH "/System/Library/Frameworks/
JavaVM.framework/Versions/1.3/Classes/classes.jar:/usr/local/
jakarta-tomcat-4.0.1/common/lib/servlet.jar:/usr/local/jakarta-tomcat-
4.0.1/webapps/mine/WEB-INF/lib/mm.mysql-2.0.7-bin.jar"
Now you can visit http://localhost:8080/mine/DBtest to confirm that you’ve been able to connect.
Putting It Together: A Weblog using JSP, JDBC, and MySQL
Now that you’ve seen how you can use Servlets, JSP, and JDBC on Mac OS X, let’s look at how you can code a new application — a simple Java-based weblog — which puts all these technologies to use.
First you’ll want to create a new Context for your application. You can do that by adding these lines to your server.xml file:
<Context path="/blog" docBase="blog" debug="0" reloadable="true">
   <Logger className="org.apache.catalina.logger.FileLogger"
			 prefix="localhost_blog_log." suffix=".txt"
		  timestamp="true"/>
</Context>
Now create the appropriate directories and copy the MySQL JDBC driver into the lib directory for your new application:
liz@localhost:~> cd /usr/local/jakarta-tomcat-4.0.1/webapps
liz@localhost:webapps> mkdir blog
liz@localhost:webapps> mkdir blog/WEB-INF

liz@localhost:webapps> mkdir blog/WEB-INF/classes
liz@localhost:webapps> mkdir blog/WEB-INF/classes/jblog
liz@localhost:webapps> mkdir blog/WEB-INF/lib
liz@localhost:webapps>
cp mine/WEB-INF/lib/mm.mysql-2.0.7-bin.jar blog/WEB-INF/lib/mm.mysql-2.0.7-bin.jar
Create your web.xml file in WEB-INF with these contents:
<!DOCTYPE web-app
    PUBLIC "-//Sun Microsystems, Inc.//DTD Web Application 2.3//EN"
    "http://java.sun.com/dtd/web-app_2_3.dtd">

<web-app>


    <!-- General description of your web application -->

    <display-name>JBlog</display-name>
    <description>
      Simple Servlet Web log Example
    </description>

    <context-param>
      <param-name>webmaster</param-name>
      <param-value>your@email.address</param-value>
      <description>
        The EMAIL address of the administrator to whom questions
        and comments about this application should be addressed.
      </description>
    </context-param>

    <servlet>
      <servlet-name>Write</servlet-name>
      <description>
      Write web log data
      </description>
      <servlet-class>jblog.Write</servlet-class>
    </servlet>

    <servlet>
      <servlet-name>Show</servlet-name>
      <description>
      Show Web log
      </description>
      <servlet-class>jblog.Show</servlet-class>
    </servlet>


    <servlet-mapping>
        <servlet-name>Write</servlet-name>
        <url-pattern>/Write</url-pattern>
    </servlet-mapping>

    <servlet-mapping>
        <servlet-name>Show</servlet-name>
        <url-pattern>/Show</url-pattern>
    </servlet-mapping>


</web-app>
The next step is to create a table for log entries, as well as a table to hold a simple password. Since this is just an example application, we’re only including the simplest possible security. Anyone who goes to /blog/add_data.jsp and enters a password which is stored in the passwords table will be allowed to add an entry to the log.
mysql> use test;

mysql> create table blog
(entry_id int not null auto_increment primary key, data blob, created timestamp not null);

mysql> create table blog_pass
(password_id int not null auto_increment primary key, password varchar(20));

mysql> insert into blog_pass (password) values ("hushhush");
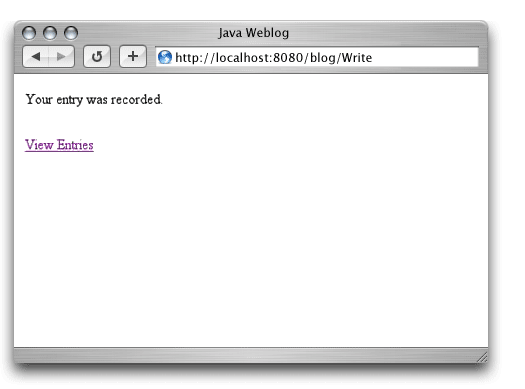
Create a JSP page in webapps/blog called add_data.jsp. It will contain a form for entering your web log data:
<html><head><title>Web log Entry</title></head><body bgcolor="white">

<form action="/blog/Write">
Log Entry:<br>
<%
        String data = request.getParameter("data");
%>

<textarea name="data" rows="10" cols="60">
<%= data != null ? data : "" %></textarea>
<br>
Password: <input type="text" name="password" value="" size="30">
<br>
<input type="submit" value="Submit">
</form>

</body></html>

Next you can create a generic MySQL connector object in blog/WEB-INF/classes/jblog, called MySQLConnector.java. This object will be used by the Write and Show servlets below.
Now it’s time to create a servlet that knows how to write log entries to the database table. Create a file called Write.java in your classes/jblog directory.
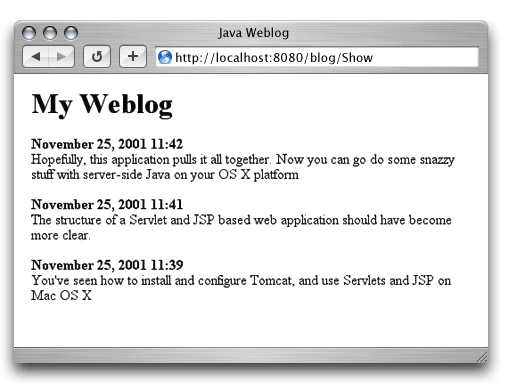
The final piece of this application is a servlet that can show log entries. This servlet will show 10 entries at a time, starting with the latest, and knows how to link back to the beginning once the user has seen all entries.
Create a file called Show.java in your classes/jblog directory.
Once you’ve re-started Tomcat (remember, you’ve added a new Servlet Context and registered several new servlet mappings) and compiled the .java files, you should have a simple but functional web log.
Suggestions for Further Reading
For more on Tomcat, Ant, JSP, and Taglibs visit The Jakarta Project’s Home Page. For more on Java on Mac OS X, point your browser at http://developer.apple.com/java. For information on Java in general, including the full Servlet specifications, visit java.sun.com. If you’re entirely new to Java and/or Servlet programming, I recommend picking up one of the excellent books published by O’Reilly, including Java in a Nutshell by David Flanagan, and Java Servlet Programming by Jason Hunter with William Crawford.
More Information
|