
AppleScript lets users—end users—combine abilities of the
applications on their system to perform tasks that no single application can
perform on its own. This means that a user can use data from one application,
process it in another, and pass it on to a third. In the same way that Unix
tools can be combined in very powerful ways on the command line, AppleScript
lets users create solutions that are more than the sum of their parts. As well,
AppleScript lets users automate repetitive tasks that they have to do often so
that they can save time and effort.
AppleScript is, however, only as good as the support given it by the
applications on the system. It gains almost all of its power by borrowing the abilities
of other applications. For this, you as a developer must give
AppleScript access to your application's functionality.
Adding AppleScript to a Carbon application is well documented. Adding
AppleScript to a Cocoa application, however, is a bit less straightforward.
However, once you have a mental model of how it works, it's not a hard task.
This article begins by taking a look at how AppleScript works both from a user
perspective and from a lower system level. Then, it will lead you through an
example of exposing features to AppleScript of one of the demo Cocoa
applications already installed on your machine (assuming you have installed the
Developer Tools, provided with every Macintosh and with Mac OS X
v10.3 Panther and late).
NOTE: This article only applies to Mac OS X v10.3 and before; if you are working with Mac OS X v.10.4 or later, some of this information may not apply.
So let's start with a little AppleScript from the perspective of an end user.
AppleScript in Action
The user interface to Apple Script is the Script Editor. It is where you write,
execute, and save scripts. Open up Script Editor (located in the
/Applications/AppleScript folder) and type the following into the
script window:
tell application "iTunes"
    playpause
end tell
Now run this script. You can do this using the Script > Run menu or simply hitting Command-R. When you do this, the Script Editor will pretty up your code (it's actually compiling it as it does this) and then will execute it. Depending on what state iTunes is in, one of the following will happen:
- If iTunes is not running, it will be launched and music will start playing
- If iTunes is running, but paused, it will start playing the current track
- If iTunes is running and playing a track, playback will pause
What you've just done is remotely control iTunes from another application.
You've sent it a command that causes it to start and stop playing on demand. But
wait a minute: AppleScript is separate from iTunes. How does it know how to deal
with objects in iTunes? The answer is that it is using a dictionary that is
provided by the application.
The Dictionary
A dictionary is nothing more than a formalized definition about the kinds of
objects (or classes) that an application exposes as well as the various commands
that can be called on that application. To help manage the classes and commands
exposed by an application, a dictionary uses suites. All scriptable applications
expose at least two suites: the standard suite and one or more application-specific suites. The standard suite contains the basic commands every Mac
application is required to support—operations like open, print, close, and
quit. The application-specific suite is more interesting. This is where the
unique functionality of an application comes to light.
For example, let's take a look at the iTunes script dictionary to see the
playpause command we just used. In Script Editor, select File > Open Dictionary
(Command-Shift-O) and in the list of applications that shows up, select iTunes,
as shown in Figure 1.

Figure 1: The iTunes Dictionary showing the various commands in the iTunes suite.
Navigate to the playpause command using the left-side tree view. You'll find it
at iTunes Suite > Commands > playpause. Click on it and see the short description and syntax that displays. Along with the playpause command,
you can see others like fast forward, rewind, resume, and stop. Play around with
these commands in the Script Editor application to get a feel for them. Here's
an example:
tell application "iTunes"
    rewind
end tell
Working with classes is a bit more involved. The trick is to know that you
access the various objects that an application exposes by looking at the
properties and elements of the application class. To see the various properties
of the iTunes application, navigate the dictionary browser to iTunes Suite >
Classes > application, as shown in Figure 2.
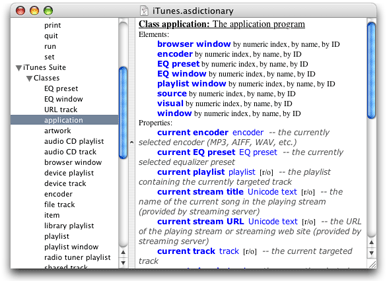
Figure 2: The iTunes Application Class.
One property that could be useful is the currently playing track. And if you
look through the list of properties associated with iTunes, you'll see one named
current track. To see what this gives you access to, edit your
script to match the following:
tell application "iTunes"
    current track
end tell
Now, when you run this script, instead of iTunes responding by starting or
stopping the music, it responds with some text that shows up in the bottom pane
of Script Editor. For example, you might see something like this:
file track id 3754 of library playlist id 3099 of source id 34 of application "iTunes"
It's not exactly user-friendly output, but you didn't have to work very hard for
it, either. To create better output, you can query properties of the track
object, as follows:
tell application "iTunes"
    name of current track
end tell
Now run the script and see what you get. For example, if you are listening to a
certain Black Eyed Peas song that recently had a cameo appearance in a iPod add,
you'd see:
"Hey Mama"
If you are listening to the Bach cello suites, you may see something like:
"Suite 4, S. 1010, E-Flat Major - I. Prelude"
Integrating Applications
AppleScript's true power comes from being able integrate the functionality of
multiple applications. For example, what should you do with the name of the song
that we've gotten from iTunes? Let's share it with the world via iChat. Enter in
the following script into Script Editor:
tell application "iTunes"
    set trackname to name of current track
end tell
tell application "iChat"
    set status message to trackname
end tell
Now, when you run your script, your iChat status will show the track you are
currently listening to. Note that iChat has no idea how to access iTunes, nor
does iTunes know how to tweak iChat's status line. What you've done is create a
little glue, in the form of a short AppleScript script, that creates this
functionality, as if from thin air. In fact, the technology behind the curtain
that makes this all possible is called Apple events.
Behind the Curtain: Apple Events
Apple events, introduced along with AppleScript as part of System 7, are the
basis for Inter-application Process Communication (IPC) on the Mac. In essence,
it allows one application to create a package (with all the right settings of
course) and then send it to the operating system that in turn routes it
to a destination application. The destination application handles the
event and performs whatever actions are requested, and then assembles a reply
package.
Designed for efficiency, Apple events are essentially chunks of binary data that
are being shuttled between applications. The AppleScript language puts a
readable face on coordinating Apple events between various applications. For
example, when you run the following script:
tell application "iTunes"
    current track
end tell
an Apple event is created and sent to iTunes. To give you an idea of what's
going on at this level, here's some output from an Apple event run through a
debugger:
{ 1 } 'aevt':  core/getd (ppc ){
          return id: 229572616 (0xdaf0008)
     transaction id: 0 (0x0)
  interaction level: 64 (0x40)
     reply required: 1 (0x1)
             remote: 0 (0x0)
  target:
    { 2 } 'psn ':  8 bytes {
      { 0x0, 0xb00001 } (iTunes)
    }
  optional attributes:
    { 1 } 'reco':  - 1 items {
      key 'csig' -
        { 1 } 'magn':  4 bytes {
          65536l (0x10000)
        }
    }
  event data:
    { 1 } 'aevt':  - 1 items {
      key '----' -
        { 1 } 'obj ':  - 4 items {
          key 'form' -
            { 1 } 'enum':  4 bytes {
              'prop'
            }
          key 'want' -
            { 1 } 'type':  4 bytes {
              'prop'
            }
          key 'seld' -
            { 1 } 'type':  4 bytes {
              'pTrk'
            }
          key 'from' -
            { -1 } 'null':  null descriptor
        }
    }
}
We're not going to try to entirely decode this printout—and you really
don't need to try to memorize it either—but you can see that there is a
multi-part structure to it. This structure identifies the target application of
the Apple event, the sender, and what action should be taken along with any
parameters.
When iTunes responds to an event, it creates an event that has the same
structure, but a different target and data, and sends it back to our script
as another Apple event. The payload of that event is the track information that
was requested.
In the last script where you tied iTunes and iChat together, your script sent an
Apple event to iTunes, received an Apple event reply, and then using data from
that reply sent another Apple event to iChat. This chain of actions is shown in
Figure 3.
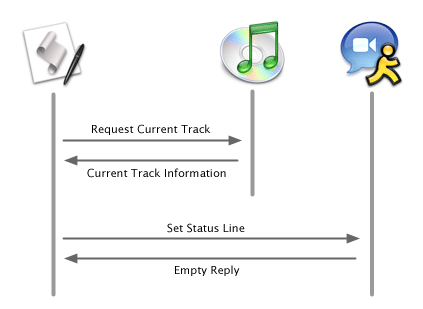
Figure 3: The sequence of events when setting the status line of iChat to the current track playing in iTunes.
Now that you've seen how Apple events work and how the application dictionary is
used, let's take a look at the files that define the dictionary.
Scripting Definition Files
There are two kinds of files in an application bundle used by AppleScript. The
first is a script suite file that defines the various commands and classes
accessible to AppleScript. The second is the script terminology file that is
used by the dictionary viewer and allows a user to navigate the various commands
and classes contained in a suite.
Let's take a look at how these files define what is seen in the iChat
dictionary. First, we'll take a look at iChat's script suite. Use the following
command in the Terminal to open up the file in Property List Editor.
open /Applications/iChat.app/Contents/Resources/IChatSuite.scriptSuite
The Property List editor opens and shows you the file, as shown in Figure 4.

Figure 4: The iChat script suite as shown in Property List Editor.
The view given by Property List Editor is conceptually organized in a tree with a structure similar to what we saw in the dictionary viewer. The most important entries in the file are the following:
AppleEventCodeThis is the four-character code that identifies the application and script suite to AppleScript. It must be unique on the system and named in accordance with the creator code guidelines.NameThe name of the script suite.ClassesThe classes defined by the script suite. The names of the classes here map, but don't exactly correspond to the class names that appear in the dictionary viewer. For example, the application class as shown in the dictionary viewer shows up here as NSApplication. That is because the Cocoa scripting layer exposes the NSApplication object as the application object to AppleScript.CommandsThe commands defined by the script suite.
By following the structure of the file, you can find the status message property
you used in our script above. It's located at Root > Classes >
NSApplication > Attributes > myStatusMessage, as shown in Figure 5.

Figure 5: The status message entry in the script suite.
Now, let's take a look at the script terminology file. Use the following command
to open it in Property List Editor:
open /Applications/iChat.app/Contents/Resources/IChatSuite.scriptTerminology
This file is organized much like the script suite file. As you look through this
file, you'll see how it is used to document the various entries in the script
suite into a more human-readable form for the script dictionary viewer.
Until recently, you had to write the XML for each of these files to enable
AppleScript access to a Cocoa application. While the structure of the files is
fairly comprehensible, trying to keep the various entries coordinated between
the files was not a trivial task. Recently Apple has started addressing this
with the introduction of the sdef file format.
The New Scripting Definition File Format
The new sdef file format describes everything about an application's scriptability, the terminology, and documentation, into one single file. As well, this file uses its own XML format instead of the property list XML format which makes it a bit easier to read. Here's an example of a very simple sdef file:
<?xml version="1.0" encoding="UTF-8"?>
<!DOCTYPE dictionary SYSTEM "file://localhost/System/Library/DTDs/sdef.dtd">
<dictionary title="My Application Terminology">
  <suite name="My Application Scripting" code="XXXX"
    description="Commands and classes for my application">
    <classes>
      <class name="application" code="capp" description=""
        inherits="NSCoreSuite.NSApplication">
        <cocoa class="NSApplication"/>
          <properties>
            <property name="some value " code="sval" type="string"
              description="A value in the application">
              <cocoa method="value"/>
            </property>
          </properties>
        </class>
      </classes>
  </suite>
</dictionary>
You can find several example sdef files on your disk in the Developer/Examples/Scripting Definitions folder.
This isn't yet the native format for the scripting system in Mac OS X—at least as of Panther (Mac OS X v.10.3). To create the script suite and script terminology files, you'll need to use the sdp command line tool which is easily integrated into an Xcode build.
Pulling It Together in Practice
As it does for so many other programming tasks, Cocoa takes care of the hardest part of making an application scriptable. It will listen for, unpackage, and repackage Apple events for you. But in order for Cocoa to help, it needs you to do a few things first.
The job in making an application scriptable boils down to the following tasks:
- Set a key in the application's
Info.plist file that tells the system that it
supports AppleScript
- Create a script definition sdef file which defines the commands, properties,
and terminology of the application that should be accessible to Apple
events
- Implement a set of methods on our application that can provide the
information to the Apple events it will receive.
To show you how to make an application handle Apple events, you're going to use
one of the sample applications that is already on your system: The familiar Circle
View, as shown in Figure 6.
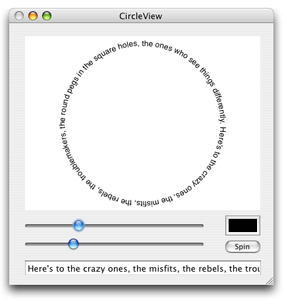
Figure 6: The CircleView application.
You find the project files for CircleView in the
/Developer/Examples/AppKit/CircleView folder. We're using this
project as it has several interesting things that we can expose to AppleEvents:
the contents of the text string, the radius of the circle, the color, and the
ability to animate the text. We're going to show you how to expose a few of
these to AppleEvents.
It is recommended that you make a copy of the project before working on it so that
you can always get back to the originals. Once you've made a copy somewhere,
open up the CircleView project in Xcode.
Marking an Application as Scriptable
The first step in making an application AppleScript aware is to set a key in its
Info.plist file that will let the system know that it can have AppleEvents sent
to it. Until you mark an application as AppleScript enabled, you can't send
AppleEvents to it or even open up its dictionary. Go ahead and build the
application and then try to open its dictionary. You'll see that you can't.
To enable AppleScript access to CircleView, open up its Info.plist (on your system, the file may be
named Info-CircleView__Upgraded_.plist— if so, it's due to its having been upgraded from a Project
Builder project to an Xcode project) and add the following key and value into the
dictionary:
<key>NSAppleScriptEnabled</key>
<string>YES</string>
Build the application again. Now, when you go back to Script Editor, you'll be able to open up CircleView's dictionary, as shown in Figure 7. By default, Cocoa provides two script suites: the standard suite and the text suite. Both of these are the basic suites that are found on almost every application.
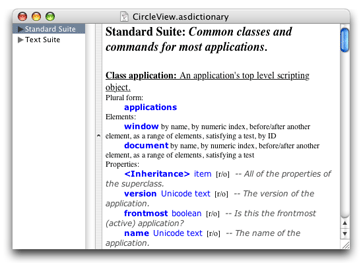
Figure 7: CircleView's default dictionary.
In order to expose the unique functionality of CircleView, we need to define a CircleView Suite. To do that, we need to create the script definition file.
Creating the Script Definition File
To create the script definition file, use the File > New File menu and select Empty File in Project. Name the new file "CircleView.sdef" and make sure that it is part of the CircleView target. Into the empty file, insert the following:
<?xml version="1.0" encoding="UTF-8"?>
<!DOCTYPE dictionary SYSTEM "file://localhost/System/Library/DTDs/sdef.dtd">
<dictionary title="">
  <suite name="Circle View Scripting" code="CrVs"
    description="Commands and classes for Circle View Scripting">
    <classes>
      <class name="application" code="capp" description=""
        inherits="NSCoreSuite.NSApplication">
        <cocoa class="NSApplication"/>
          <properties>
            <property name="circle text" code="crtx" type="string"
              description="The text that gets spun into a circle">
              <cocoa method="circleText"/>
            </property>
          </properties>
        </class>
      </classes>
  </suite>
</dictionary>
Next, we need to set up the CircleView target to build the script suite and script terminology files. To do this, we're going to add a shell script phase to the target. Select the CircleView target in the project Groups & Files tree and then use the Project > New Build Phase > New Shell Script Build Phase. This will add a shell script phase entry to the target, as shown in Figure 8.
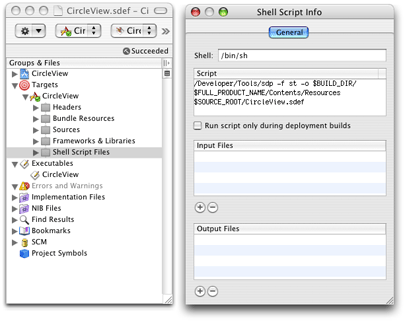
Figure 8: Adding a shell script phase to generate the script suite and script terminology files.
Open up the shell script phase target inspector using the Project > Get Info (Command-I) menu. In the script box, enter in the following (all onto one line):
/Developer/Tools/sdp -f st -o $BUILD_DIR/$FULL_PRODUCT_NAME/Contents/Resources $SOURCE_ROOT/CircleView.sdef
This will build the CircleView.scriptSuite and CircleView.scriptTerminology files into the correct location. Build the application again and then open up CircleView's dictionary in Script Editor. Be sure to open the dictionary using the File > Open Dictionary menu rather than File > Open Recent menu. You'll see the application class and the command that was defined in the CircleView.sdef file. If you actually try to write a script using these new entries, however, you'll get errors. There is one more thing to do: write some code to enable the behavior that we've defined.
Implementing the Functionality
When Apple events are sent to CircleView, the scripting definition file is set up to expose the application properties via the NSApplication object. In order to provide the functionality defined in the scripting definition file, you need to extend the functionality of the NSApplication object in some manner. There are three ways to do this:
- Create a subclass of NSApplication and assign it as the File's Owner of the MainMenu.nib.
- Create a category of NSApplication and implement the functionality there.
- Create a NSApplication delegate and assign it to the File's Owner object in the MainMenu.nib file.
In this example, we are going to use a delegate object to implement the functionality. For your own applications, you may find that using a category works better.
To create the delegate, add a new class to the project named AppDelegate using the File > New File menu and selecting Cocoa > Objective-C Class from the dialog box. Once it has been created, edit the AppDelegate.h file to match the following:
#import


@interface AppDelegate : NSObject {
    IBOutlet id circleView;
}

@end
Next, open up the MainMenu.nib file in Interface Builder and perform the following steps:
- Let Interface Builder know about AppDelegate.h. Use the Classes > Read Files menu and select the AppDelegate.h file and then hit the Parse button. The AppDelegate class will appear in the classes panel.
- Create an AppDelegate object instance. Select the AppDelegate class and use the Classes > Create Instance menu. This will create an instance and add it to the Instances panel in Interface Builder.
- Set up the AppDelegate as the NSApplication delegate. Control-Drag a connection from the File's Owner object (a proxy for the NSApplication object for the application) to the AppDelegate instance and connect it to the delegate outlet, as shown in Figure 9.
- Connect the AppDelegate to the CircleView. Control-Drag a connect from the AppDelegate object to the CircleView and connect it to the circleView outlet.

Figure 9: Setting a delegate object on NSApplication.
That's all that you need to do in Interface Builder. It's time to go back to Xcode and add some code to the AppDelegate class. First, add the following method that will tell the Cocoa scripting system that it can handle properties:
- (BOOL)application:(NSApplication *)sender
 delegateHandlesKey:(NSString *)key
{
    if ([key isEqual:@"circleText"]) {
        return YES;
    } else {
        return NO;
    }
}
Next, implement the accessor methods for the circle text property. These are common Cocoa style accessors.
- (NSString *)circleText
{
    return [circleView string];
}

- (void)setCircleText:(NSString *)text
{
    [circleView setString:text];
}
You should note that a property's accessor methods must be named using Key-Value Coding (KVC) conventions in order for the scripting support to work correctly.
Next, you'll need to add a method to the CircleView class so that the AppDelegate can have access to the string painted on screen. Add the following method declaration to the CircleView.h file:
- (NSString *)string;
Then add the method implementation to the CircleView.m file:
- (NSString *)string
{
    return [textStorage string];
}
Build and Run
That's it. You now have an AppleScript-aware application. Build and run the application from Xcode. Then go to Script Editor and enter the following script:
tell application "iTunes"
    set t to current track
    set s to name of t & " - " & artist of t & " - " & album of t
end tell

tell application "CircleView"
    set circle text to s
end tell
And watch the magic happen. You've just glued iTunes and Circle View together. Now imagine what you could enable users of your application to do. All it takes is a little work on your part to free their imagination.
Conclusion
This article has shown you how to activate AppleScript to your application and how to expose simple properties to AppleScripts. And, it has covered the hardest part of the task: getting started. But there is much, much more that you can do to better expose your applications to AppleScript. Your next steps should be to investigate adding commands and other classes to your applications.
For More Information
See the following AppleScript documentation available on the ADC website:
Also, the following book by Matt Neuberg is available from O'Reilly, and covers AppleScript under Mac OS X v10.3 Panther:
Updated: 2008-10-08
|