User Names, Passwords, and Groups: Basic
Username, passwords and groups together with the additional parameters are managed in 4 tabs:
- Basic: all necessary elements for password management
- Additional: additional specifications, including history
- Dates and Times: expiry and statistics
- Password Policy: specific differences to the default
Most labels in the Basic and Additional Property Pages are Smart Labels.
This means that when you click on them, the current contents of the relevant field
are copied to the clipboard. The label will flash green to show that the data has
been copied. The currently supported labels are:
- Basic
- Group
- Title
- Username
- Password
- Notes
- URL
- Email
- Additional
- AutoType
- Run Command
Note: By pressing the Ctrl key down whilst clicking on the AutoType and Run Command
labels, variables will not be substituted in the strings before copying to the clipboard.
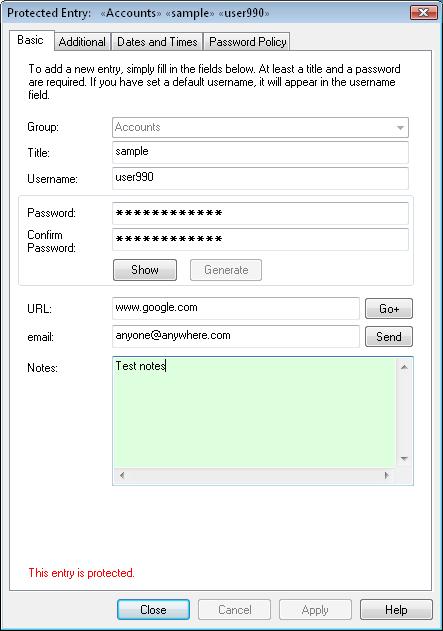
Basic Tab
In this tab the most important elements are combined.
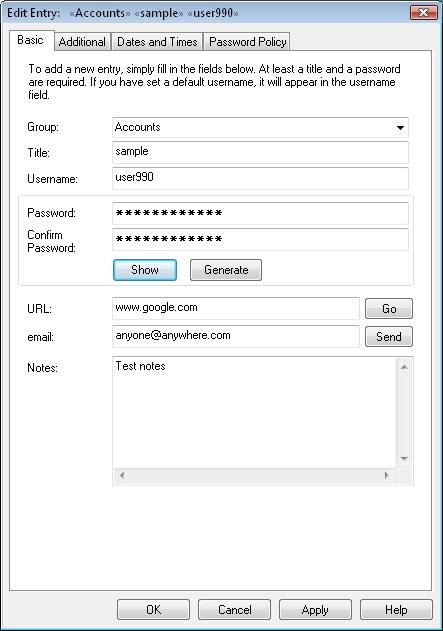
The following bits of information are associated with each
password entry:
- Group: A name for grouping (organizing) several related entries
- Title: A friendly name for a password entry
- User name: The user name
- Password: The password
- Notes: Free-form general notes field
Only the title and password fields are required; all others are optional.
In addition, the following fields may be set in this tab:
- URL: The URL associated with the entry. If this field is not empty, then the "Go" button
is enabled. If the protocol is not specified, then "http://" is assumed
(e.g., "www.foo.net" is the same as "http://www.foo.net"). TheGo button to the right
of the URL field is enabled if the URL field is not empty. Clicking with the Control key
pressed (Ctrl+Click) will, in addition, invoke the AutoType
function on the opened browser page. See the following notes
for more information.
- email: The email address associated with this entry. Note
that this is meant for keeping an e-mail address associated with the
site, e.g., support@myvendor.com. If the site requires an e-mail
address as your login, it's much easier to set your email address in
the Username field.
If this field is not
empty, then the "Send" button is enabled. Clicking on this button will invoke the default mail
program with the To: field set to the specified address. See the following notes
for more options.
The following notes describe the way
URLs are handled in more detail:
- By default, Password Safe will use the browser that your
PC usually opens web pages with. If desired, you can specify an
alternate browser by
putting '[alt]' before the URL, e.g., "[alt]http://www.foo.net". This
is useful, for example, if your default browser is Firefox, and you
wish to access a website that works best with Internet Explorer. To
configure an alternate browser, use the
"Manage → Options → Misc." dialog box.
- If '{alt}' is put before the URL, then it is passed
'as-is' to the alternate browser, that is, without adding 'http://' if
no protocol is specified. This is useful if the alternate browser is a
remote access application, e.g., an SSH client. [ssh] will achieve the
same effect.
- If '[autotype]' is found before the URL, then after the
URL has been displayed/actioned, Password Safe then performs the AutoType
action using this entry's AutoType field, or the default value if not
specified.
The email address is according to the standard rules (per RFC 2368):
- Open the database where you wish to place the new entry
- From the Edit menu, select Add Entry
- Enter information into the Edit/View Entry dialog fields as necessary
Note: If a Group name is selected and then a new entry added,
that entry will have that Group name prefilled in the Edit/View Entry dialog.
If a name of a new group is added to the Group field, that Group will
be created.
If you wish, you can enter your own password into the password
field manually, or you can have Password Safe generate a new one
based on the current Password Policy.
To have Password Safe generate a password, just click on Generate
in the Edit/View Entry dialog. If you're unhappy with the result,
you can click on Generate again, or edit the password manually.
Note: If you're using a "single sign-on" system that allows
you to share the same password across different machines/servers/applications,
etc. you can setup Password Safe entries accordingly, so that changing
one password affects all other related entries. This is called "aliasing"
entries, and is explained in detail here.
Editing Existing Entries
- Select the password entry to edit from the list
- Select Edit/View Entry from the Edit menu
Note: By default, passwords are obscured. To see
the password associated with the Entry click Show Password.
Add a New Group
- Select Add Group from the Edit menu
- Enter the Group name
Edit a Group Name
- Right-click on the group and select Rename Group
from the drop down list
Notes:
- Group names can be "nested" i.e. placing a group name within/under another group name.
- Groups do not exist in their own right. They exist by virtue of an entry being
present with within it or within a sub-group of the group. Therefore, if you add a group
and the database is saved before you add an entry in it or its sub-group, it will disappear.
The simplest method of ensuring a new group remains is to create a new entry and type
in the new group path in the group field (groups are separated by periods ('.')).
Protected Entries
If the entry is protected, you will not be able to change any fields until you unprotect
the entry via the Edit menu or right-click context menu. Protected entries will be indicated
in red at the bottom of this tab.