Quick Tutorial - Colorbar and Table Assistant
The Colorbar
- The Colorbar is part of the the statusbar. It is hidden the first time you use Anansi so you need to open it by pulling it to the right.
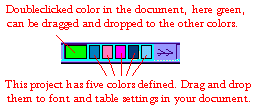
- To define colors, rightclick the mouse at the Colorbar and when a menu appears, choose Add Colors. The standard Windows Color Dialog follows. The trick is not to choose one color, but to add all wanted colors at once to the defined colors, I mean those 2 rows of 8 white spots. Get your favourite colors in those white spots.
- After you've choosen some colors, these can be dragged and dropped to the editor. My favourite way of using the Colorbar is doubleclicking an existing colorvalue in the document and then replacing it by dropping another one on it. This is the Replace Color Only setting. However, you can also have Anansi insert complete font or table attributes by changing the settings with the colorbar's mousemenu. Use BGColor for tables and Color for fonts.

- The fixed-size rectangle with the black border is designed to show colorvalues in the document. Doubleclick on a colorvalue to view it. Viewed colors can be dragged and dropped to the other colors, where they will be added to the list.
The Table Assistant
- The Table Assistant helps when you need to set up complicated tables. I'll guide you through the three separate pages of the Table Assistant and will let show you how to make the sample page linked at the bottom. Press F5.
- For the sample page, choose 5 rows and 4 columns. Leave it centered. Now, this was easy. You could stop here but I want to show you the rest too. Click the Next button.
- No, you don't want a caption for the sample page. A caption is just as is says, it's a row either at the top or the bottom of the table that can be used for giving it a title. I don't really like captions and usually make my own captions when needed. For the sample page, use no border and narrow it to 90%. The option to force the table to use 100% of the height even when it's a small table, is very useful for desiging frontpages. It will nicely distribute your content over the complete page. Mind you, some visitors use their browsers non-maximized at a 640x480 resolution, others at say maximized at a 800x600 resolution. You want your page to always look good and don't want to look as incompetent as some of the professional website designers. I'm stepping down my soapbox now. Choose the force 100% height, set cellspacing to 0 and crank up cellpadding to 10. This will remove space between cells and enlarge the space between the border and the content of cells. Go to the last page.
 |
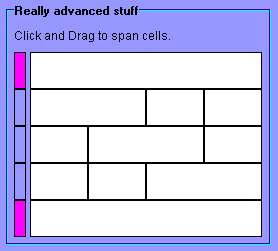
| This is how the table sample page was made |
- Span the cells by dragging them together. There's no undo/ redo facility, but you can always reset by going back to the previous page. Assuming you've already defined some colors, they'll show up in the Colorbar of the Table Assistant. Beta 3f of Anansi can only set row colors. This is done by dropping a color on one of the cells in the small column on the left. Colored tables are only supported by the Netscape and MSIE versions 3 and higher. Press Preview if you're want to check your design with a browser, press OK when you're satisfied.
Table tricks
- Before browsers had the ability to work with stylesheets, tables were often used for faking margins. You shouldn't do this anymore, but here's how. Center a one row one column table and setting the width value. Don't make tables too large. Browsers only display tables after they're completely loaded. With the traffic congestion on the net, this means that some visitors won't bother to wait until your nicely designed tables have loaded. They hit escape of back to never come back again. Split large tables up into smaller ones!
- Use tables for adding comments to images. I've done this at this page, see the image/ table just above.
- One row two columns tables are often used for faking a width left margin that carries its own information. You need to insert a width attribute for the first column, add width=whatever in the first TD tag. Be careful with absolute pixelsvalues, a percentage is safer but if you keep the first column narrow enought an absolute value is fine too.
- One row one column tables are sometimes used as floating texttables aligned to the left or right margin. This is one of my favourites. I press the table button at the toolbar and add width=30% align=right to the table tag. It's that simple. You can also use the Table Assistant of course.
See the table sample file
See the first sample file, this time with a table
Next: The finishing touch
Return to the Index


