


FontFX
RISCWorld
How to use FontFX
When you run FontFX, an icon will appear on the RISC OS Desktop iconbar. Clicking MENU whilst pointing at this icon brings up a small 'icon bar menu' giving the means of quitting the application, and some information about the program itself. Clicking SELECT opens the main control window for FontFX. This is divided into a number of panels; at the top, a writeable icon to hold the string of characters you want converted - the maximum number of characters is 250; under this is an icon showing the name of the outline font that will be used to define the characters. To the right is an area which lets you select the fill colour(s) for the characters in your string. Below are panels dealing with outline colour and thickness, font size, arc or circle effects, rotation, rippling, column, shadows, stencils and growing and shrinking.
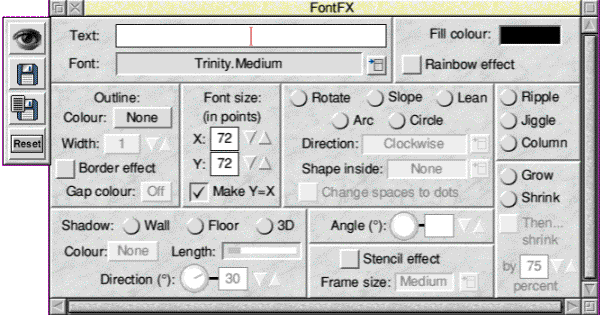
Depending on your personal preference, there may be a 'toolbox' attached to the left-hand side of the main control window. This has icons which create and display the drawing, create and open a save box for the drawing, open a save box for the control window settings and finally reset the control window to normal settings. Whilst your mouse pointer is within the main control window, clicking MENU will normally produce the 'main menu' which duplicates the toolbox functions and allows you to switch the toolbox on and off. The only exceptions to this are when the mouse pointer is above the fontname icon (in which case the font menu appears) or the stencil size icon (in which case the stencil size menu appears).
The minimum amount of work you have to do to create a drawing is to type in some text and click on 'Create' in the main menu, or on the 'Create' (eye) button in the toolbox, or on the 'Save' (disc) button in the toolbox, or by pressing 'F3' whilst the caret is in the text icon. The resulting drawing will have the default settings shown in the control window whenever you first run FontFX: normally, this means the font will be Trinity Medium, coloured black, with no outline, X and Y font size 72pt and using no other special effects, but it is possible to customise your copy of FontFX to start up (i.e. default to) other settings if you wish. For details of how to use the special effects, or alter any of the other settings, see the following sections.
When you click on 'Create' there will be a short pause whilst FontFX does its work, and then a new window will appear, within which is your created drawing.

If the drawing is satisfactory you can then either save it to disc or transfer it straight to another application. To do this, bring up the 'preview menu' by clicking MENU within the preview window and slide across 'Save drawing' to open a traditional 'save box' containing an icon to represent your drawing. To save your drawing onto disc, drag the icon into a directory viewer, or type in a pathname in the writeable area under the icon and then click on 'OK'. If you want to transfer it to another application, drag the icon to that application.

A special case is !Draw itself: if you want to transfer the drawing to !Draw, all you have to do is click on 'OK' without entering a pathname. Incidentally, you can also do all of this by sliding across 'Save' in the 'main menu', which opens a submenu: this contains the further option 'Drawing', and if you slide across that, the 'save box' appears as described above.
A quick note: if you have typed in your string and want to change letters from upper to lower case, or vice versa, you can do this quickly by positioning the caret before the character you want to change and pressing Ctrl-S.
Fonts
The default font is normally Trinity.Medium, but you can use the designs of any outline font in your possession. To change the font, bring up the 'font menu' by clicking on the menu button to the right of the font name icon, or by clicking MENU over the font name icon itself. By doing this, a list of all the fonts on your system will appear. Just click SELECT or ADJUST on the desired font, and its name will appear in the control window, displayed in the font itself. If you click with ADJUST , the menu will remain on the screen, so you can keep selecting different fonts to see what they look like.
Note that it may take a little time to display the text string, as the definitions of the characters have to be read from a font file on disc unless the font definition is already held in the computer's font cache. If you have a lot of fonts, this process will be speeded up by having a large font cache (memory size permitting). In case the font name is obscured in the control window, the currently selected font is always ticked in the font menu.
Font Size
The size and shape of the drawing you create are determined by the settings of font size. These can be set within the range 1 to 999 in points. The X and Y sizes can be altered separately: a larger X size than Y size results in characters that are wider than they normally are for their height, whereas a larger Y size than X size makes the characters taller than normal.
Although you can change the size of your drawing, to get the best resolution you should keep the size as high as practicable - remember that all DTP packages rescale to fit a frame in any case. To change the sizes, click on the arrow icons on alongside the box that shows the current setting. Clicking SELECT on the up arrow increases the size, whilst ADJUST decreases it. On the down arrow, SELECT decreases and ADJUST increases. If you want to lock the two sizes together, click on the 'Make Y=X' option icon: this will force the Y size to be equal to the X size, and changing either one will alter both together. The arrows increment or decrement the size in varying steps: if the current setting is 1-32, the change is in single points; if the current setting is 32-128, the change is in steps of 8 points; if the current setting is 128 or more, the change is in steps of 32 points.
Another way of changing the sizes is by typing in a value - first click in the X- or Y-size icons, so that the caret appears there, then type in a value. If you type in a value which doesn't correspond to one you could obtain using the arrows, and subsequently use the arrows, the first click on an arrow will change the setting to the nearest value normally obtainable, e.g. if you had typed in 67 and clicked down, the new setting would be 64. Note that you can 'by-pass' the Y=X option if you type a value directly into either box, but as soon as you click on one of the arrows, the Y size will be made equal to the X size again. Pressing 'Return' or 'Page Up' or 'Page Down' or the up or down cursor keys moves the caret from the X size icon to the Y size icon, and vice versa.
Outline and Fill Colours and the Rainbow Effect
Normal outline font characters have a black fill colour and no outline. These are the normal default settings in FontFX too. You can change either of these settings to any of sixteen million available colours, or have no fill, or no outline colour at all (but you must have at least one of them set). To change the colours, you click on the box showing the currently selected colour to open a 'Colour Picker Dialogue Box'.
Here you can select a colour from the 'colour cube', or by dragging up and down the levels of red, green and blue in the colour, or by typing in percentage values of red, green and blue. You can also use CMYK or HSV models for choosing colours (only recommended for the knowledgeable or the adventurous!), or even restrict your choice to one of the 16 desktop palette colours, which appear in a grid above the OK button. As long as the outline colour is not sent to 'none', you can select 'none' as the fill colour, and vice versa: in other words, only one of them can be 'none'.
A further option for fill colour is to choose the 'Rainbow' effect. In this case, each letter will have a different fill colour, in a sequence that can be defined by the user. If this option is selected, you cannot manually alter the fill colour - if you want to do this, switch off the rainbow effect. Note also that switching on rainbow will disable the stencil option (see below), and vice versa.

To alter the sequence of colours in the rainbow effect, click over the fill colour icon in the main control window (which will become 'stripy' as soon as the rainbow option is selected). Instead of the colour picker, a window will appear showing the current rainbow sequence. If you just want to alter the colours in the sequence, click on the appropriate colour icon to open a colour picker box. If you want to extend or shorten the sequence, click on the up or down arrow beside the box telling you how many colours are in the sequence: this can be from a minimum of 2 to a maximum of 16. If you reduce the number of colours, the appropriate icons in the sequence will be greyed out: if you extend the sequence, the appropriate icons will be reactivated. Note that when you save either default settings or a script file (about which more below), the rainbow sequence will be saved in the file.
Outline Width
If you select an outline colour, you can also specify how thick the outline should be. There are five settings, ranging from 1 (very thin) to 5 (very thick). You alter the current setting using the arrow icons in the same way as described above for font size and colours. If you produce a drawing with font sizes 72pt, and transfer it to !Draw, the outline width settings correspond to the line width settings in the !Draw menu, i.e. 1 (FontFX) = 'Thin' (Draw), 2 = 0.25 points, 3 = 0.5 points, 4 = 1 point and 5 = 2 points. If you create your drawing to a different size, the point width of the outline will be scaled accordingly, e.g. font size 144pt, FontFX outline width 5, gives !Draw line width 4 points.
RISCWorld