


Rhapsody3
RISCWorld
Chapter 7
Introduction
A number of large scale operations can be carried out including copying and deleting, transposing and changing note styles etc. Many require a section of the score to be marked as a block which can be any length and can contain any number of contiguous staves. Others can be carried out on a whole stave or a complete score.
7.1 Marking a block
There are two ways of marking a block. The first is to place the cursor at the start of the section you wish to mark on the uppermost stave. (This does not have to be the top stave in the score). Next select the Block marker icon in the Main Panel, shown left, and then click on the Insert-at icon. A red arrow will appear at the top of the score indicating the presence of a block marker. Now move the cursor to the the end of the block and position it on the lowest stave in the block (not necessarily the bottom stave in the score) and insert a second block marker in the same way. The marked block will now appear shaded so you can see exactly what is included.
The second method is generally more convenient. Position the cursor in the score by double-clicking with the Select button holding the button down after the second click. This will start a drag operation and a small dotted box will appear. Holding the mouse button down all the while, drag this box out until it covers the area of the block you wish to mark. You will find that when you get near to the edges of the window, the score will scroll so you can reach parts of the score which are initially out of sight. When you release the button, the block is marked. If you use the Adjust button instead of Select, the top left hand corner of any block (if there is one) stays in the same place. This can conveniently be used to make small adjustments to the end of a block.
You can mark anything from a single slot to the whole score. When marking complete bars (eg for copying etc) it is best to include the first bar line in the block but to omit the last one .
Once a block is marked, the Block option on the main menu will become unshaded and you can get access to the Block menu which contains a number of options.
Operations which can also be carried out on a whole stave or a complete score will be mentioned in passing.
7.2 Re-tailing
The next option on the menu, Block, leads to a third menu which allows you to specify whether the tails of the notes in the marked block should have their stems pointing up, down, or both ways depending on their height on the stave. Be careful not to re-tail music which is written in two parts on one stave. If you do, the parts will be merged together and some information about note lengths may be lost.
A whole stave can be re-tailed without marking a block from the Stave menu:
7.3 Transposing
If you want to transpose a passage up or down a number of semi-tones, this is the option to use. Transposing is not a trivial task because transposing an F natural in the key of G major (which has an F# in the key signature) up one semitone could result in either an F without an accidental, an F# or even a Gb depending upon the context and what notes exist earlier in the bar. As with the other transcribing and transposing routines, Rhapsody is not very intelligent about this and would undoubtedly fail its grade 5 theory exam. What it does is it looks to see if it can find a note on the current scale (which includes changes made by other accidentals earlier in the bar) to see if it can find one with the same pitch. If not, it chooses a naturalised note in the case of the 'white' notes. For the 'black' notes, it uses a look-up table which you supply by selecting the appropriate icons in the window which the Transpose menu item leads to.
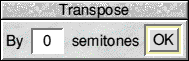
This is the default setting with the five 'black' notes on the piano transcribed as C#, Eb, F#, G# and Bb. You set the number of semitones in the usual way. Positive numbers mean transpose up , negative numbers mean transpose down . The range is -12 to +12 semitones, ie down or up one octave.
Because of the limitations mentioned above, transposing a passage back to its original pitch will not recreate the original accidentals - though the passage will still play correctly of course.
One of the most common uses for transposing is so that the part can be played by a transposing instrument such as a clarinet or trumpet. In this case, however, not only must the notes be changed, so must the key signatures. This is achieved automatically whenever you transpose a whole stave from the Stave menu. In addition, whenever you do this, the transpose interval is also changed so that the stave continues to sound at the original pitch.
7.4 Shifting
While it may be appropriate in some circumstances to transpose a block by shifting it into another key (without changing the key signature), it is also necessary sometimes to shift the notes up or down the stave. Note that this is NOT the same as transposing it because the notes remain in the original key. One reason for doing this is to change a passage written in one clef to another clef. As a matter of fact, Rhapsody will shift the notes for you automatically if you insert a new clef so you may not have to use this routine very often.
Moving over the arrow leads to a little window which enables you to set the number of lines to shift:
7.5 Accenting
The next item on the Block menu leads to the Accents menu which allows you to apply staccato and other accent marks to every note in the whole block in one go. It is equally useful when applying a slur to a group of notes. Just mark the group as a block by double-click dragging, then choose the slur option.
The last item on the menu removes all accents and slurs from the marked block.
7.6 Changing the note style
Rhapsody permits four different type of note head, selected from the Note type menu:
Small notes are used for cue parts. (To silence cue parts use the Voice Change symbol - see page 35)
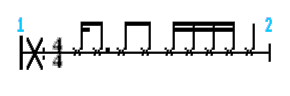
Cross head notes are often used for untuned percussion sounds eg:
Old notes are in a quasi mediaeval style:

7.7 Copying
The simplest copying routine is the Duplicate option on the Score menu. As the name suggests, this does nothing more than copy a complete score. If there are no blank scores available, an error message will be given.
The copy/stave option is much more sophisticated in that it will attempt to merge the new music with what is already present. Obviously the two passages have got to be in some degree compatible for this to be successful (eg they have got to have the same number of beats in every bar!)
First position the cursor on a barline at the place where you want the stave to be copied across to. (If you want to create a new stave, you will have to add a new one first, then put the cursor at the beginning. It is also a good idea to delete the default clef otherwise you will get two clefs at the start of the stave.) Now bring up the main menu by clicking on the stave you wish to copy . Select Stave ç Copy and away you go.
There are three block copy routines - Copy/merge and Copy/insert and Copy/text
To copy an area of music from one score to another or from one place to another in the same score, first mark the block you wish to copy; then position the cursor at the position you wish to start copying (this will become the top left hand corner of the copied bloc)k. Then bring up the main menu by clicking on the block you wish to copy . This is important because there may be more than one score open and each score can have its own marked block. Select Block ç Copy ç Merge from the main menu and the block you have marked will be copied to the new place and merged with whatever is already there .
If, on the other hand, you want to copy (or move) a complete section of music from one place to another, you can use Copy/insert. To do this, you must, however, include all the staves in the block you wish to copy. Position the cursor as usual and select Block ç Copy ç Insert. Note that the new block will be inserted in front of the cursor. If you want to copy a whole number of bars, it is recommended that you get into the habit of including the first bar line in the block , but not the last , and putting the cursor on the bar line where you want the copy to appear. In this way, you can copy one section of bars immediately after the original set without getting duplicate or missing bar lines.
Copy/text is similar to Copy/merge but it only copies text. Another difference is that the marked block must only be one stave high. If you are copying text from one part of a score to another, you must make sure that the notes are similar. This is because the text is copied literally, slot by slot. If the destination has an extra slot in it for some reason, all your text will be out of synchronisation with the music! The most common use for this option is copying text down a score from one stave to all the others beneath. In this case, the problem will not arise.
The next item on the Block menu (Tidy) will be dealt with in the next chapter. Here we shall deal with getting rid of things.
7.8 Discarding
A Score can be discarded - that is to say, it is removed completely from memory and replaced by the default score. There are two ways of doing this. Firstly from the main menu which gives you the option of discarding any of the five scores or all of them.
Secondly, from the main Score menu:
7.9 Clearing
You will see from the above menu that a score can also be clear ed. What this means is that all the notes, rests and text are deleted but key signatures, clefs, time signatures etc remain. A stave and a block can also be cleared, The main pupose of this facility is to get rid of notes which have not been transcribed satisfactorily so that you can try again, perhaps with a different quantisation setting. In the case of a stave , if the selected stave is also the stave with the cursor on it, the stave will be cleared from the cursor to the end rather than clearing the whole stave. Again, this is designed to make it easier to clear out notes after transcribing.
The short cut is <Ctrl> D. If there is a block present in the current score, you will be asked for confirmation that you want to clear the block. If there is no block, you will be asked if you want to clear the stave from the cursor to the end.
7.10 Deleting
A stave can be deleted ie removed from the score completely.
A block can also be deleted but in this case the block must extend vertically down the whole of the score ie it must include all the staves including the top and the bottom staves. The short cut for this is <Ctrl> X.
RISCWorld