


Dr Fonty
The full manual for our cover software
Copyright © APDL and iSV Products 2004
All rights reserved. This program is licensed for use on a single computer by a single user.
This version is supplied for the use of RISC World subscribers only.
The version of Dr Fonty supplied on this CD is for use on 26 bit machines only. We are offering the latest version, which is fully 32 bit and Iyonix compatible, to RISC World subscribers for the special price of just £10 including carriage.
Published by -
APDL
39 Knighton Park Road
Sydenham
London SE26 5RN
Phone : 020 8778 2659
Fax : 020 8488 0487
E-mail : info@apdl.co.uk
Contents
- About Dr Fonty
- Dr Fonty's main window
- Outline windows
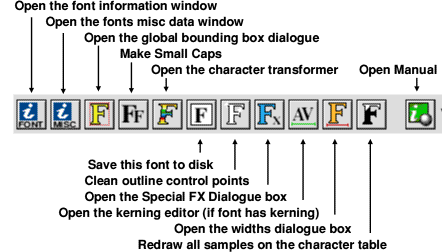
- Toolbar
- Dr Fonty's main menu
- The Misc Menu
- The Bounding menu
- The Characters menu
- Composites menu
- The Save Menu
- Outlines menu
- The Kerning menu
- The Scaffolds menu
- The Skeletons menu
- The Widths menu
- Outline window menu
- Moving & attaching Scaffolds
- Zoom & Restore
- Dr Fonty's Preferences
- Font rendering preferences
- Tutorial - Making fonts
- Font Problem solving
- Swapping kerning
- Base 0 fonts
- Making composite accents
- Loading very complex fonts
About Dr Fonty
Dr Fonty is a multitasking font editor for RISC OS. He is designed as a replacement for Acorn Computers FontED application.
Dr Fonty's requirements
Dr Fonty requires RISC OS 3.1 or later and a hard disk in order to work. Dr Fonty can be run on a machine with 4Mb of memory, however iSV Products recommend 8Mb if you wish to load very complex fonts.
Dr Fonty will require roughly 2600K of free memory before he will load. Once loaded he will not need to claim any further memory.
If your machine does not have enough free memory then quit any applications loaded onto the icon bar and try loading Dr Fonty again. Removing applications from your boot sequence then re-booting the machine may free up more memory. Some applications (such as Impression) can claim a lot of memory and not free it up again even after being quit. Removing items such as !NewLook can also free up more memory.
Loading
Dr Fonty is loaded by a double click on his icon in a filer window. A title banner will appear, then Dr Fonty will load onto the icon bar.
Loading a font
Once Dr Fonty is loaded a font can be loaded by double clicking on its Outlines file, or dragging it to the Dr Fonty icon on the icon bar. Double clicking on an Outlines file if Dr Fonty is not loaded will not load a font. This is on purpose. It allows you to set up your machine so that double clicking on a font file without Dr Fonty loaded will load the font into FontED.
If you load another font after the first one Dr Fonty will ask if you are sure you want to load the new font. Clicking on OK will load this new font and discard the old one. i.e. Dr Fonty can only edit 1 font at a time. You can however load other Dr Fonty/FontFiend files whilst editing a font. For example you could drag a kern file into Dr Fonty to load kerning and add it to the current font.
Once a font has been loaded into Dr Fonty his main window will open showing you all the characters.
DrawWorks OLE link
Dr Fonty can also be loaded by selecting a font in your DrawWorks document and clicking on the Dr Fonty button. In this case Dr Fonty will be automatically loaded and the selected font will then be loaded by Dr Fonty.
Dr Fonty's main window
This is the window that opens when a font is loaded.
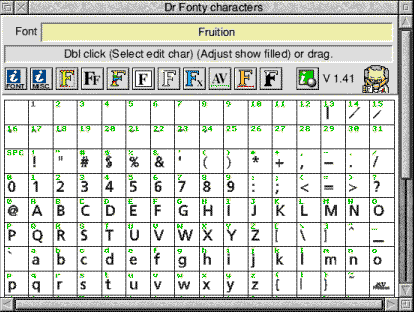
The name of the font loaded is shown in the writable icon at the top of the window. Below this is the on-line help icon. As you move the mouse over Dr Fonty's windows this icon will tell you what everything does (Dr Fonty also supports Acorns !Help application). Below this is the button bar, this allows you to quickly open often used windows. The main table below this shows small samples of each character.
The buttons on Dr Fonty's main window act as follows.
A single click with any mouse button will perform the required action. Dr Fonty has been designed to operate in the same way as FontED. So for example a double click with SELECT on a sample on the main character table will open the outlines window for a character. A double click with ADJUST will open a scalable filled sample of the character. Those familiar with FontED may wish to experiment.
Main Table (Clicks & Drags)
Clicking and dragging on the main character table using SELECT or ADJUST will perform the following actions.
Clicks
- SELECT (Double click) - Open outline window for char.
- ADJUST (Double click) - Open filled character window.
- MENU (Single click) - Open Dr Fonty's main menu.
Drags
- SELECT - Copy character (or export as drawfile).
- SELECT + SHIFT - Move character.
- ADJUST - Copy characters scaffolds.
- ADJUST + SHIFT - Copy character as a composite.
- ADJUST + CTRL - Remove composite character.
For example if you drag character A and drop it on top of character B using just SELECT character B will be replaced by a copy of character A.
If you drag character A and drop it onto character B using ADJUST then any scaffolds in character A will be copied to character B.
Outline windows
When you double click on a character on the main table an outline window for that character appears.
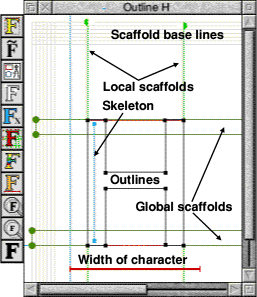
This window displays all of the components that make a character.
You can drag many of these components around. (See the next page).
You can also move the entire character around using the cursor keys. Holding down either SHIFT or CONTROL while using the cursor keys will increase the amount the character moves. (Note that you can only move a character around when the title bar of its window is yellow (has input focus).
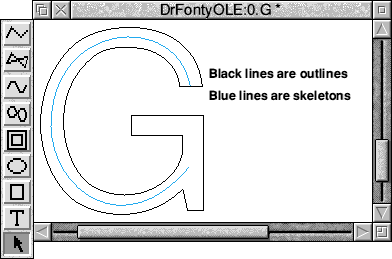
An outline window can display all the following information:
- Characters outlines (Black outlines with control points)
- Local scaffolds (Light green & can be dragged)
- Global scaffolds (Dark green & cannot be dragged)
- Width of the character (red line under the outlines)
- Base lines (light blue lines in X & Y axis)
- Scaffold base lines (light grey lines top & left of window)
- Composites (grey outlines with no control points)
- Skeletons (Light blue lines inside outlines)
Some of these can be dragged inside the outline window. For example, outline control points, local scaffolds and composites can be dragged about. When you click on an outline control point or scaffold to drag it it will become highlighted.
Note If you wish to drag bezier control points from the characters outlines you will need to turn on the option "Render outline control points" from Dr Fonty's rendering preferences window. (MENU on icon bar, click on Prefs..).
Clicking and dragging on the outline window:
Clicks
- SELECT - Select a control point or local scaffold
- ADJUST - OLE the current outlines & skeletons to !Draw.
- MENU - Open Dr Fonty's character menu.
Drags
- SELECT - alter position of a control point or scaffold
- SELECT + CTRL - drag out a rectangle to enclosed any control points that should be connected to the currently selected scaffold.
Toolbar
The buttons on the toolbar at the side of the outlines window perform the following actions.
Filled character windows
These windows provide an example of what the character will look like when rendered by the font manager.
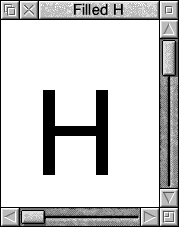
Altering the size of the window will alter the size of the character sample displayed. Clicking with SELECT in one of these window will open the Outline Window for the particular character.
If you click SELECT in a filled character window then the appropriate outlines window will open.
Dr Fonty's main menu
The main menu for Dr Fonty is opened by clicking MENU over the main table.
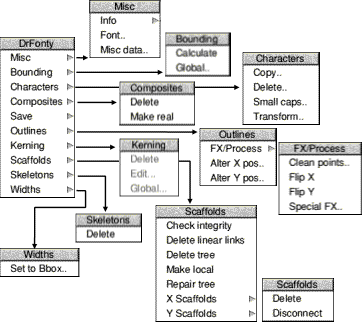
The next section of the manual will cover these menu options in detail.
The Misc Menu
Font
This option opens the font information dialogue box.

- No of chunks - each chunk of the font contains 32 chars.
- Scaffold - this is the size of the fonts scaffold area.
- Scaf Chars - number of characters that can be scaffolded
- Version - the type of the font (6=OS2 8=OS3)
- Kerns - the number of kern pairs in the font.
- Max beziers - the max number of control points per char.
- Design size - the number of co-ordinates per em.
- Monochrome - with this button turned on the font will not be anti-aliased by the font manager when rendered.
- Non zero - turning this button on will force the font manager to render the font with a non-zero winding rule. Turbodrivers from CC do not support non zero fonts.
Misc data..
This option opens the font misc data dialogue box.
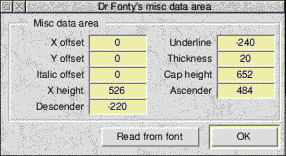
RISC OS 3 fonts have an extra misc data area similar to that of PostScript fonts. This area contains extra information about the font.
Dr Fonty can work out all the information himself automatically or you can type in new values for any of the entries. Some of these entries purely provide information, for example altering the x height will not actually alter the x height of the font. Cap height, descender, italic offset and ascender also only provide information. However altering X offset, Y offset, underline and thickness will actually alter the way the font is displayed. Note Fonts with a Y offset other than 0 will not work correctly on current versions of Risc OS.
The Bounding menu
This menu has two options. The first Calculate will simply re-calculate all bounding boxes for the font. (This will only happen if the option "Re-calculate bounding boxes" is on from preferences on the icon bar.
Clicking on Global will open the global bounding box dialogue box.
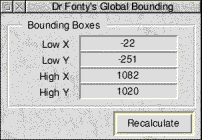
This dialogue box shows the fonts global bounding box. This is the smallest area that can enclose any character in the font (including accented letters). The recalculate button will force Dr Fonty to re-check all letters in the font to ensure that they will fit into the global bounding box. If any letters do not then the global bounding box will be adjusted accordingly.
The Characters menu
This menu is concerned with entire characters (Outlines, skeletons, scaffolds and composites).
Copy & Delete
Clicking on one these options opens a relevant dialogue.

For example suppose you want to copy the upper case letters on top of the lower case letters. Select the "First" character from the encoding menu as "A". Select the "Last" character as "B", then select to "To" as "a". Clicking on OK will result in "A" being copied to "a", "B" copied to "b" e.t.c.
Delete works in the same way as copy except there is no destination character. Copying or deleting characters can corrupt a fonts scaffold tree if present. Clicking on the "Repair Tree" entry in the scaffold menu will fix this.
Small Caps
Clicking on the Small Caps.. option will open the small caps dialogue box. This allows Dr Fonty to make small versions of upper case letters to use as lower case letters.
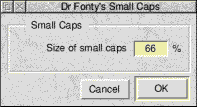
You can set the size of the small caps in relation to the upper case letters. 100% is the same size as upper case, 50% is half the size.
When you make small caps at a size less than roughly 85% of the size of upper case letters the stroke widths of these new letters will then be wrong. These new letters will appear too light in relation to the rest of the font. This can be corrected by using the Outline Effects dialogue box from the outlines menu to alter the weight of the small caps so that they appear visually similar to the upper case letters.
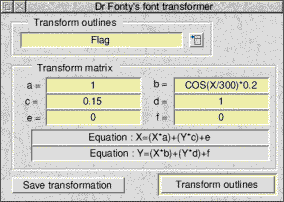
Transform
Clicking on this option will open Dr Fonty's font transformer.
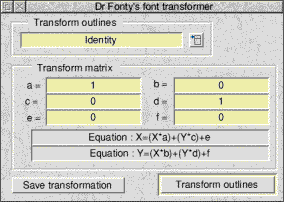
This dialogue allows you to alter the appearance of an entire font, for example to make it oblique, condensed, extended e.t.c.
The menu button at the top allows you to choose one of the pre-defined transformations. This will be applied to the entire font, including all outlines, skeletons, composites and scaffolds. For example if you extend a finished font with all scaffolding and composite accented characters in place Dr Fonty will shift all scaffolds so they remain correct as well as adjusting composites, widths e.t.c.
Not only can you choose a transformation from the ones on the built in menu you can create your own. This example shows the transformation for oblique.
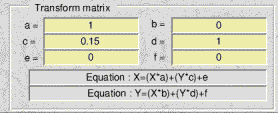
The important part of this transformation is the 0.15 in the c section of the matrix. This could be altered by typing in a new value (as shown below).
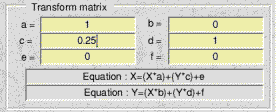
This would make a more slanted font. This new transformation can be saved to disk for later use by clicking on the "Save transformation" button. There are more example transformations supplied on disk. Playing with these along with the built in ones will make this clearer.
Each of the variables in the transform window (a to f) have a particular effect on a font when it is transformed.
- a = Positive numbers extend font, negative condense it.
- b = Positive makes font slope up, negative down.
- c = Alter obliqueness of font, positive more, negative less.
- d = Positive numbers make font taller, negative smaller.
- e = Alters X position of the fonts characters.
- f = Alters Y position of the fonts characters.
In addition you can use mathematical equations, these can include SIN, COS, TAN, RAD etc. The example below shows the Flag matrix loaded from disk. When you alter a font with a matrix you may need to use the Outline FX dialogue to alter the weight.
Composites menu
This contains two entries, the first is Delete . Clicking on this will delete all composite characters from the font. For example supposing an accented character (�) is produced from composites of C and �. Clicking on Delete will remove this composite character but will leave the original letters (C and �) alone.
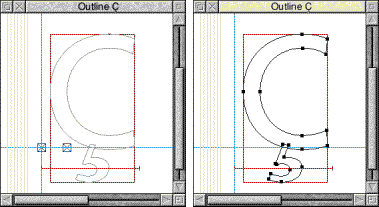
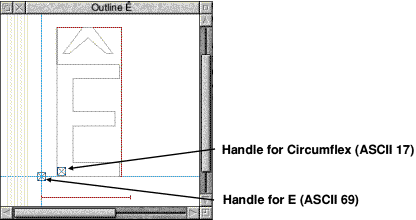
Make Real will convert all composites in the font to real outlines. The example below left shows a composite character (note the two blue handles). The other example shows the result of clicking on make real.
The Save Menu
Using this menu you can save either an entire Acorn font, a PostScript font (for use with Adobe Type Manager running under Windows) or a kerning file to disk.
Font
When you save a font to disk you will only drag one file icon from the save dialogue box. A font consists of two files (Outlines & Intmetrics). Provided that the option "Save Intmetrics with Outlines" is on from Dr Fonty's preferences window the fonts intmetrics will be automatically saved next to its outlines on disk.
PostScript
This menu has three options. Just like an Acorn font a PostScript font consists of two files (AFM - like Acorn Intmetrics, and PFB - like Acorn Outlines). This menu has a third option which is "ATM info". This saves an info file for Adobe Type Manager. If you want to use the font created directly under Windows then you will need to create this file. If you are going to export the font to a PC/Macintosh font editor then you do not need to save this file. Acorn font names and PostScript names are not the same. Dr Fonty will automatically convert Acorn names to PostScript using the same format as DrawWorks Millennium. This means that you can produce an EPS (PostScript) file and also supply the required fonts on disk with the correct matching font names.
Kerning
You can save the kerning from one font to disk, then load a different font, then re-load the kerning. This allows you to add kerning to fonts which do not have any, or to swap kerning between fonts. If you do load kerning from one font into another then this new kerning will need to be adjusted using the kerning editor.
Outlines menu
This menu is concerned with a fonts outlines.
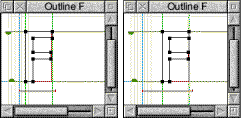
Alter X/Y Pos
Clicking on these will open the X or Y position dialogue box.
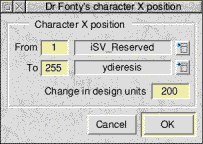
This allows you to alter the X/Y position of all characters in the font. For example you could add an offset (often called a left side bearing) to all characters in the font. Using this with a positive value will increase the gap between the start of a character and position 0,0. A negative value will reduce the gap.
The example below shows the effect of altering X position by 200 units.
FX/Process menu
This contains a number special options that can be used on a fonts outlines.
Clean Points
Clicking on this will open the clean points dialogue box.
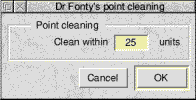
This dialogue is designed to remove double sets of control points that could cause errors when using the Dr Fonty Outline Effects dialogue box (see page 25). Some fonts have control points very close together, this can cause the "Make Open" effect to have undesirable results.

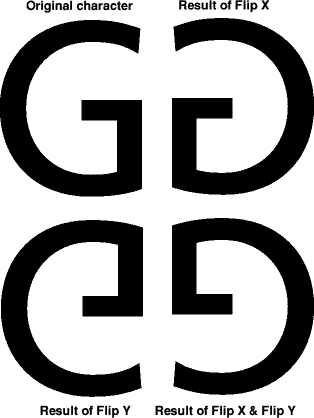
Flip X/Y
The two options Flip X and Flip Y do just that, they flip characters in the font over.
Special FX
Clicking on this option will open the Outline Effects dialogue box.
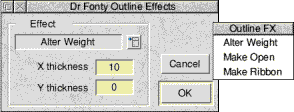
From here you can apply a number of effects to the outlines of a font. For example:
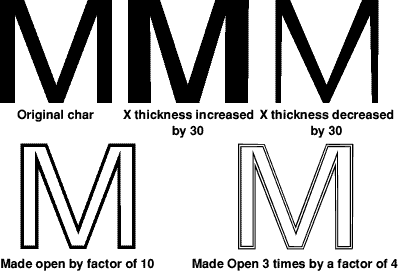
The alter weight option can be exceptionally useful. If for example you make an extended font using the "Characters Transform" option the vertical strokes will be wider than the horizontal strokes. You can use alter weight to restore the stroke width.

In the example above the final character was produced by gradually reducing the X thickness in steps of -4 until all stroke widths were identical.
You can of course combine effects. For example you could make a font bolder (increase X thickness) then make an "open" version of it.
The Kerning menu
This menu allows access to Dr Fonty's kerning editor. If the options on this menu are greyed out then the current font does not have any kerning. You can of course load kerning by dragging in a kern file from disk.
Delete
Clicking on this option will delete all kerning from the current font. Dr Fonty will confirm that this is what you want to do before deleting all the kerning.
Global..
Clicking on this will open the global kerning dialogue box.
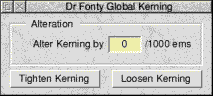
This allows you to globally tighten or loosen all the kern pairs in a font. Often the kerning from one font can be transferred to another and only needs to be adjusted globally. For example the kerning from one sanserif font can often be quickly adapted for another.
Edit
Clicking on this option will open the local kerning editor.
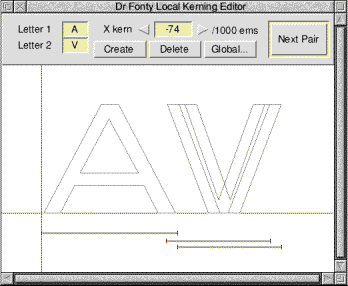
From here you can edit any of the kern pairs in the font, delete pairs you do not want or add pairs that you need.
The display shows the pair of letters to be kerned along with the kerned and unkerned positions. At the top of the window is the current kerning amount. Clicking menu over the kerning display will open a menu for all kern pairs.
You can adjust a kern pair in a number of ways. Firstly by typing in a new value into the writable icon at the top of the window. Secondly you can use the left and right arrows to decrease or increase the value. You can also alter the kerning by clicking in the kerning display and then using the cursor keys in conjunction with SHIFT or CONTROL .
Making a new pair
If you need to add a new kern pair then type the two characters which need a pair into the top left writable icons and then click on the "Create" button. If the pair already exists it will be displayed, if not it will be created and then displayed.
Deleting a pair
To delete a kern pair simply choose that pair from the kerning menu and then click on the "Delete" button. Dr Fonty will check before deleting the pair.
Moving to the next pair
You can move on to the next kern pair by clicking on the "Next Pair" button or by pressing the return key.
The Scaffolds menu
This menu is entirely concerned with a fonts scaffolding.
Check Integrity
This option makes Dr Fonty check the entire scaffold tree in a font to ensure that it has no errors. If any errors are found they will be reported. FontED will refuse to load fonts that have faulty scaffold trees, often reporting errors such as "Cyclic scaffold link". With this option you can find any faults in the scaffolds, as well as ensure any scaffolds you have made yourself will not cause errors.
Delete linear links
Linear links are joins between scaffolds in a character. FontED can also complain about these "Invalid linear link" being a common complaint. Dr Fonty can delete these linear links so that the font will then function correctly.
Delete Tree
This option will delete all global scaffolds, and hence the scaffold tree from the font. Global scaffolds will not be replaced with local ones they will just be removed totally. This can be very useful in recovering fonts with very badly damaged scaffolds.
Make Local
This option will convert all global scaffolds into local scaffolds, removing the scaffold tree in the process. Fonts with very complex scaffold trees can be very difficult to edit without corrupting the scaffolds. This option can be used to keep all the scaffolding intact but ensure that any changes to the scaffolds on one character will not effect others. So before editing any characters you can click on this option. The font will still be fully hinted but will be slightly larger.
Repair Tree
This option can be used after "Check Integrity". Dr Fonty will check the entire scaffold tree and remove any defective global scaffolds. You may need to re-scaffold some chars.
X/Y Scaffolds Delete
This option can be used to delete scaffolds in either direction.
X/Y Scaffolds Disconnect
This will disconnect the relevant scaffolds from outlines & skeletons. This may be useful on an Oblique font when X scaffolds will no longer "hint" the font correctly.
The Skeletons menu
This menu only contains one option, Delete . This can be very useful after a font has been changed using the "Outline effects" dialogue box. For example making a font bolder (increasing its X thickness) may result in skeletons that are no longer needed. They may either be no longer required or may poke out past the outlines of letters.

Adding skeletons to a font
To add skeletons to a character first OLE the character into Draw (see the section "OLE Editing with Draw"). Now you need to select the line colour as cyan (light blue). Now you can draw the skeletons inside the outlines in the Draw window. Once you have added the skeletons you want just click on "Save" from Draws main menu. The best way to see how skeletons should be drawn is the examine fonts such as Trinity and Homerton.
The Widths menu
This only has one option "Set to Bbox..". Clicking on this will open the character widths dialogue box.
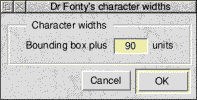
This is used to quickly set up widths for an entire font. Widths will be set based upon each characters bounding box plus a specific value. In the example above 90.
This can be useful to either recover a font with some very bad widths, or when designing your own font from scratch. If designing from scratch we recommend that you use the default setting of 90 to start with. You can then alter some individual characters if they are not correct.
This can also be used to tighten or loosen character spacing within a font. For example setting the value to 25 will result in a font with characters very close together.
Note - when making your own fonts don't forget to set the width of the space character! This is best done manually.
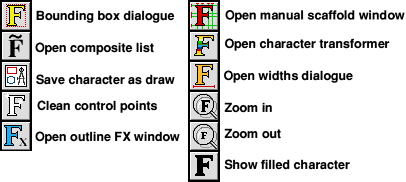
Outline window menu
If you click MENU over one of the outline windows then the following menu will open.
Many of the options on this menu are similar to those on Dr Fonty's main menu. However instead of effecting the entire font they will only effect the particular character concerned.
Many of the dialogue boxes attached to this menu can be opened using the tool bar to the left of the outline window (See page 9). This section will only cover those menu options that are different to those on the main menu.
Composites List
Clicking on this option will open the composite list window.
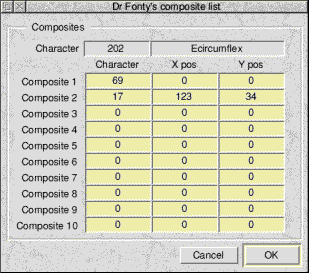
This window provides a complete list of any composite character inclusions in a character along with their X and Y positions (offsets). An X and Y pos of 0 means that the composite inclusion will appear in exactly the same position as the real character. In the example above (Ecircumflex) character E (ASCII 69) has an X and Y pos of 0 so it appears in the same place as E. Circumflex (17) is offset so that it appears over the centre of E.
If you move a composite around in the outline window by using its blue handle then the changes will be shown here.
You can delete a single composite simply by setting all the contents of a row in this window to zero and then clicking on the "OK" button.
You can also add composites to a character by typing the new composite inclusions ASCII code and X and Y pos into the first free line and clicking on "OK". (Note however that it is usually easier to insert composites by dragging with SHIFT + ADJUST on the main character table).
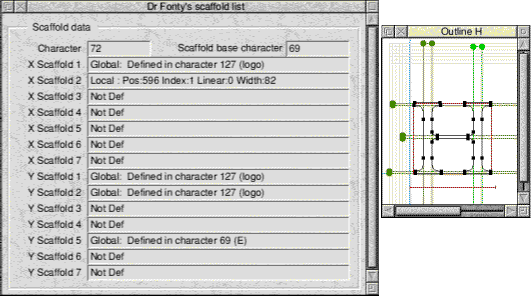
Scaffolds list
Clicking on this option will open the scaffold list window for the current character. This window provides detailed information on the scaffolds used in a character including which character any global scaffolds are actually defined in. This example shows one local X scaffold, one global X scaffold and three global Y scaffolds. (Global scaffolds are shown dark green, local ones are light green).
Scaffolds manual
Clicking on this option opens the manual scaffold window.
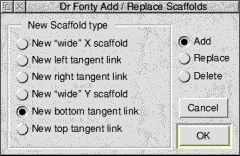
This allows you to add, replace or delete single scaffolds.
Adding a scaffold
To add a scaffold simply choose the type of scaffold you want to add, click on the "Add" button and then on the "OK" button.
Deleting a scaffold
To delete a scaffold select it in the outline window (it will turn red). Choose "Delete" and then click on "OK".
Replacing a scaffold
To replace a scaffold select it in the outline window (it will turn red). Now choose the type of scaffold you wish to replace it with, click on the "Replace" button and then click on the "OK" button.
Scaffolding a character
In order for scaffolding to work correctly it needs to be applied correctly. Simple rules can be applied to make it easier for beginners.
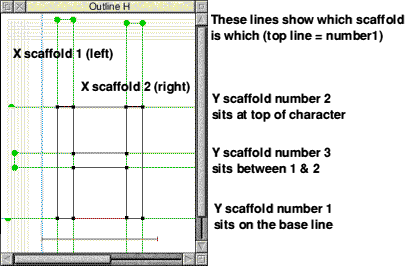
- Y scaffold 1 should be on the base line of the character.
- Y scaffold 2 should be at the top of the character.
- If more Y scaffolds are needed they sit between 1 and 2.
- X scaffold 1 should be on the left of the character.
- X scaffold 2 should be on the right of the character.
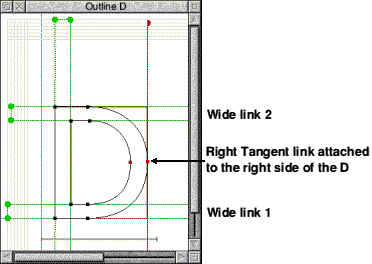
As you will have noticed there are different types of scaffold, Wide links and Tangent links. Wide links are used to scaffold rectangular sections of a character, for example the left stroke of the D below. They can also be used for sections of a letter with a constant width, for example the top and bottom of the D. Tangent links are designed to be used to prevent unsightly pips at the edges of curved shapes, for example the right side of the D. Tangents can be left, right, top or bottom. Dr Fonty will try to add tangent links in roughly the right place.
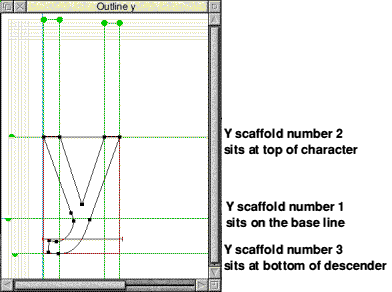
As you can see from the previous two examples applying simple scaffolds is quite easy. There are however a few cases when characters can be more awkward to scaffold. For example, characters such as g and y which have descenders. You may be tempted to place Y scaffold 1 at the bottom of the descender, this would be wrong as you can see from the example below. Y scaffold 1 is still on the base line, scaffold 2 at the top and scaffold 3 is now used to hint the descender.
Moving & attaching Scaffolds
When placing scaffolds in the correct place they will of course need to be moved. Tangent links can be moved by simply clicking SELECT on them to hilight them and then holding down SELECT and dragging.
Wide links have two handles, dragging the bottom or left handle will move the entire scaffold. Dragging the top or right handle will alter the width of the wide link (up to a maximum width of 253).
Attaching scaffolds
For scaffolds to work they need to be attached to the control points that make up the skeletons and outlines of the character. In the example on page 40 you can see the right hand tangent link selected (red) with the control points that are attached to it also shown red.
To attach a scaffold first you need to hilight it by clicking SELECT on its handle, then hold down CTRL and drag out a rectangle. Any control points enclosed by this rectangle will be attached to the selected scaffold.
Making global scaffolds
Scaffold trees have been discussed several times in this manual, but how are they made? Very simply one character is scaffolded, for example H. The scaffolds for this character are then copied onto another character, for example E. (This is done from the main character table by dragging H on top of E using ADJUST).
All of the scaffolds in H will then appear in E as global scaffolds. These can then be used to hint E, although some may need deleting and others replacing with local scaffolds.
The process then continues throughout the font, so the scaffolds from E could be used to hint F, for example.
Making a scaffold tree can be fraught with disaster as it can be very easy to accidentally break the tree by deleting the wrong scaffold. If you do wish to make a font with a scaffold tree then we suggest that you regularly check the integrity of the tree (Scaffolds.Check integrity) and then save the font as a backup if there are no errors. Should the tree get corrupted you can then re-load the last backup.
Zoom & Restore
This menu will simply zoom the current outline window up or down. This can also be achieved using the buttons on the toolbar to the left of the outline window. You can also restore the size of the window using the 1:1 option.
Keyboard shortcuts can also be used to zoom the window in or out (CTRL W will zoom in, CTRL Q will zoom out).
Restore
This option acts as a simple undo feature. Whenever an outline window gains input focus (its title bar goes yellow and the tool pane gets attached to its side) Dr Fonty will make a backup of the character. You can then edit the character (outlines, scaffolds, composites e.t.c.) in any way you like. If it all goes wrong simply click on "Restore" and after a prompt from Dr Fonty the character will be returned to the state it was in before you altered it.
Note the restore only works on the last character changed. For example, If you open the outline window for "H" and edit it then open another outline window and edit the character in that you will not be able to restore "H".
Dr Fonty's Preferences
Dr Fonty's preference window is opened by clicking on "Prefs.." from the icon bar menu.
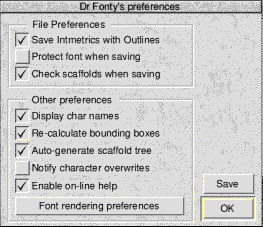
- "Save intmetrics with Outlines" will force Dr Fonty to save a new intmetrics file next to the fonts outlines file when you save it. If this button is off then no new intmetrics will be saved.
- "Protect font when saving" if this option is selected then any font that us saved is protected so that it cannot be loaded into FontED. Dr Fonty, or FontFiend can still load the font.
- "Check scaffolds when saving" if this option is on then Dr Fonty will check the fonts scaffolds for errors automatically before saving the font. This is the same as using the "Scaffolds.Repair tree" option from the main menu.
- "Display char names" if this option is on then small green ASCII characters will be shown on the thumbnails in the main table.
- "Re-calculate bounding boxes" with this option on Dr Fonty will automatically re-calculate bounding boxes as you work on a font. This button should be left on.
- "Enable on-line help" with this button turned on Dr Fonty will display on-line help messages in the help line above the main character table.
- "Font rendering preferences", clicking on this button will open the font rendering preferences window, described below
You can save your new preferences to disk so that they will become the new default by clicking on the "SAVE" button.
These new preferences can be set as temporary by clicking on the "OK" button.
Font rendering preferences
This window controls how Dr Fonty renders the outlines of characters in the outline character windows.
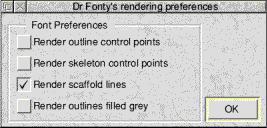
- "Render outline control points" this will force Dr Fonty to render all the bezier curve control points in a characters outlines.
- "Render skeleton control points" this will force Dr Fonty to render all the bezier curve control points in a characters skeletons.
- "Render scaffold lines" with this option selected all of a character scaffolds will be displayed in the characters outline window.
- "Render outlines filled grey" with this option selected outlines will be filled grey instead of being unfilled.
Tutorial - Making fonts
Dr Fonty can be used to make fonts from scratch quite quickly (although not as quickly as FontFiend). Making a font from scratch can be split up into the following activities:
- Draw the shapes of the letters (outlines in Draw).
- Import these into Dr Fonty.
- Give the characters widths (including space!).
- Optional - Scaffold the characters
- Optional - Add kerning.
- Save the finished font to disk.
In the examples directory is a directory called "BuildFont". This contains a font and a drawfile. The drawfile contains objects that can be used to make a font.
As you can see some letters have already been made and these can be saved out from Draw as selections and dropped onto the correct slot in Dr Fonty's main character table.
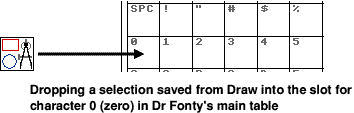
Once you have imported a drawfile it will appear on the main character table.
If the imported character is in the wrong place then it can be easily moved. For example if you import a character "y" you may find that it is sitting too high up. If this is the case then simply double click on the character in the main table. Its outline window will then open. Click in the outline window to give it input focus (title bar turns yellow) and use the CURSOR keys with SHIFT and CTRL to move the character to the correct place.
Adding widths
When you import drawfiles they will have no widths. The easiest way to set the widths is to use the "Widths. Set to BBox" option from Dr Fonty's main menu. Use a value of around 50 to start with. This will add a width to all the characters in the font with outlines. The SPACE character must be done by hand using the "Width" option from the Outline window menu for SPACE. The width should be the same as that for I (upper case i) usually this is around 300.
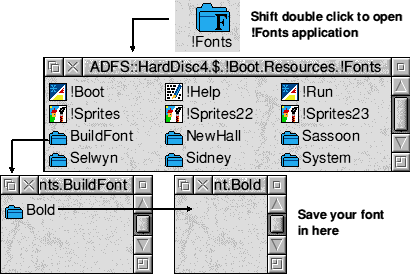
Having produced a font with outlines and widths you may well decide to save it and use it. Before saving the font you will need to give it a name in the writable icon at the top of Dr Fonty's main window.
The example above shows the name "Buildfont.Bold". before saving the font you will need to make a directory inside a !Fonts application for the font to live. The directory structure you make must EXACTLY match the font name. You can now save your font.
Ole Editing with Draw
The best way to edit the outlines (and the only way to edit skeletons) in a character is to OLE the character to Draw. This is done by clicking ADJUST in the outline window for the character you want to edit. A Draw window will then open containing the outlines and skeletons.
You can now use any of Draws normal editing tools to alter the outlines and skeletons. To return the edited character to Dr Fonty simply click on "Save" from Draws main menu
Font Problem solving
This section will cover some font related problems.
- "Font cache full" errors
This font has one or more faulty bounding boxes. Make sure that the Re-calculate bounding boxes option is on in the Dr Fonty preferences window. Now load the font then save it out again. This will repair any faulty bounding boxes. - The font is fine on screen but doesn't print correctly
The normal reason for this is use of a Computer Concepts Laser Direct or Turbodriver printer driver. Both of these printer drivers have problems rendering many fonts correctly. Turn the halftone text option in the Laser Direct/TurboDriver Halftone options window off. The only draw back with this is that all text will then be printed black, regardless of its actual colour on screen. This is not a fault with Dr Fonty. All professional font suppliers in the Acorn market have encountered this problem. - "Cyclic scaffold tree" and "Invalid linear link"
The font in question has a badly corrupted scaffold tree. What you need to do is load the font into Dr Fonty and then delete all scaffolds. When you save the font back out from Dr Fonty the scaffolds will be removed but FontED will then be able to load the font without errors. You may also decide to re-scaffold the font in Dr Fonty before saving it back out. Also using the Scaffolds.Repair Tree option may well recover the font and most of the hinting. - When I use the font some characters get filled in
The font has been saved with the wrong winding rule. Load the font into Dr Fonty and then go to the Misc.Font option in the main menu. Alter the status of the Non zero winding rule button. Now save the font back out again. This will usually fix the problem. - I have made a font using Dr Fonty, can I distribute it?
Yes, Dr Fonty is a commercial font editor. The program itself is copyright, however any font you make yourself from scratch using the package belongs to you. - I have made a PostScript font, what do I do with it?
The usual reason for producing PostScript fonts is to supply them to a bureaux along with a print job so that it can be output on an imagesetter.
Swapping kerning
It is often very useful to take the kerning from one font and then apply it to another. In order to do this you need to do the following:
- Load the font with kerning into Dr Fonty.
- Save the kerning from this font to disk.
- Load the font that does not have any kerning.
- Drag the kernfile you saved earlier into Dr Fonty.
If you do not have any fonts with suitable kerning then you could start with one of the kerning files in Dr Fonty's examples directory.
Base 0 fonts
The Acorn font manager supports a font type known as Base 0. These fonts can easily be identified because they have a 0 at the end of their file name.
Base 0 fonts contain more than the normal 256 characters. Dr Fonty can load these fonts and convert them to Latin 1.
The original idea behind Base 0 was that the font manager would be able to select the correct encoding file for the given territory and then display any Base 0 font with the correct character set. However for some reason although this feature is built into Risc OS it doesn't actually work correctly.
When you load a Base 0 font Dr Fonty will first confirm that you want to convert the font to latin 1. If you want to work with other encodings then it may be worth looking at our other font editor FontFiend.
Some Base 0 fonts, such as Homerton, contain a complex scaffold tree Dr Fonty will convert as much of this scaffold tree as possible. Occasionally some letters that form part of the tree will not appear in the Latin 1 encoding. This may result in the odd letter that has a couple of scaffolds missing. 99% of Base0 fonts will convert with all scaffolds.
Making composite accents
In the examples directory next to Dr Fonty are two accents files. These can be used to load accents into a font. Note that these files only contain accents, not accented characters.
If you want to add all the missing accented characters to a font then you can drag one of these files into the Dr Fonty main table. This will ensure that the font you are making has all the correct accented letters.
You can then make all the accented letters using composites of the real letter and the accent. For example to produce Agrave (�) you need to drag character A on the main character table (using SHIFT & ADJUST) to the slot where Agrave is on the main table (2 columns in, 4 rows up from the bottom). This will insert A into Agrave as a composite. Repeat this process for grave (one character before lower case a).
Double clicking on Agrave on the main table will open the outlines for this character. You can now adjust the position of the composites (using the blue handles) until they are correct (Also open the Composites.List window).
Loading very complex fonts
When loading very complex fonts Dr Fonty may report that some characters are corrupted, or that there is not enough memory to load them.
You can increase the free memory available to Dr Fonty by dragging the size of the "Next" slot in the task manager up to 6400K.
Then quit and re-load Dr Fonty. Now reload your font and it should load intact without any error messages.
RISCWorld